2016年2月28日 星期日
No divider in List view
<ListView
android:id="@+id/detail_widget_list2"
android:divider="@null"
android:dividerHeight="0dp"
android:layout_width="match_parent"
android:layout_height="match_parent" />
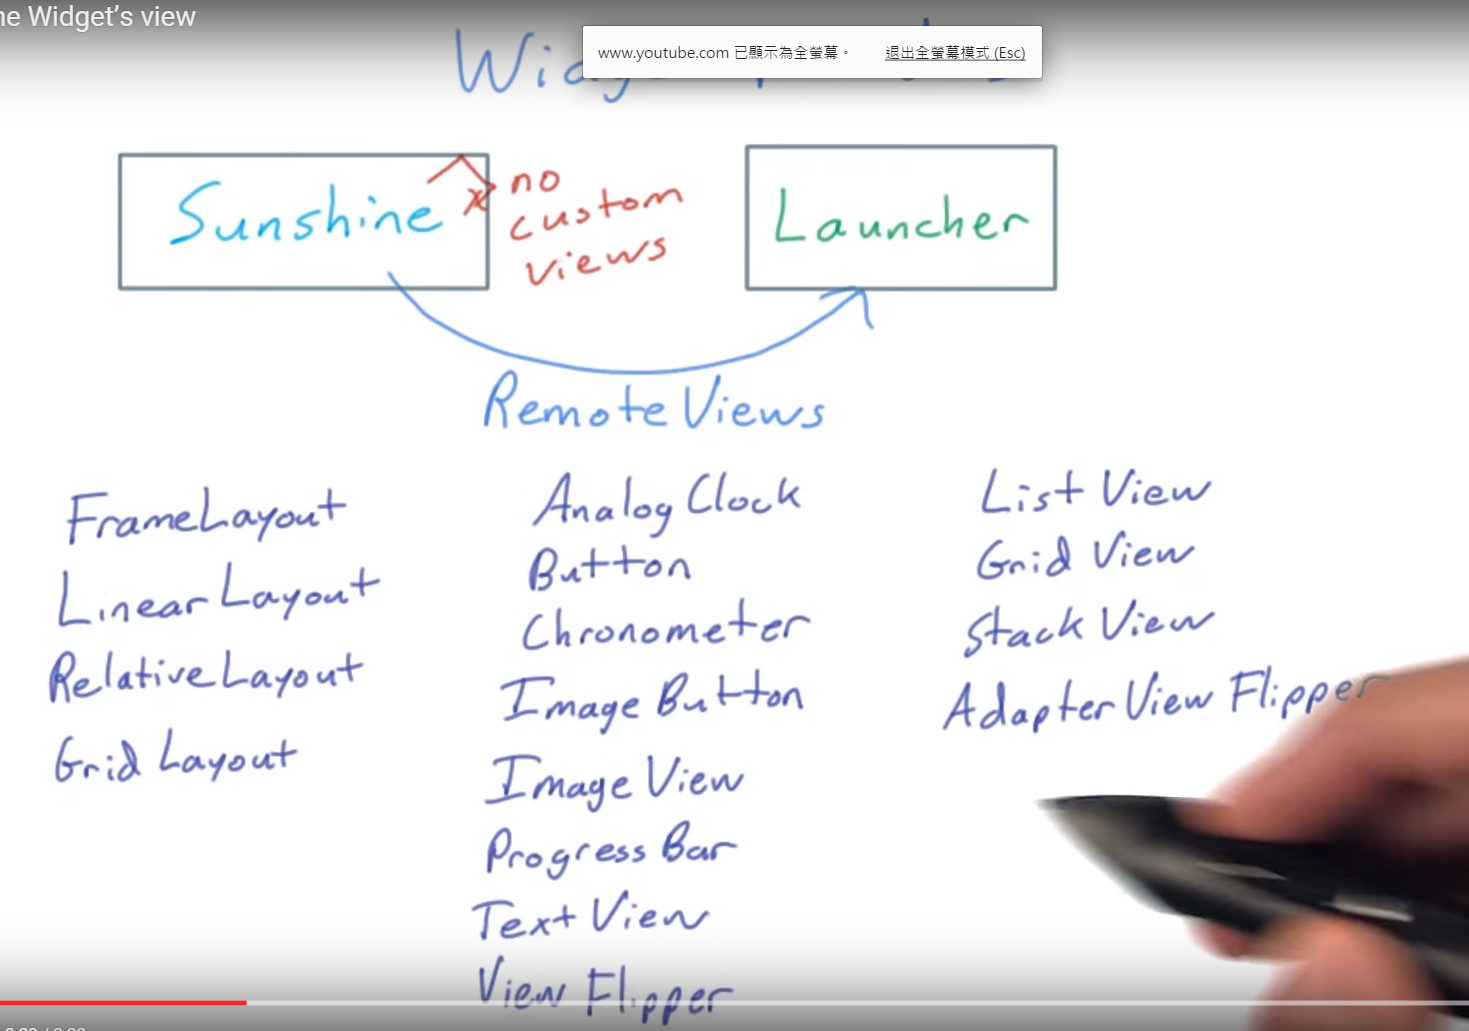
Create a Widget for a app
Create a Widget for a app
a Widget depend on a application
it make by two part:
appwidgetprovider and appwidgetprovider xml

appwidgetprovider xml:
describe your widget attribute:size,can reszie?,preview image
appwidgetprovider :

hold all the logic for create the widget view
fill the view with correct data
set the click listener

we can have not only one widget instance

image that,sunschine can have many widget,that support different location
now,start to code
the widget we can think that it is a remote view of the app,it put on the launcger.
In the remote view,it only can content the view original in the android,can not have custom view
if need to click
in manifest xml
now ,we want to create a widget with static data
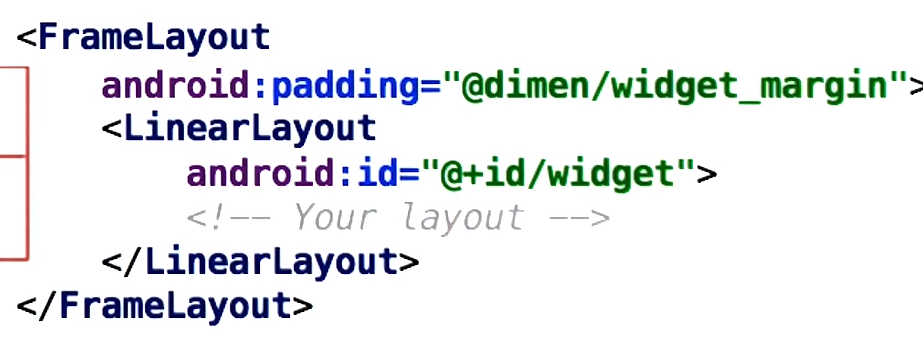
1.Layout
important***In the remote view,it only can content the view original in the android,can not have custom view
we crate a layout call widget_today_small
there is a problem,it is because
<4.0the mergian need to make by urself
>=4.0,auto have
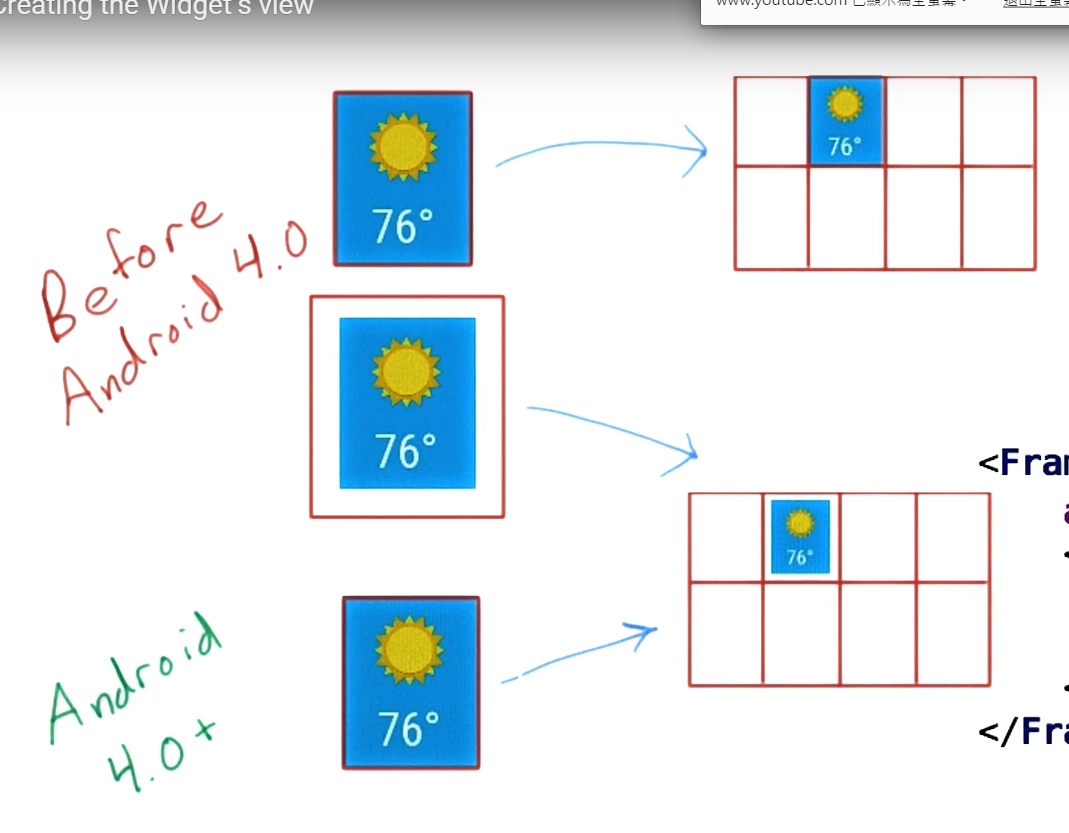
how to make the widget show the same in different system?
we know that the auto margin is 8dp
so we can add widget_margin in dimens.xml:,if>=v14 widget_margin =0
if <v-14,widget_margin =8dp
like this
res/values/dimens.xml:
<dimen name="widget_margin">8dp</dimen>
res/values-v14/dimens.xml:
<dimen name="widget_margin">0dp</dimen>
1.now we can make the layout:
<?xml version="1.0" encoding="utf-8"?>
<FrameLayout xmlns:android="http://schemas.android.com/apk/res/android"
android:layout_width="match_parent"
android:layout_height="match_parent"
android:padding="@dimen/widget_margin">
<LinearLayout
android:id="@+id/widget"
android:layout_width="match_parent"
android:layout_height="match_parent"
android:background="@color/primary"
android:orientation="vertical">
<ImageView
android:id="@+id/widget_icon"
android:layout_width="wrap_content"
android:layout_height="0dp"
android:layout_gravity="center_horizontal"
android:layout_weight="1"
android:src="@drawable/art_clear" />
<TextView
android:id="@+id/widget_high_temperature"
android:layout_width="wrap_content"
android:layout_height="wrap_content"
android:layout_gravity="center_horizontal"
android:text="25"
android:textAppearance="?android:textAppearanceLarge"
android:textColor="@color/primary_text" />
</LinearLayout>
</FrameLayout>
2.AppwidgetProvider info

n is the number of the box
set the preview image :
android:previewImage="@drawable/preview"
we create widget_info_today.xml in rex/xml
<appwidget-provider xmlns:android="http://schemas.android.com/apk/res/android"
android:initialLayout="@layout/widget_today_small"
android:minHeight="@dimen/widget_today_default_height"
android:minWidth="@dimen/widget_today_default_width"
android:updatePeriodMillis="0" />
How often, in milliseconds, that this AppWidget wants to be updated. will call onUpdate,
it is because now the widget is static 0,or the app will updateit,show is 0.
<dimen name="widget_today_default_width">40dp</dimen>
<dimen name="widget_today_default_height">40dp</dimen>
it is because n=1,so 40dp
3.Appwidget provioder
step1,create a class call TodayWidgetProvider extends AppWidgetProvider
step 2 override onUpdate(Context context, AppWidgetManager appWidgetManager, int[] appWidgetIds)
Called in response to the {@link AppWidgetManager#ACTION_APPWIDGET_UPDATE} and
* {@link AppWidgetManager#ACTION_APPWIDGET_RESTORED} broadcasts
it is because a widget may have different instance,each instance have a id,so the int[] appWidgetIds hold all the id

4.for all the weidget,give a view to them, and add onClick to them
this is the code example:
public void onUpdate(Context context, AppWidgetManager appWidgetManager, int[] appWidgetIds) {
super.onUpdate(context, appWidgetManager, appWidgetIds);
for (int appWidgetId : appWidgetIds) {
RemoteViews remoteV = new RemoteViews(context.getPackageName(), R.layout.widget_today_small);
Intent intent = new Intent(context, MainActivity.class);
PendingIntent pendintent = PendingIntent.getActivity(context, 0, intent, 0);
remoteV.setOnClickPendingIntent(R.id.widget, pendintent);
appWidgetManager.updateAppWidget(appWidgetId, remoteV);
}
}
how to set the text and img src?
need to use the remote view specical method:
// set the text
remoteV.setTextViewText(R.id.widget_high_temperature, Utility.formatTemperature(context,10));
// set the image
remoteV.setImageViewResource(R.id.widget_icon,R.drawable.art_clear);
5.change the Manifest file

<receiver
android:name="TodayWidgetProvider"
android:label="@string/title_widget_today">
<intent-filter>
<action android:name="android.appwidget.action.APPWIDGET_UPDATE" />
</intent-filter>
<meta-data
android:name="android.appwidget.provider"
android:resource="@xml/widget_info_today" />
</receiver>
TodayWidgetProvider is a Brodcast receiver, when it receive a brodcast have action(android.appwidget.action.APPWIDGET_UPDATE),
The AppWidgetManager automatically sends all other App Widget broadcasts to the AppWidgetProvider as necessary.
the OnUpdat will run,so we need to declare these.
the project code:
but,now,it can only show the static data,How can it show the update data form the content provider?Next we will talk.
google API and location picker
Using the google API
the access of the google API;
before using ,we need to enable the place API in the google console,and get the key
here is the step:
Setting up your project to use the Places API
To set your project up to use the places API, you'll need to follow 4 steps.
- Find your app's certificate information
- Enable the Places API in the Developer Console
- Get an Android API key
- Add the API key to your Android manifest file.
Finding your app's certificate information
For this tutorial, we'll be using a debug certificate. For information on release certificates, look here.
First, you'll need to find your debug keystore file. This is a file located in your .android/ directory, along with your AVD files.
Once there, you'll need to open a terminal window and enter one of the following commands:
(Mac and Linux)keytool -list -v -keystore ~/.android/debug.keystore -alias androiddebugkey -storepass android -keypass android
(Windows)keytool -list -v -keystore "%USERPROFILE%\.android\debug.keystore" -alias androiddebugkey -storepass android -keypass android
You should get an output with a number of lines. What we need to get is the line starting with "SHA1", which should be 20 pairs of hexadecimal numbers separated by colons. Copy this key.
Enabling the Places API in the Developer Console.
Since we've already created a project in the Developer console, we will need only to enable the Places API. To do so, follow this link and follow the directions. You'll want to select the project you used for the GCM lesson, then enable the Places API.
Get an API key
Once you've enabled the Places API, you should receive a message asking you to add credentials. Click on that drop-down menu and choose 'API key'. This will bring up a pop-up menu, and you will press the 'Android key' button. Choose a name for your key, and then enter your app's package name and SHA1 fingerprint. The fingerprint is the set of 20 pairs of hexadecimal numbers you got from the terminal earlier.
Click 'Create' and you should receive an API key, which should be a string of characters, like this:
AIzaSyBdVl-cTICSwYKrZ95SuvNw7dbMuDt1KG0
Add the API key to your Android manifest file
Within your android manifest file, add a <meta-data> tag like the following, with your API key in place of YOUR_API_KEY:
<application>
...
<meta-data
android:name="com.google.android.geo.API_KEY"
android:value="YOUR_API_KEY"/>
</application>
...
<meta-data
android:name="com.google.android.geo.API_KEY"
android:value="YOUR_API_KEY"/>
</application>
And now you should be completely ready to move on to the next video. Well done!
in the program,before we use the google service,we need to check the google service appear in the app,the checking way can see the before article.
the timw to check:
in the sunshine app,we already check the google play service available at the onCreated in Main Activity,because we want to register the GCM.
however,we will go to the seting activity at the Active,we can’t not assume that the google play service still ok after many stste.
So,we need to check again when showing the location preference

here is the code that use to check
when the google play service available,we go to add the widget to the location.
we want to add a icon ,to let the people…...
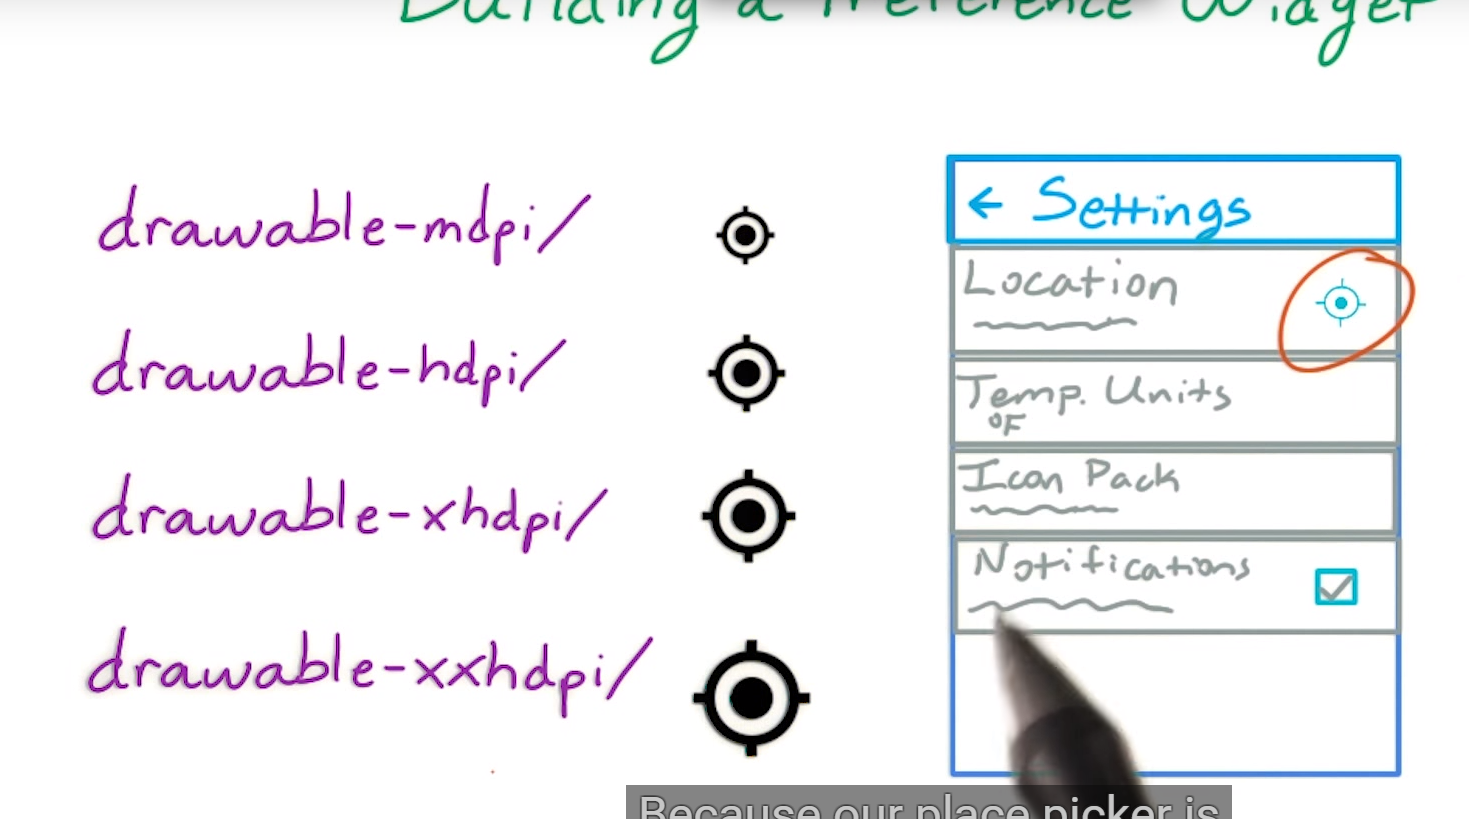
in the location preference view:
add this code
get the loaction button we create,than ads a onclick listerner
now we start to code:
1
we download theicon first
2.add the icon to the folder
3.
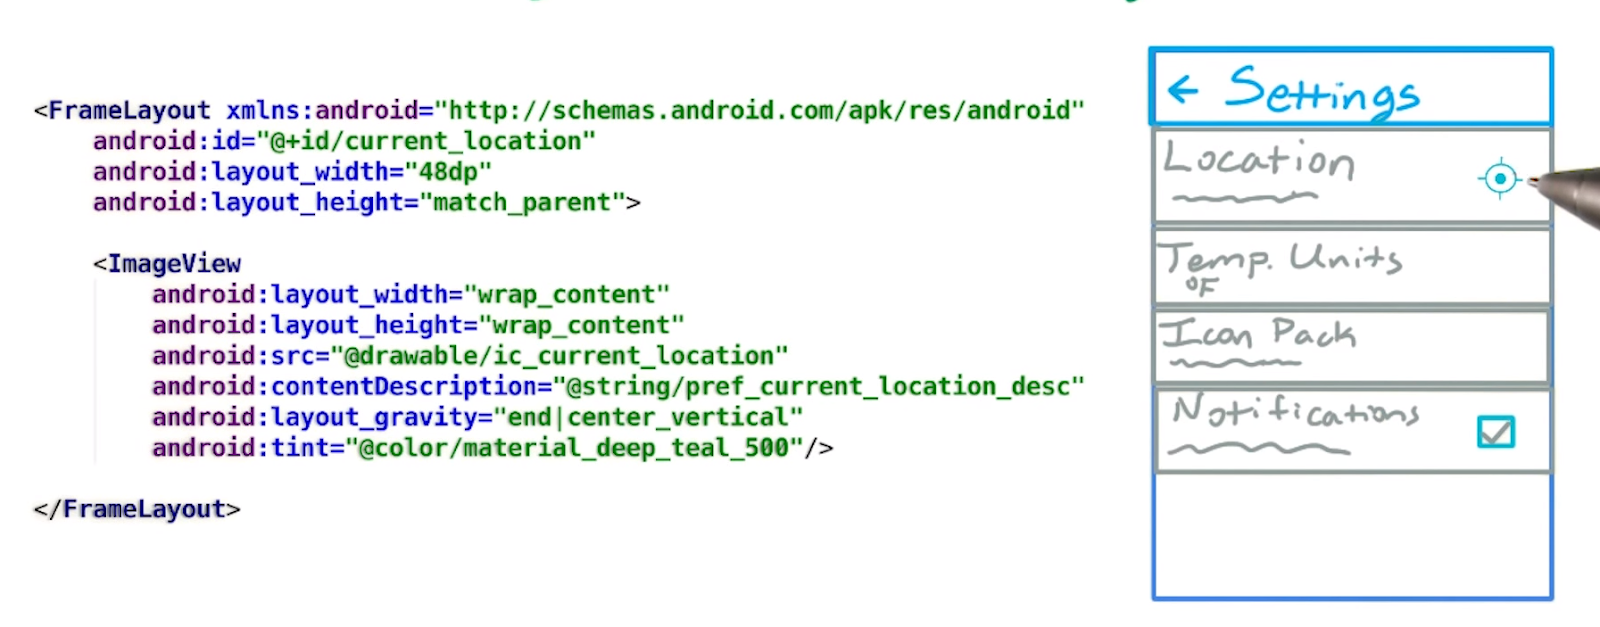
in order to add the icon to the location preference,create a layout-pref_current_location.
Becuase we just put a inageview,so use frame layout is ok.and
here is the code
<?xml version="1.0" encoding="utf-8"?>
<FrameLayout xmlns:android="http://schemas.android.com/apk/res/android"
android:id="@+id/current_location"
android:layout_width="48dp"
android:layout_height="match_parent">
<ImageView
android:layout_width="wrap_content"
android:layout_height="wrap_content"
android:layout_gravity="end|center_vertical"
android:src="@drawable/ic_gps_fixed_black_36dp"
android:tint="@color/material_deep_teal_500" />
</FrameLayout>
end mean:
Push object to the end of its container, not changing its size.
tint:
您可使用 setTint() 方法對 BitmapDrawable 或 NinePatchDrawable 物件套用著色。您也可以使用 android:tint 和 android:tintMode 屬性,設定版面配置中的著色顏色和模式。
android:layout_gravity="end|center_vertical":because we want the imageview align to the below box
about the size of the image view,
if we set the ImageView is wrap content,and the image is 36dporginally,when we set the width and height to the FrameLayout,the it only can make the ImageView smaller,can’t make it bigger,that mean the maxium size is =36dp,altoough we set 48dp,it is becasue we set wrap_content foe the image view .the maxium size is control bu the imageview.
for the framelayout,if we set different dp in the layout_width and layout_height,like
android:layout_width="48dp"
android:layout_height="7dp">
the icon ration will keep,and the size will follow the smaller one,that mean 7dp.if
<FrameLayout xmlns:android="http://schemas.android.com/apk/res/android"
android:id="@+id/current_location"
android:layout_width="48dp"
android:layout_height="match_parent">
will follow the layout_width
however,if we set the match_parent to the image view,the image view will become as big as it can,and limited by the framelayout, that mean frame layout can bake the image view bigger than 36dp(icon orginal size).
conclusion:
if the parent width and height is a number one of than,tha bigger size for the imageview will be limited,the ration keep
the parent width and height is match_parent for both ,no limited to the bigger size,the size is control by the imageview.
the parent width and height is wrap content for both ,no limited to the bigger size,the size is control by the imageview.
if the imageview width and height is match_parent for both,the image view want it size is the original size,but limited by the parent
if the imageview width and height is wrapcontent for both,the image view want it size is the original size,but limited by the parent
if the imageview width and height is match_parent and other is a number ,the smaller number will control the size,the ration keep
if the imageview width and height is match_parent for both,the image view want it size is the original size,but limited by the parent??????
but how we load this layou?we we load it after check the google service
4.
we need to check the google service at the Locationpreference mkae by ourself,we will check the service when the system create the Locationpreference object ,so we check in the constructer.
How to check?
GoogleApiAvailability apiAvailability = GoogleApiAvailability.getInstance();
int resultCode = apiAvailability.isGooglePlayServicesAvailable(getContext());
if (resultCode == ConnectionResult.SUCCESS) {
// Add the get current location widget to our location preference
setWidgetLayoutResource(R.layout.pref_current_location);
}
first get the GoogleApiAvailability object,use the object to check the GoogleApiAvailability stste,if the stse is ok,load the pref_current_location(the image we created before),and set it as the WidgetLayoutResource,than it will show.
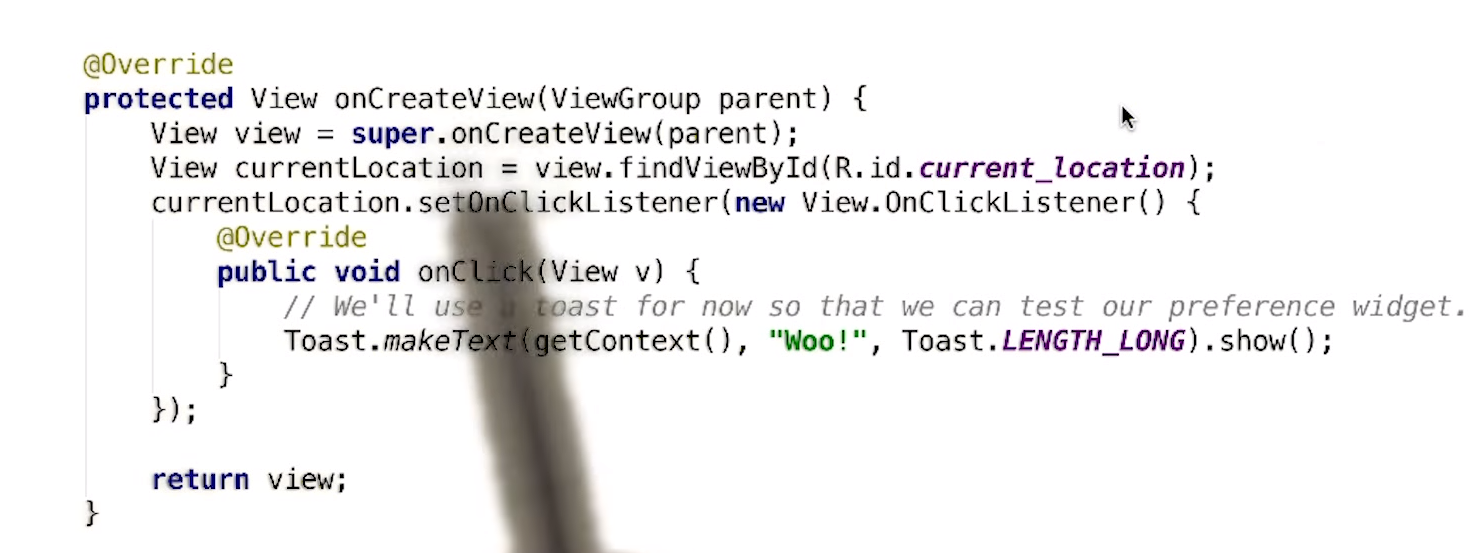
5.but we want ot the image view can click,where can we add the onClicklisterner?
at the onCraeate view
@Override
protected View onCreateView(ViewGroup parent) {
View view = super.onCreateView(parent);
View current_location = view.findViewById(R.id.current_location);
current_location.setOnClickListener(new View.OnClickListener() {
@Override
public void onClick(View v) {
Toast.makeText(getContext(), "Woo", Toast.LENGTH_SHORT).show();
}
});
return view;
}
now when we cliack the image view it will show the toast
Add the place picker

the concept is click the image view,it start the Place picker,choose the place,than it return a address
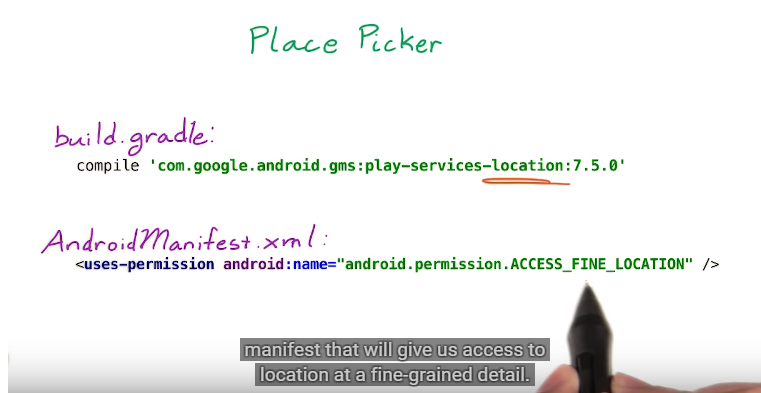
1.compile "com.google.android.gms:play-services-location:8.3.0"
2.add the npermission
<uses-permission android:name="android.permission.ACCESS_FINE_LOCATION" />
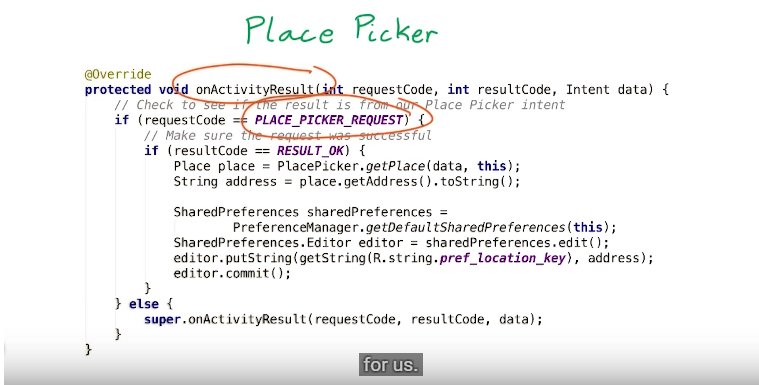
3.it is because the Setting activity will receive the result give by the place oicker,so need to override the onActivityResult in the SettingActivity,the place picker will give bac kthe intent:
how can we get the data?first we need to check is it the place picker return?if yes,than check is it the result ok?
here is the code:
@Override
protected void onActivityResult(int requestCode, int resultCode, Intent data) {
if (requestCode == PLACE_PICKER_REQUEST) {
// Make sure the request was successful
if (resultCode == RESULT_OK) {
Place place = PlacePicker.getPlace(data, this);
String address = place.getAddress().toString();
SharedPreferences sharedPreferences =
PreferenceManager.getDefaultSharedPreferences(this);
SharedPreferences.Editor editor = sharedPreferences.edit();
editor.putString(getString(R.string.pref_location_key), address);
editor.commit();
}
} else {
super.onActivityResult(requestCode, resultCode, data);
}
}

how to create a plca picker?
4.call the place picker in the onClick inLoactionPreference
when we call the plac picker,we need a intent,show we use a PlacePicker.IntentBuilder to crate the intent.
than use the startActivityForResult and intent to start a place picker.
the code is:
PlacePicker.IntentBuilder builder = new PlacePicker.IntentBuilder();
Intent intenppt = builder.build(settingsActivity);
settingsActivity.startActivityForResult(intenppt,SettingsActivity.PLACE_PICKER_REQUEST);
now the place picker is ready to use
however,the app have error now!!!!!!
why?
Becuase at the orginal ,our app is use the loaction ID to query,however, the place picker return the name.
we nee t ochange the place picker return the latitude and logtitude,
here is the code to cahnge:
訂閱:
意見 (Atom)