ref:
https://github.com/GoogleCloudPlatform/gradle-appengine-templates/tree/master/HelloEndpoints
see the above link,you can learn how to create a api on google cloud,and use in android.
below example show how to add you self method.
public class MyEndpoint {
private static int jokeAcount = 0;
final String[] jokeArray = {"joke1", "joke2", "joke3", "joke4", "joke5"};
/**
* A simple endpoint method that takes a name and says Hi back
*/
@ApiMethod(name = "sayHi2")
public MyBean sayHi2(@Named("name") String name) {
MyBean response = new MyBean();
response.setData("Hi, " + name);
return response;
}
@ApiMethod(name = "getJoke")
public JokeObject getJoke() {
JokeObject jokeObject = new JokeObject(jokeArray[jokeAcount]);
jokeAcount++;
if (jokeAcount >= jokeArray.length) jokeAcount = 0;
return jokeObject;
}
}
2016年3月22日 星期二
2016年3月9日 星期三
How to partially update the widget
ref:http://stackoverflow.com/questions/11808331/how-to-partially-update-views-in-an-app-widget-without-rebuilding-all-the-remote
can use in onReceive.
can use in onReceive.
PendingIntent.getBroadcast request code,problem
PendingIntent leftpendingIntent = PendingIntent.getBroadcast(context, request code, leftintent, 0);
if for the intent,has the same action,and same request code,android system may thaink that the Broadcast is the same and send the old Brodcast,although the putExtra method,put other thing.
if for the intent,has the same action,and same request code,android system may thaink that the Broadcast is the same and send the old Brodcast,although the putExtra method,put other thing.
List view in Widget:when data changed,show the update data in list view
use : https://github.com/roy989898/Advanced_Android_Development/tree/7.04_Integrating_the_Detail_Widget
be a example
<receiver
android:name=".widget.DetailWidgetProvider"
android:label="@string/title_widget_detail"
android:enabled="@bool/widget_detail_enabled" >
<intent-filter>
<action android:name="android.appwidget.action.APPWIDGET_UPDATE" />
<action android:name="com.example.android.sunshine.app.ACTION_DATA_UPDATED" />
</intent-filter>
<meta-data android:name="android.appwidget.provider"
android:resource="@xml/widget_info_detail" />
</receiver>
data = getContentResolver().query(weatherForLocationUri,
FORECAST_COLUMNS,
null,
null,
WeatherContract.WeatherEntry.COLUMN_DATE + " ASC");
use to get the data again.
be a example
step 1: register the provide with one more action
<receiver
android:name=".widget.DetailWidgetProvider"
android:label="@string/title_widget_detail"
android:enabled="@bool/widget_detail_enabled" >
<intent-filter>
<action android:name="android.appwidget.action.APPWIDGET_UPDATE" />
<action android:name="com.example.android.sunshine.app.ACTION_DATA_UPDATED" />
</intent-filter>
<meta-data android:name="android.appwidget.provider"
android:resource="@xml/widget_info_detail" />
</receiver>
step2 in DetailWidgetProvider overview onReceive
@Override
public void onReceive(@NonNull Context context, @NonNull Intent intent) {
super.onReceive(context, intent);
if (SunshineSyncAdapter.ACTION_DATA_UPDATED.equals(intent.getAction())) {
AppWidgetManager appWidgetManager = AppWidgetManager.getInstance(context);
int[] appWidgetIds = appWidgetManager.getAppWidgetIds(
new ComponentName(context, getClass()));
appWidgetManager.notifyAppWidgetViewDataChanged(appWidgetIds, R.id.widget_list);
}
}
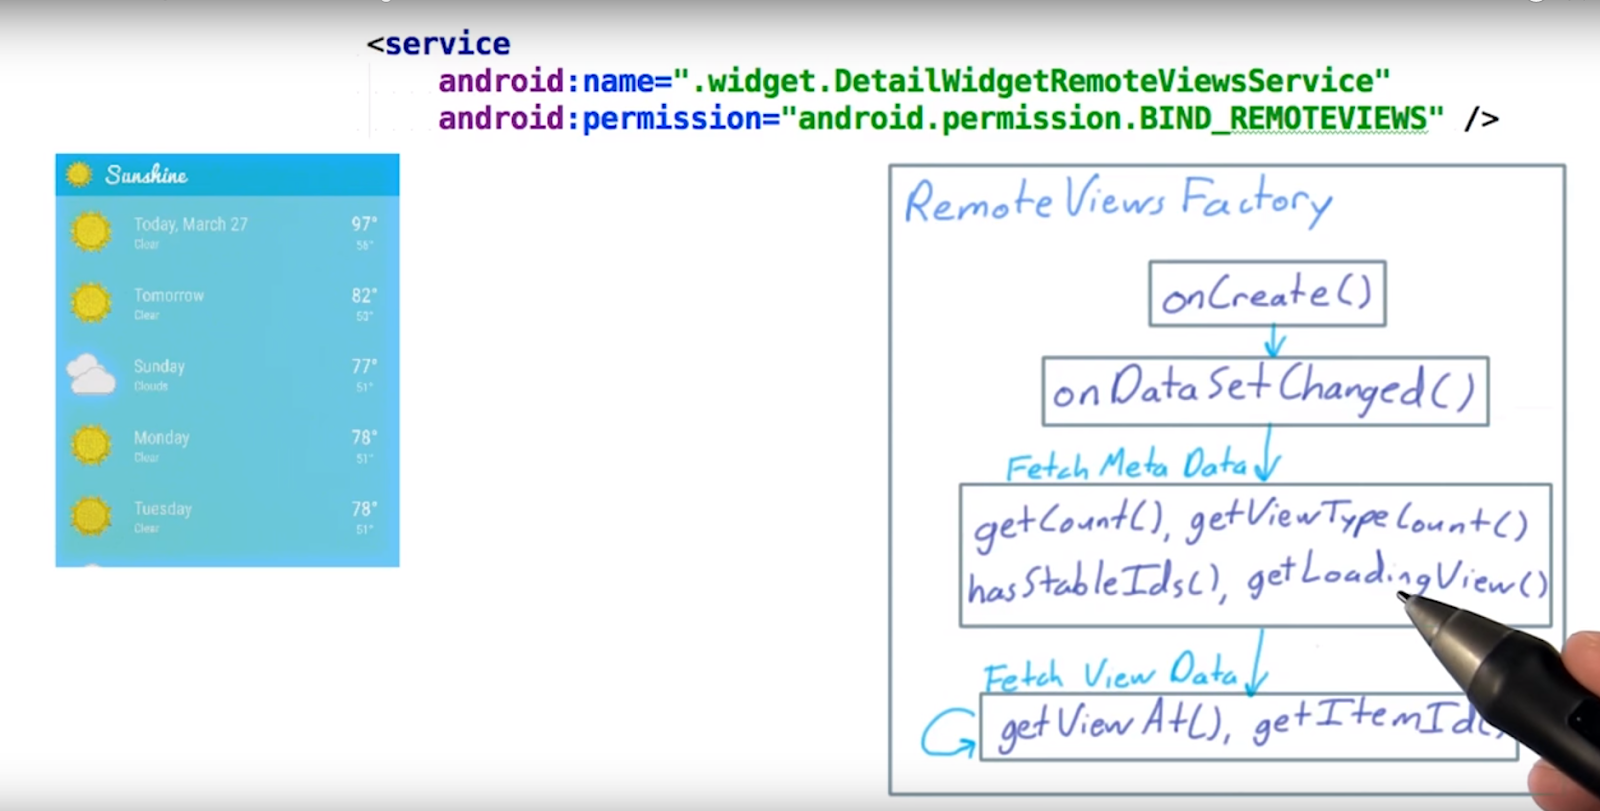
the above code will call the RemoteViewsFactory 's onDataSetChanged method.
step 3 override the onDataSetChanged in RemoteViewsFactory class
if (data != null) {
data.close();
}
// This method is called by the app hosting the widget (e.g., the launcher)
// However, our ContentProvider is not exported so it doesn't have access to the
// data. Therefore we need to clear (and finally restore) the calling identity so
// that calls use our process and permission
final long identityToken = Binder.clearCallingIdentity();
String location = Utility.getPreferredLocation(DetailWidgetRemoteViewsService.this);
Uri weatherForLocationUri = WeatherContract.WeatherEntry
.buildWeatherLocationWithStartDate(location, System.currentTimeMillis());
data = getContentResolver().query(weatherForLocationUri,
FORECAST_COLUMNS,
null,
null,
WeatherContract.WeatherEntry.COLUMN_DATE + " ASC");
Binder.restoreCallingIdentity(identityToken);
explain
data = getContentResolver().query(weatherForLocationUri,
FORECAST_COLUMNS,
null,
null,
WeatherContract.WeatherEntry.COLUMN_DATE + " ASC");
use to get the data again.
step 4 send the broadcast with action define in step 1 to update
2016年3月2日 星期三
send Broadcast and Broadcast Receiver
Broadcast Receiver
1.create a class extends Brodcast Receiver
2. override onReceive
this method will run after the Receiver receive the brodcast
private class MyBrodcastReceiver extends BroadcastReceiver{
@Override
public void onReceive(Context context, Intent intent) {
//do something
}
}
3 register the Broadcast Receiver
only registered Broadcast Receiver can receiver brodcast,what message ,depend on the intern filter
M1.register in the program
//register the brodcast receiver
MyBrodcastReceiver mybrodcastReceiver=new MyBrodcastReceiver();
IntentFilter intentFilter=new IntentFilter(BRODCAST_ACTION);
getActivity().registerReceiver(mybrodcastReceiver,intentFilter);
M2.register in XML
<receiver android:name=".AddBook$MyBrodcastReceiver">
<intent-filter>
<action android:name="it.jaschke.alexandria.brodcastmessage"/>
</intent-filter>
</receiver>
4.send Brodcast
Intent brodcastIntent=new Intent();
brodcastIntent.setAction(AddBook.BRODCAST_ACTION);
sendBroadcast(brodcastIntent);
the action should be match to the InterFilter.
How to check the connection state:
How to check the connection state:
1.get the permission:
<!--Permission to check the connection state-->
<uses-permission android:name="android.permission.ACCESS_NETWORK_STATE"/>
2.get the ConnectivityManager
Context.getSystemService(Context.CONNECTIVITY_SERVICE).
3.check
ConnectivityManager cm =
(ConnectivityManager)context.getSystemService(Context.CONNECTIVITY_SERVICE);
NetworkInfo activeNetwork = cm.getActiveNetworkInfo();
boolean isConnected = activeNetwork != null &&
activeNetwork.isConnectedOrConnecting();
2016年3月1日 星期二
Create widget(With list view) with remote view service and remote view Factory
Create widget with remote view service and remote view Factory
the remote View factor is a cursor adapter for remote view

create the click
now start
step1 create a Detail widget Layout
detail_widget.xml
example code:
<FrameLayout xmlns:android="http://schemas.android.com/apk/res/android"
android:layout_width="match_parent"
android:layout_height="match_parent"
android:padding="@dimen/widget_margin">
<LinearLayout
android:orientation="vertical"
android:layout_width="match_parent"
android:layout_height="match_parent">
<LinearLayout
android:layout_width="match_parent"
android:id="@+id/detail_widget_bar"
android:layout_height="@dimen/detail_widget_bar_height"
android:background="@color/primary_light"
android:orientation="horizontal">
<ImageView
android:layout_width="wrap_content"
android:layout_height="wrap_content"
android:src="@drawable/ic_clear"/>
<ImageView
android:layout_width="wrap_content"
android:layout_height="wrap_content"
android:src="@drawable/ic_logo"/>
</LinearLayout>
<ListView
android:layout_width="wrap_content"
android:layout_height="wrap_content"
android:id="@+id/detail_widget_list" />
</LinearLayout>
</FrameLayout>
detail_widget_list_iteam.xml
example code:
<FrameLayout xmlns:android="http://schemas.android.com/apk/res/android"
android:layout_width="match_parent"
android:layout_height="match_parent"
android:padding="@dimen/widget_margin">
<LinearLayout
android:orientation="vertical"
android:layout_width="match_parent"
android:layout_height="match_parent">
<LinearLayout
android:layout_width="match_parent"
android:id="@+id/detail_widget_bar"
android:layout_height="@dimen/detail_widget_bar_height"
android:background="@color/primary_light"
android:orientation="horizontal">
<ImageView
android:layout_width="wrap_content"
android:layout_height="wrap_content"
android:src="@drawable/ic_clear"/>
<ImageView
android:layout_width="wrap_content"
android:layout_height="wrap_content"
android:src="@drawable/ic_logo"/>
</LinearLayout>
<ListView
android:layout_width="wrap_content"
android:layout_height="wrap_content"
android:id="@+id/detail_widget_list" />
</LinearLayout>
</FrameLayout>
step2 AppwidgetProvider info
example code:
<?xml version="1.0" encoding="utf-8"?>
<appwidget-provider xmlns:android="http://schemas.android.com/apk/res/android"
android:initialKeyguardLayout="@layout/detail_widget"
android:initialLayout="@layout/detail_widget"
android:minHeight="250dp"
android:minWidth="180dp"
android:resizeMode="vertical"
android:updatePeriodMillis="0"
android:widgetCategory="home_screen"/>
step3 Appwidget provioder
public class DetailWidget extends AppWidgetProvider {
@Override
public void onReceive(Context context, Intent intent) {
super.onReceive(context, intent);
if (SunshineSyncAdapter.ACTION_DATA_UPDATED.equals(intent.getAction())) {
Intent startintent = new Intent(context, DetailWidgetIntentService.class);
context.startService(startintent);
}
}
@Override
public void onUpdate(Context context, AppWidgetManager appWidgetManager, int[] appWidgetIds) {
Intent intent = new Intent(context, DetailWidgetIntentService.class);
context.startService(intent);
}
@Override
public void onEnabled(Context context) {
// Enter relevant functionality for when the first widget is created
}
@Override
public void onDisabled(Context context) {
// Enter relevant functionality for when the last widget is disabled
}
}
DetailWidgetIntentService
public class DetailWidgetIntentService extends IntentService {
/**
* Creates an IntentService. Invoked by your subclass's constructor.
*
* @param name Used to name the worker thread, important only for debugging.
*/
public DetailWidgetIntentService(String name) {
super(name);
}
static void updateAppWidget(Context context, AppWidgetManager appWidgetManager,
int appWidgetId) {
// Construct the RemoteViews object
RemoteViews views = new RemoteViews(context.getPackageName(), R.layout.detail_widget);
// Instruct the widget manager to update the widget
appWidgetManager.updateAppWidget(appWidgetId, views);
}
@Override
protected void onHandleIntent(Intent intent) {
Context context=this;
AppWidgetManager appWidgetManager=AppWidgetManager.getInstance(this);
int[] appWidgetIds = appWidgetManager.getAppWidgetIds(new ComponentName(this, DetailWidget.class));
for (int appWidgetId : appWidgetIds) {
updateAppWidget(context, appWidgetManager, appWidgetId);
}
}
}
step4 change the Manifest file
<receiver android:name=".widget.DetailWidget">
<intent-filter>
<action android:name="android.appwidget.action.APPWIDGET_UPDATE" />
<action android:name="com.example.android.sunshine.app.ACTION_DATA_UPDATED" />
</intent-filter>
<meta-data
android:name="android.appwidget.provider"
android:resource="@xml/detail_widget_info" />
</receiver>
step5 How to make the ListView in the widget show the data?
Normally,we use the ListView,we need the Adapter.In the widget,we use RemoteViewsFactory.
so we create a 1.class extends RemoteViewsFactory first
public class DetailWidgetListAdapter implements RemoteViewsService.RemoteViewsFactory {
private Context context;
public DetailWidgetListAdapter(Context context) {
this.context=context;
}
private int[] data;
@Override
public void onCreate() {
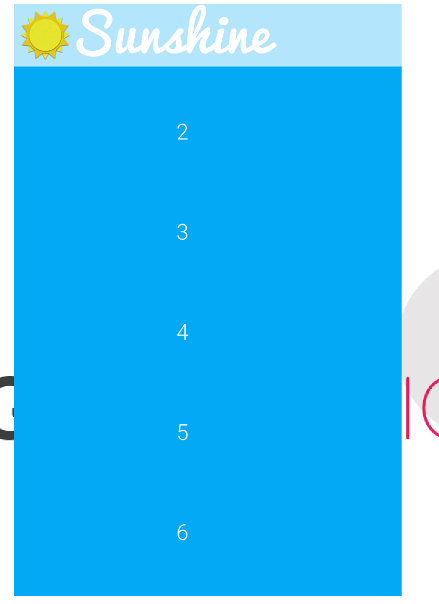
data=new int[]{1,2,3,4,5,6};
}
@Override
public void onDataSetChanged() {
}
@Override
public void onDestroy() {
}
@Override
public int getCount() {
return data.length;
}
@Override
public RemoteViews getViewAt(int position) {
RemoteViews rview=new RemoteViews(context.getPackageName(), R.layout.detail_widget_list_iteam);
rview.setTextViewText(R.id.detail_widget_list_item_date_textview,data[position]+"");
return rview;
}
@Override
public RemoteViews getLoadingView() {
return null;
}
@Override
public int getViewTypeCount() {
return 1;
}
@Override
public long getItemId(int position) {
return position;
}
@Override
public boolean hasStableIds() {
return false;
}
}
the getView at cretae the remote view for the ListView iteam
how we set the RemoteViewsFactory(adapter) to the ListView in the wiget?we need RemoteViewsService first.
2.create a class implements RemoteViewsService
public class MyWidgetService extends RemoteViewsService {
@Override
public RemoteViewsFactory onGetViewFactory(Intent intent) {
Log.d("DetailonUpdate","onGetViewFactory");
return new DetailWidgetListAdapter(getApplicationContext());
}
}
it is simple now,just return,it is not running in the UI thread,so we can do some long work at here.e.e. get data from content provider
how to 3.set a adapter to the list view?
RemoteViews views = new RemoteViews(context.getPackageName(), R.layout.detail_widget);
//set the array adapter
Intent intent = new Intent(context, MyWidgetService.class);
// Add the app widget ID to the intent extras.
intent.putExtra(AppWidgetManager.EXTRA_APPWIDGET_ID, appWidgetId);
intent.setData(Uri.parse(intent.toUri(Intent.URI_INTENT_SCHEME)));
// Instantiate the RemoteViews object for the App Widget layout.
// Set up the RemoteViews object to use a RemoteViews adapter.
// This adapter connects
// to a RemoteViewsService through the specified intent.
// This is how you populate the data.
if (Build.VERSION.SDK_INT >= Build.VERSION_CODES.ICE_CREAM_SANDWICH) {
Log.d("DetailonUpdate", "ice");
views.setRemoteAdapter( R.id.detail_widget_list2, intent);
// rv.setRemoteAdapter(appWidgetId, R.id.detail_widget_list, intent);
}
// Instruct the widget manager to update the widget
appWidgetManager.updateAppWidget(appWidgetId, views);
The import ant thing is we need t add 4.the promise to the WidgetService
<service
android:name=".widget.MyWidgetService"
android:exported="false"
android:permission="android.permission.BIND_REMOTEVIEWS" >
</service>
it can show 1-6 no!!!!
step 6 make the widget to how the content provider data
now,we wnat the list in the widget to show the content provider data
so,we need to use the content resolver at the RemoteViewsService(because not in the UI thread),to get the data
1.get the cursor
private static final String[] FORECAST_COLUMNS = {
// In this case the id needs to be fully qualified with a table name, since
// the content provider joins the location & weather tables in the background
// (both have an _id column)
// On the one hand, that's annoying. On the other, you can search the weather table
// using the location set by the user, which is only in the Location table.
// So the convenience is worth it.
WeatherContract.WeatherEntry.TABLE_NAME + "." + WeatherContract.WeatherEntry._ID,
WeatherContract.WeatherEntry.COLUMN_DATE,
WeatherContract.WeatherEntry.COLUMN_SHORT_DESC,
WeatherContract.WeatherEntry.COLUMN_MAX_TEMP,
WeatherContract.WeatherEntry.COLUMN_MIN_TEMP,
WeatherContract.LocationEntry.COLUMN_LOCATION_SETTING,
WeatherContract.WeatherEntry.COLUMN_WEATHER_ID,
WeatherContract.LocationEntry.COLUMN_COORD_LAT,
WeatherContract.LocationEntry.COLUMN_COORD_LONG
};
String sortOrder = WeatherContract.WeatherEntry.COLUMN_DATE + " ASC";
String locationSetting = Utility.getPreferredLocation(this);
Uri weatherForLocationUri = WeatherContract.WeatherEntry.buildWeatherLocationWithStartDate(
locationSetting, System.currentTimeMillis());
ContentResolver resolver = getContentResolver();
Cursor cursor = resolver.query(weatherForLocationUri, FORECAST_COLUMNS, null, null, sortOrder);
2. give the cursor to the DetailWidgetListAdapter(RemoteViewsFactory)
in public class DetailWidgetListAdapter implements RemoteViewsService.RemoteViewsFactory,change this:
private Context mcontext;
private Cursor mcursor;
private int[] data;
public DetailWidgetListAdapter(Context context, Cursor cursor) {
this.mcontext = context;
this.mcursor = cursor;
}
public Cursor getMcursor() {
return mcursor;
}
also it is because when onDataSetChanged and onDestroy we will use other or will not use the same cursor object again,so need to set the mcursor=null;
@Override
public void onDestroy() {
if(mcursor!=null)
mcursor=null;
}
important!!!!!!however,we can not do this:
public void onDataSetChanged() {
Log.d("DetailonUpdate","onDataSetChanged");
if (mcursor != null)
mcursor = null;
}
this make the cursor input become 0,because:
RemoteViewsFactory create,RemoteViewsFactory run first
3. make the list view in the widget show the data in cursor
that mean we need to change the getViewAt method.
we nee to get the datathat we need in the cursor
/*because private static final String[] FORECAST_COLUMNS = {
// In this case the id needs to be fully qualified with a table name, since
// the content provider joins the location & weather tables in the background
// (both have an _id column)
// On the one hand, that's annoying. On the other, you can search the weather table
// using the location set by the user, which is only in the Location table.
// So the convenience is worth it.
WeatherContract.WeatherEntry.TABLE_NAME + "." + WeatherContract.WeatherEntry._ID,
WeatherContract.WeatherEntry.COLUMN_DATE,
WeatherContract.WeatherEntry.COLUMN_SHORT_DESC,
WeatherContract.WeatherEntry.COLUMN_MAX_TEMP,
WeatherContract.WeatherEntry.COLUMN_MIN_TEMP,
WeatherContract.LocationEntry.COLUMN_LOCATION_SETTING,
WeatherContract.WeatherEntry.COLUMN_WEATHER_ID,
WeatherContract.LocationEntry.COLUMN_COORD_LAT,
WeatherContract.LocationEntry.COLUMN_COORD_LONG
};*/
static final int COL_WEATHER_ID = 0;
static final int COL_WEATHER_DATE = 1;
static final int COL_WEATHER_DESC = 2;
static final int COL_WEATHER_MAX_TEMP = 3;
static final int COL_WEATHER_MIN_TEMP = 4;
static final int COL_LOCATION_SETTING = 5;
static final int COL_WEATHER_CONDITION_ID = 6;
static final int COL_COORD_LAT = 7;
static final int COL_COORD_LONG = 8;
private RemoteViews binData(RemoteViews rview, Cursor mCursor) {
Log.d("DetailonUpdate","binData");
long dateInMillis = mCursor.getLong(COL_WEATHER_DATE);
double high = mCursor.getDouble(COL_WEATHER_MAX_TEMP);
double low = mCursor.getDouble(COL_WEATHER_MIN_TEMP);
int weatherId = mCursor.getInt(COL_WEATHER_CONDITION_ID);
int defaultImage = Utility.getIconResourceForWeatherCondition(weatherId);
//set the icon
rview.setImageViewResource(R.id.detail_widget_list_item_icon, defaultImage);
//set the date
rview.setTextViewText(R.id.detail_widget_list_item_date_textview, Utility.getFriendlyDayString(mcontext, dateInMillis));
//set the weather desc
String description = Utility.getStringForWeatherCondition(mcontext, weatherId);
rview.setTextViewText(R.id.detail_widget_list_item_forecast_textview, description);
//set the high temp
String highString = Utility.formatTemperature(mcontext, high);
rview.setTextViewText(R.id.detail_widget_list_item_high_textview, highString);
//set the low temp
String lowString = Utility.formatTemperature(mcontext, low);
rview.setTextViewText(R.id.detail_widget_list_item_low_textview, lowString);
return rview;
}
@Override
public RemoteViews getViewAt(int position) {
Log.d("DetailonUpdate","getViewAt");
RemoteViews rview = new RemoteViews(mcontext.getPackageName(), R.layout.detail_widget_list_iteam);
mcursor.moveToPosition(position);
return binData(rview, mcursor);
}
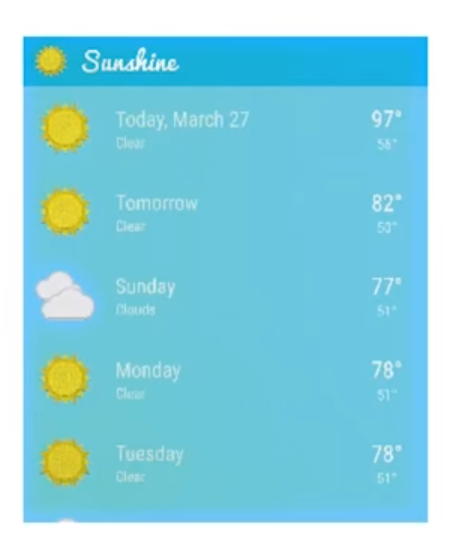
now,it can show the iteam

however,it can not click.
3.2 it can't update correctly when the sql database
update:see:http://pomprogrammer.blogspot.com/2016/03/list-view-in-widgetwhen-data.html
3.2 it can't update correctly when the sql database
update:see:http://pomprogrammer.blogspot.com/2016/03/list-view-in-widgetwhen-data.html
step7 handle the click
1.we want click the bar ,go to main activity
in DetailWidget onUpdate method:
RemoteViews views = new RemoteViews(context.getPackageName(), R.layout.detail_widget);
Intent startMainintent=new Intent(context, MainActivity.class);
PendingIntent pendingIntent=PendingIntent.getActivity(context,0,startMainintent,0);
views.setOnClickPendingIntent(R.id.detail_widget_bar,pendingIntent);
2.we want click the iteam ,go to the right detail

2.1先用setPendingIntentTemplate方法为collection整体的点击设置一个处理的PendingIntent
in AppWidgetProvider >onUpdate
Intent clickIntentTemple=new Intent(context, DetailActivity.class);
PendingIntent pendingIntentTemplate= TaskStackBuilder.create(context).addNextIntentWithParentStack(clickIntentTemple).getPendingIntent(0,PendingIntent.FLAG_UPDATE_CURRENT);
views.setPendingIntentTemplate(R.id.detail_widget_list2,pendingIntentTemplate);
because we want to start DetailActivity.class,so DetailActivity.class in the intent
The meaninig of PendingIntent.FLAG_UPDATE_CURRENT
這個FLAG 的意思就是:如果系統中已存在該PendingIntent對象,那麼系統將保留該PendingIntent對象,但是會使用新的Intent來更新之前PendingIntent中的Intent對像數據,例如更新Intent中的Extras。
2.2然后通过RemoteViewsFactory使用setOnClickFillInIntent为collection视图中的每一项传入一个与该项相关的Intent。该Intent会被合入处理时接收到Intent中。
in DetailWidgetListAdapter implements RemoteViewsService.RemoteViewsFactory>getViewat
//set the iteam click intent
Intent fillintent = new Intent();
String locationSetting = Utility.getPreferredLocation(mcontext);
Uri contentUri = WeatherContract.WeatherEntry.buildWeatherLocationWithDate(locationSetting, dateInMillis);
fillintent.setData(contentUri);
rview.setOnClickFillInIntent(R.id.detail_widget_list_iteam,fillintent);
it is because we already at 2.1 set the destination activity Detail activity,so we do not need to set it again.we just set the data that we want ot send to the activity.
now! when we click the iteam,we can go the the relevent detail
nut here is a problem,because our app have tablet mode and phone mode,in tablet mode ,we do not have detail activity,we only have one page,so, have error.
ste8 solve the tablet mode problrm
we can set always go to main activity in tablet mode
how?
in normal
<?xml version="1.0" encoding="utf-8"?>
<resources>
<bool name="tabletmode">false</bool>
</resources>
in sw 600dp
<?xml version="1.0" encoding="utf-8"?>
<resources>
<bool name="tabletmode">true</bool>
</resources>
in stpe7 step 1
change to
if(isTabletmode){
//in tablety mode
Intent liststartMainintent=new Intent(context, MainActivity.class);
PendingIntent listpendingIntent=PendingIntent.getActivity(context,0,liststartMainintent,0);
views.setOnClickPendingIntent(R.id.detail_widget_list2,listpendingIntent);
}else{
//int phone mode
Intent clickIntentTemple=new Intent(context, DetailActivity.class);
PendingIntent pendingIntentTemplate= TaskStackBuilder.create(context).addNextIntentWithParentStack(clickIntentTemple).getPendingIntent(0,PendingIntent.FLAG_UPDATE_CURRENT);
views.setPendingIntentTemplate(R.id.detail_widget_list2,pendingIntentTemplate);
}
in stpe7 step 2
change to
if(!isTabletmode){
Intent fillintent = new Intent();
String locationSetting = Utility.getPreferredLocation(mcontext);
Uri contentUri = WeatherContract.WeatherEntry.buildWeatherLocationWithDate(locationSetting, dateInMillis);
fillintent.setData(contentUri);
rview.setOnClickFillInIntent(R.id.detail_widget_list_iteam,fillintent);
}
訂閱:
文章 (Atom)