Responsive Design
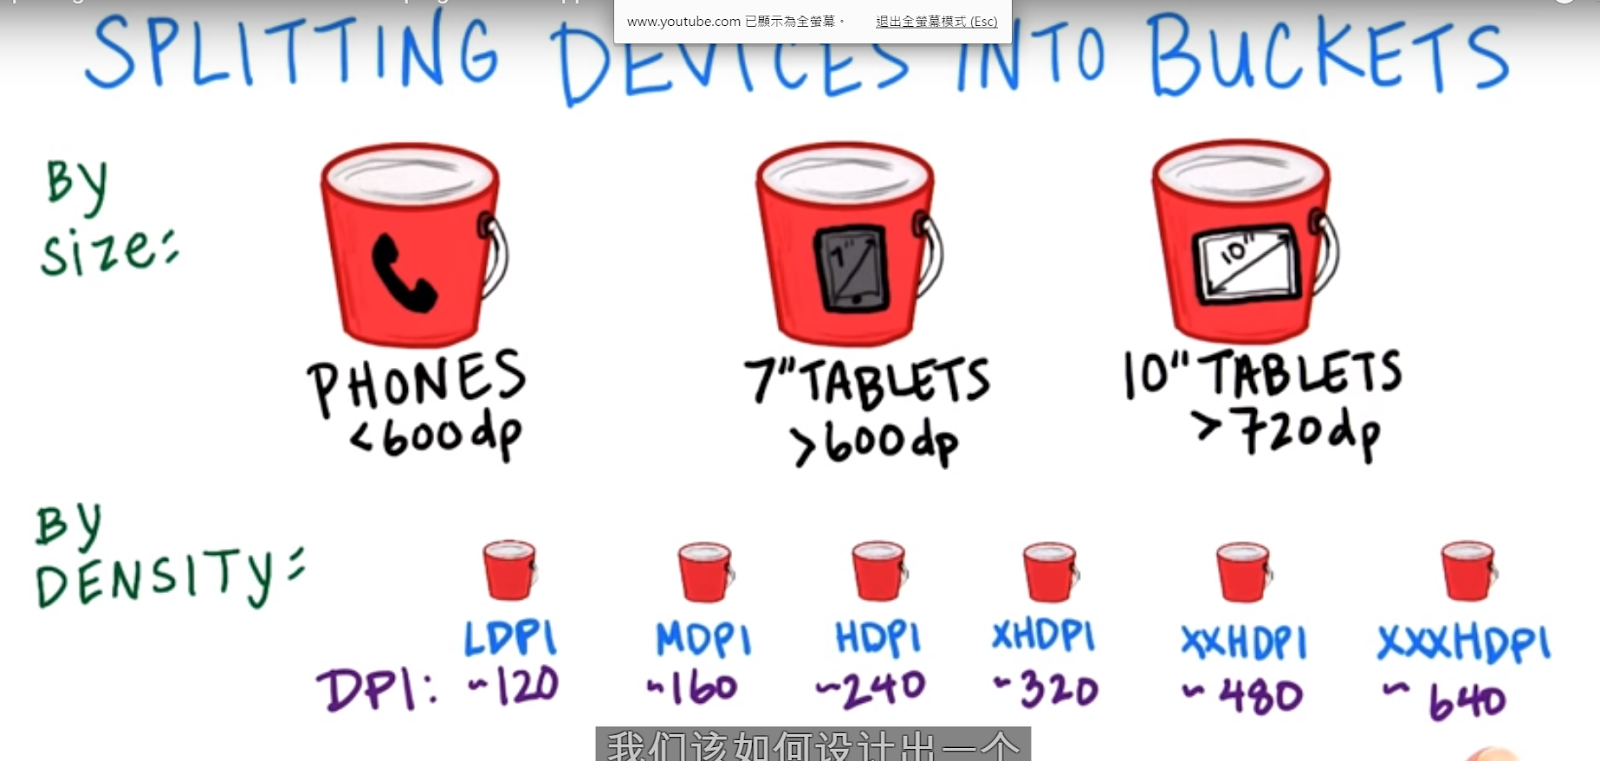
use size to dive not enough,becuase have different resoultion,different dpi
dpi :
DPI stands for Dots Per Inch which technically means printer dots per inch.
|
if we use pixel be a unit for the iteam,at different DPI,their size will be diffreen at different dpi but same size screen
we need DP
Density independent pixel
Density-independent pixel (dp)
A virtual pixel unit that you should use when defining UI layout, to express layout dimensions or position in a density-independent way.
The density-independent pixel is equivalent to one physical pixel on a 160 dpi screen, which is the baseline density assumed by the system for a "medium" density screen. At runtime, the system transparently handles any scaling of the dp units, as necessary, based on the actual density of the screen in use. The conversion of dp units to screen pixels is simple: px = dp * (dpi / 160). For example, on a 240 dpi screen, 1 dp equals 1.5 physical pixels. You should always use dp units when defining your application's UI, to ensure proper display of your UI on screens with different densities.
if 48 dp,on on a scrren ,different density with same size,the 48 dp will be the same
Resource Folder Qualifiers

-****
resuorce for different device specif
fro example :land or horizontal
so, when the device rotat , android load all theresource again,because may be all the layout and resource is different.

calculate the dpi:
Android 的 pixel 與 dp
一直以來, 手機規格尺寸 pixel 與 dp (Density- Independent Pixels) 的問題,
就滿常出現在開發者之中的.
網路文章往往也一知半解, 即使知道了 pixel 與 dp 的轉換公式,
也不知公式如何得來?!
近日, Android Developer 上傳了一部影片, 比較詳細地說明了這些單位的前世今生!
我將其重點摘要如下:
DPI - dots per inch
Android 的螢幕解析度的好壞, 可以用 pixel density 來衡量. 而它的單位便是 dpi.
dpi 越高的的螢幕, 可以顯示的越精細, 看下圖便可瞭解.

因此, Google 為了簡化區分這些不同裝置螢幕解析度的好壞,
將其依 dpi 分成了四個不同的類別, 分別是: MDPI, HDPI, XHDPI, XXHDPI.

160 dpi 的裝置屬 MDPI, 240 dpi 即 HDPI, 320 dpi 是 XHDPI, 480 dpi 是 XXHDPI.
以 MDPI 為最基本的解析度, 其他三個都是其倍數.
Density Independent Pixels (dp or dip)
Density Independent Pixels 簡寫為 dp or dip, 是一個虛擬的解析度,
目的是為了讓我們更好量化手機上的視覺大小.
1 dp 在 160 dpi (MDPI) 的裝置上的長度等於 1 pixel.
1 dp 在 320 dpi (MDPI) 的裝置上的長度等於 2 pixel.
(如果是算大小, 記得要平方.)
以此類推, 因此有了這個公式:

相同的 dp 大小在不同的裝置上看起來, 基本上會是非常相近的.
而我們人的手指大小通常約 50 dp, 因此 button建議的大小是不小於 50dp 左右的長寬.
計算( 以 Nexus 7 為例 )
Nexus 7 是一個 7" 的 XDPI 裝置, 解析度為 1920 x 1200 px, 問長寬分別是多少 dp?
首先, XDPI 是 320 dpi,
接著套用公式,
長 1920/ (320/160) = 960 dp
寬 1200/ (320/160) = 600 dp
設計上的建議
瞭解了整個單位設計的原因, 影片的最後還給了兩點建議:
1. 視覺 Layout 的設計上以 dp 為單位
2. 依需要分別給 MDPI, HDPI, XHDPI, XXHDPI 不同大小的圖片.

Mipmap vs Drawable

if build apk,for hdpi screen,only hdpi drawable will include in the apk,but all the different resoultoin resource in mipmap will keep.
why we nedd the resource that is different dpi with our device?
for example, launcger app,it will use the high resoultion up icon,not the math resoultion icon
example”
Nexus5 xxhdpi
use xxhdpi drawable
use xxxhdpi icon
Tablet UX Mocks
from
Mobile View


To
Tablet view


Why Do We Need Fragments?
can combine two or more page at phone to be a a page in tablet
any app have multi activity,can replay with a activity,multi fragment
but,that will

How Fragments Work
lify cycle of the fragment

Fragment Lifecycle
Fragment has many methods which can be overridden to plug into the lifecycle (similar to an Activity):
onAttach()is called when a fragment is connected to an activity.onCreate()is called to do initial creation of the fragment.onCreateView()is called by Android once the Fragment should inflate a view.onViewCreated()is called afteronCreateView()and ensures that the fragment's root view isnon-null. Any view setup should happen here. E.g., view lookups, attaching listeners.onActivityCreated()is called when host activity has completed itsonCreate()method.onStart()is called once the fragment is ready to be displayed on screen.onResume()- Allocate “expensive” resources such as registering for location, sensor updates, etc.onPause()- Release “expensive” resources. Commit any changes.onDestroyView()is called when fragment's view is being destroyed, but the fragment is still kept around.onDestroy()is called when fragment is no longer in use.onDetach()is called when fragment is no longer connected to the activity.
onCreate()
系統會在建立片段時呼叫這個方法。在實作這個方法時,您必須初始化您想保留的必要片段元件,以便恢復已暫停或停止的片段。
onCreateView()
onPause()
系統會在使用者初次離開片段時呼叫這個方法 (即使使用者這麼做未必會刪除片段)。 您通常需要透過這個方法提交要在目前的使用者工作階段以外保留的任何變更 (原因在於使用者可能不會返回)。
In a activity,can replace a fragment by other fragment,so the life cyclee of fragment can independent to the activity life cycle.
BUT:

調整 Activity 生命週期
內含片段的 Activity 的生命週期會直接影響片段的生命週期,這樣一來,Activity 的每次生命週期回呼會針對每個片段產生相似的回呼。 例如,當 Activity 收到 onPause() 後,Activity 中的每個片段都會收到 onPause()。
不過,片段有幾個額外的生命週期回呼,可用於處理與 Activity 之間的特殊互動,以執行建置或刪除片段 UI 等動作。以下是這些額外的回呼方法:
系統會呼叫這個方法來建立與片段相關聯的檢視階層。
當使用者移除與片段相關聯的檢視階層時,系統就會呼叫這個方法。
當使用者將片段與 Activity 解除關聯時,系統就會呼叫這個方法。
SO, the lifecycle can be dependent and independent
we need to at onDestory() to clean up the resource related to the UI.example:bitmap in momery,cursor ,anything thing in memory but will not show in the UI again(because replace by other fragment)

How to add and replace fragemtn?
replace =remove+add
some basic information:
FragmentManager manage the fragment,it can
- 使用 findFragmentById() (針對在 Activity 版面配置中提供 UI 的片段) 或 findFragmentByTag() (針對未提供 UI 的片段) 取得 Activity 中的現有片段。
and open a Frgment Transaction
for add
ExampleFragment fragment = new ExampleFragment();
fragmentTransaction.add(R.id.fragment_container, fragment);
fragmentTransaction.commit();
for replace
FragmentManager fragmentManager = getSupportFragmentManager();
FragmentTransaction fragmentTransaction = fragmentManager.beginTransaction();
// Create new fragment and transaction
Fragment newFragment = new DetailFragment();
FragmentTransaction transaction = fragmentManager.beginTransaction();
// Replace whatever is in the fragment_container view with this fragment,
// and add the transaction to the back stack
transaction.replace(R.id.weather_detail_container, newFragment);
transaction.addToBackStack(null);
// Commit the transaction
transaction.commit();
將替換交易儲存到返回堆疊,以便使用者按下 [返回]按鈕來復原交易以及返回上一個片段。
如果您將多項變更新增至交易 (例如新增另一個 add() 或 remove()),並且呼叫 addToBackStack(),那麼您在呼叫 commit() 之前套用的所有變更都會新增至返回堆疊做為單次交易,在這種情況下,按下 [返回] 按鈕就能一次復原所有變更。
so,the back button is recover the transaction,not the action(add,replace remove)
example
example
the back stack
when we push back buttton will quite the activity,not go to the before fragment,so we nee add to the back stack
FragmentB fragmentB = new FragmentB();
Bundle bundle = new Bundle();
bundle.putString("String", input);
fragmentB.setArguments(bundle);
FragmentTransaction transaction = fragmentManager.beginTransaction();
transaction.replace(R.id.container, fragmentB);
transaction.addToBackStack(null);
transaction.commit();
some reference:
Fragments with No UI
a fragment is not required to be a part of the activity layout; you may also use a fragment without its own UI as an invisible worker for the activity.
How:
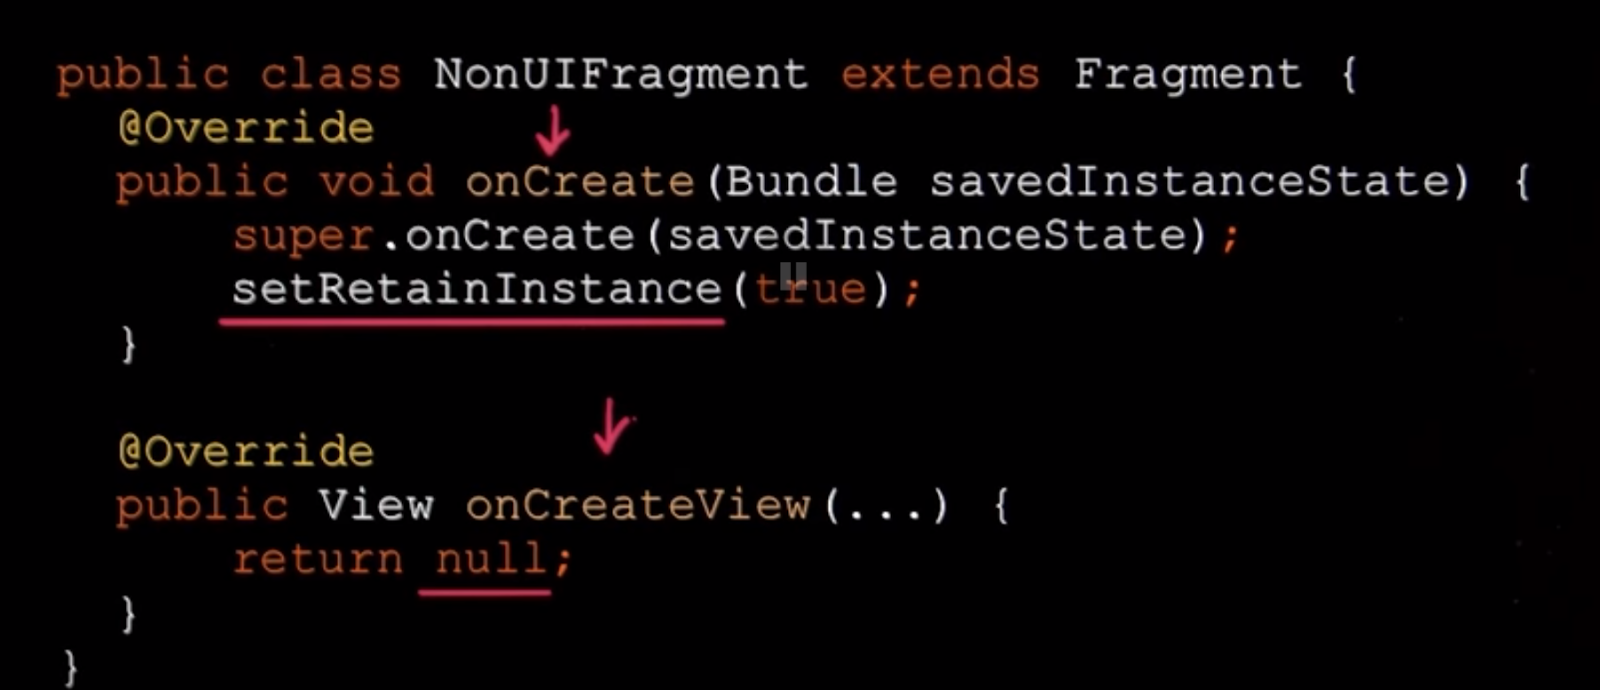
it is because no UI, so ,when the config od device change, no need t oload the layout agian,so no neeed destory and than create again.
Useful:
start the task,connection…….no interrupt by the rotaate of the rotate.
Put layout in different folder to support mobile phone tablet
first,we need to know the dp of the height or weith
calculate:
than Using new size qualifiers-determin the layout folder name
The different resource configurations that you can specify based on the space available for your layout are summarized in table 2. These new qualifiers offer you more control over the specific screen sizes your application supports, compared to the traditional screen size groups (small, normal, large, and xlarge).
Note: The sizes that you specify using these qualifiers are not the actual screen sizes. Rather, the sizes are for the width or height in dp units that are available to your activity's window. The Android system might use some of the screen for system UI (such as the system bar at the bottom of the screen or the status bar at the top), so some of the screen might not be available for your layout. Thus, the sizes you declare should be specifically about the sizes needed by your activity—the system accounts for any space used by system UI when declaring how much space it provides for your layout. Also beware that the Action Bar is considered a part of your application's window space, although your layout does not declare it, so it reduces the space available for your layout and you must account for it in your design.
Table 2. New configuration qualifiers for screen size (introduced in Android 3.2).
Screen configuration
|
Qualifier values
|
Description
|
smallestWidth
|
sw<N>dp
Examples:
sw600dp
sw720dp
|
The fundamental size of a screen, as indicated by the shortest dimension of the available screen area. Specifically, the device's smallestWidth is the shortest of the screen's available height and width (you may also think of it as the "smallest possible width" for the screen). You can use this qualifier to ensure that, regardless of the screen's current orientation, your application's has at least <N> dps of width available for its UI.
For example, if your layout requires that its smallest dimension of screen area be at least 600 dp at all times, then you can use this qualifier to create the layout resources, res/layout-sw600dp/. The system will use these resources only when the smallest dimension of available screen is at least 600dp, regardless of whether the 600dp side is the user-perceived height or width. The smallestWidth is a fixed screen size characteristic of the device;the device's smallestWidth does not change when the screen's orientation changes.
The smallestWidth of a device takes into account screen decorations and system UI. For example, if the device has some persistent UI elements on the screen that account for space along the axis of the smallestWidth, the system declares the smallestWidth to be smaller than the actual screen size, because those are screen pixels not available for your UI.
This is an alternative to the generalized screen size qualifiers (small, normal, large, xlarge) that allows you to define a discrete number for the effective size available for your UI. Using smallestWidth to determine the general screen size is useful because width is often the driving factor in designing a layout. A UI will often scroll vertically, but have fairly hard constraints on the minimum space it needs horizontally. The available width is also the key factor in determining whether to use a one-pane layout for handsets or multi-pane layout for tablets. Thus, you likely care most about what the smallest possible width will be on each device.
|
Available screen width
|
w<N>dp
Examples:
w720dp
w1024dp
|
Specifies a minimum available width in dp units at which the resources should be used—defined by the <N> value. The system's corresponding value for the width changes when the screen's orientation switches between landscape and portrait to reflect the current actual width that's available for your UI.
This is often useful to determine whether to use a multi-pane layout, because even on a tablet device, you often won't want the same multi-pane layout for portrait orientation as you do for landscape. Thus, you can use this to specify the minimum width required for the layout, instead of using both the screen size and orientation qualifiers together.
|
Available screen height
|
h<N>dp
Examples:
h720dp
h1024dp
etc.
|
Specifies a minimum screen height in dp units at which the resources should be used—defined by the <N> value. The system's corresponding value for the height changes when the screen's orientation switches between landscape and portrait to reflect the current actual height that's available for your UI.
Using this to define the height required by your layout is useful in the same way as w<N>dp is for defining the required width, instead of using both the screen size and orientation qualifiers. However, most apps won't need this qualifier, considering that UIs often scroll vertically and are thus more flexible with how much height is available, whereas the width is more rigid.
|
While using these qualifiers might seem more complicated than using screen size groups, it should actually be simpler once you determine the requirements for your UI. When you design your UI, the main thing you probably care about is the actual size at which your application switches between a handset-style UI and a tablet-style UI that uses multiple panes. The exact point of this switch will depend on your particular design—maybe you need a 720dp width for your tablet layout, maybe 600dp is enough, or 480dp, or some number between these. Using these qualifiers in table 2, you are in control of the precise size at which your layout changes.
For more discussion about these size configuration qualifiers, see the Providing Resources document.
Configuration examples
To help you target some of your designs for different types of devices, here are some numbers for typical screen widths:
- 320dp: a typical phone screen (240x320 ldpi, 320x480 mdpi, 480x800 hdpi, etc).
- 480dp: a tweener tablet like the Streak (480x800 mdpi).
- 600dp: a 7” tablet (600x1024 mdpi).
- 720dp: a 10” tablet (720x1280 mdpi, 800x1280 mdpi, etc).
Using the size qualifiers from table 2, your application can switch between your different layout resources for handsets and tablets using any number you want for width and/or height. For example, if 600dp is the smallest available width supported by your tablet layout, you can provide these two sets of layouts:
res/layout/main_activity.xml # For handsets
res/layout-sw600dp/main_activity.xml # For tablets
In this case, the smallest width of the available screen space must be 600dp in order for the tablet layout to be applied.
For other cases in which you want to further customize your UI to differentiate between sizes such as 7” and 10” tablets, you can define additional smallest width layouts:
res/layout/main_activity.xml # For handsets (smaller than 600dp available width)
res/layout-sw600dp/main_activity.xml # For 7” tablets (600dp wide and bigger)
res/layout-sw720dp/main_activity.xml # For 10” tablets (720dp wide and bigger)
Notice that the previous two sets of example resources use the "smallest width" qualifier, sw<N>dp, which specifies the smallest of the screen's two sides, regardless of the device's current orientation. Thus, usingsw<N>dp is a simple way to specify the overall screen size available for your layout by ignoring the screen's orientation.
However, in some cases, what might be important for your layout is exactly how much width or height is currentlyavailable. For example, if you have a two-pane layout with two fragments side by side, you might want to use it whenever the screen provides at least 600dp of width, whether the device is in landscape or portrait orientation. In this case, your resources might look like this:
res/layout/main_activity.xml # For handsets (smaller than 600dp available width)
res/layout-w600dp/main_activity.xml # Multi-pane (any screen with 600dp available width or more)
Notice that the second set is using the "available width" qualifier, w<N>dp. This way, one device may actually use both layouts, depending on the orientation of the screen (if the available width is at least 600dp in one orientation and less than 600dp in the other orientation).
If the available height is a concern for you, then you can do the same using the h<N>dp qualifier. Or, even combine the w<N>dp and h<N>dp qualifiers if you need to be really specific.
Example:

put main_activity.xml in two layout file
Finally
layout for the mobile phone,
layout-sw600dp for the tablet
Smallest Width Qualifier
if we have this

and we have device

640dp or 360 dp?
360dp@!!! because 360<640
and because 360dp <720dp and <600dp,so it use the basic layout
if we have

use layout 600dp for detail.xml and iteam xml
other use basic layout
if we have

iteam:use 720dp
detail:600dp
iteam:600dp
main:basic layout
Now ,start to make the mobile app to be a tablet app
here is the app only for mobile
1. Remove values-w820dp folder
We don’t need to to provide specific logic for where the current orientation is greater than 820dp.
2. Make two activity_main.xml files
Make a layout-sw600dp folder and create a new activity_main.xml to override the base activity_main.xml
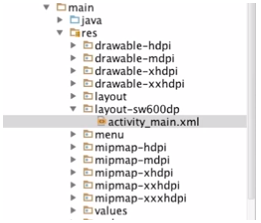
Copy and paste this file in the sw600dp activity_main.xml. This file is essentially a horizontal linear layout that has a ForecastFragment on the left and a DetailFragment on the right.

the right on is a frame layout
The ForecastFragment is considered a Static Fragment because we explicitly define that the fragment contains an instance ofForecastFragment in the xml layout with the lineandroid:name="com.example.android.sunshine.app.ForecastFragment". We do this because it is not meant to change (ie, it is meant to stay static).
the DetailFragment is a Dynamic Fragment, which is meant to change. In fact, every time the user clicks a menu item, the fragment’s contents will be a new DetailFragment. We therefore do not explicitly mention the class in the xml and instead only declare a FrameLayout container for it in the xml.

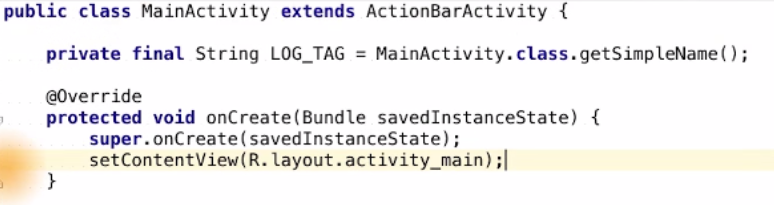
3. Make the base activity_main.xml and activity_detail match the 2-pane UI xml
at base activity_main.xml
add the ForecastFragment to the activity_main,give the same id =fragment_forecast
at the activity_detail.xml
we want the id of the container to match in both layouts so that the logic in MainActivity is simplified. We know that we will always add the DetailFragment to a container named weather_detail_container
in both the one and two pane layout.
so,we change the id of FrameLyout in activity_detail to fragment_forecast,so now the frameloyout in activity_detail and activitymain(sw600dp) have same id
now,they are match
4. Update DetailActivity to add the detail fragment-for one pane case(mobile phone)
it is because we change the id before, son change the id to weather_detail_container Detailactivity. Detailactivity only apeaore at one pane case, because at two pane case,will not have Detailactivity .
5. Fix Tags and onResume in MainActivity????????
If you haven’t already, create theprivate static final String DETAILFRAGMENT_TAG = "DFTAG" inMainActivity. It will eventually be used in the onResume. We no longer need the FORCASTFRAGMENT tag since we’re no longer explicitly creating the ForcastFragment. Since we no longer have this tag, we need to update on resume to have this line instead:
ForecastFragment ff = (ForecastFragment)getSupportFragmentManager().findFragmentById(R.id.fragment_forecast);
6. Update MainActivity so that it sets up the layout correctly and knows whether it’s one or two pane mode
we need to know now we used 1 pane or 2 pane layout .the method is determin is R.id.weather_detail_container in the acivity_main.xml
findviewbuid(R.id.weather_detail_container)
if retur null.that mean not in acivity_main,that mean using 1 pane
Start by removing the code that dynamically adds a ForecastFragment, since in both cases it’s added by the xml.
Now add a boolean member variable called mTwoPane which will store whether MainActivity is dealing with a one or TwoPane layout.
To know what case it is, have your MainActivity check whether or not the layout contains a view with the id weather_detail_container. If it does, it’s a two pane layout so set mTwoPane to true, otherwise you can set it to false. Also, if it’s a two pane layout, you’ll need to add a new DetailFragment :
protected void onCreate(Bundle savedInstanceState) {
super.onCreate(savedInstanceState);
mLocation = Utility.getPreferredLocation(this);
setContentView(R.layout.activity_main);
if (findViewById(R.id.weather_detail_container) != null) {
// The detail container view will be present only in the large-screen layouts
// (res/layout-sw600dp). If this view is present, then the activity should be
// in two-pane mode.
mTwoPane = true;
// In two-pane mode, show the detail view in this activity by
// adding or replacing the detail fragment using a
// fragment transaction.
if (savedInstanceState == null) {
getSupportFragmentManager().beginTransaction()
.replace(R.id.weather_detail_container, new DetailFragment(), DETAILFRAGMENT_TAG)
.commit();
}
} else {
mTwoPane = false;
}
}
Important!!!!2 question
1.why in the two pane case we check if the saved instance state is null?
Well if we rotate the phone, the system saves the fragment state in the saved state bundle and is smart enough to restore this state.
Therefore, if the saved state bundle is not null, the system already has the fragment it needs and you shouldn’t go adding another one.
will learn later for savedInstanceState
2.why have a tag at replace?
tagOptional tag name for the fragment, to later retrieve the fragment with FragmentManager.findFragmentByTag(String).
because we do not finish the app,so have below
7. Put placeholder data in the detail_fragment xml
If you want to see something in the detail fragment to check that it’s loading correctly, add some dummy data.
8. Modify the DetailFragment to handle the case where it received no Uri
If DetailFragment is created without a uri (as in intent.data() == null), it should not try to create a loader.
@Override
public Loader onCreateLoader(int id, Bundle args) {
Log.v(LOG_TAG, "In onCreateLoader");
Intent intent = getActivity().getIntent();
if (intent == null || intent.getData() == null) {
return null;
}
// Now create and return a CursorLoader that will take care of
// creating a Cursor for the data being displayed.
return new CursorLoader(
getActivity(),
intent.getData(),
DETAIL_COLUMNS,
null,
null,
null
);
}
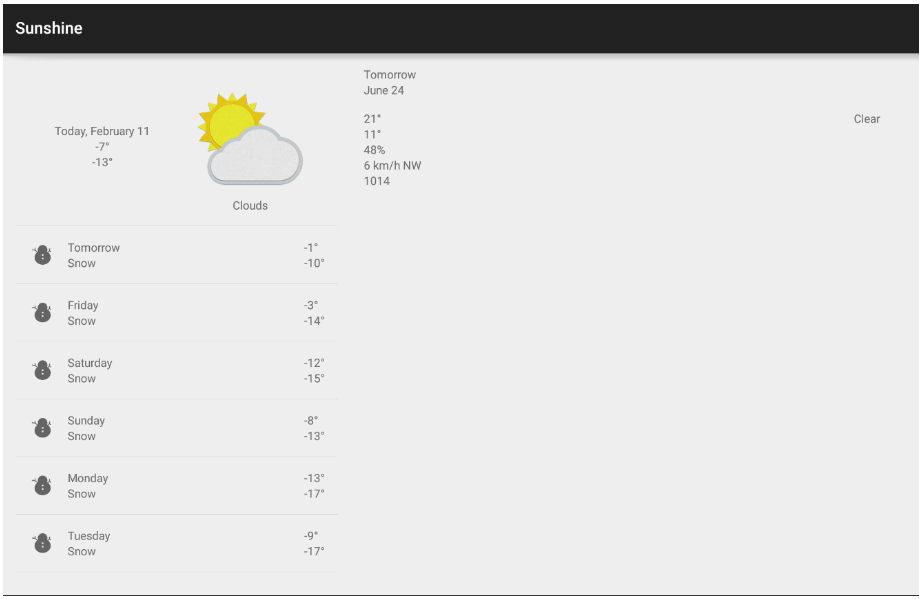
And you’re done, you should now be able to see a two panel ui on a tablet that looks like this:
next,we will handle the click on the iteam at the 2 pane mode.
Handle List Item Click
on Phone

at tablet

Now ,when we click the iteam,the app will start a DetailActivity,and the show the DetailFragment.So
How can we Replace the fragment in the container only in the tablet mode when will click the iteam?
Problem 1 :only in tablet mode
it is because only the MainActivity know which node athe the app in,phone mode or tablet mode?
So, we need to Foecast Fragment tell thte main activity,a iteam has click, than the MainActivity will deside,1.start a detail Activity, or 2. replace a Fragment in the contaioner(Frame layout)
forecast fragment use callback interface to talk to the MainActivity
Step1:create a callback interface
in ForecastFragment
create a innterface
public interface Callback {
/**
* DetailFragmentCallback for when an item has been selected.
*/
public void onItemSelected(Uri dateUri);
}
Step2: at Onattach() of ForecastFragment
public void onAttach(Activity activity) {
super.onAttach(activity);
try{
mainActivity= (Callback) activity;
}catch (ClassCastException e){
Log.d("cast",e.toString());
}
}
Step3:public class MainActivity extends ActionBarActivity implements ForecastFragment.Callback
and override the
public void onItemSelected(Uri dateUri) {
}
step4:
at ForecastFragment,call the mainActivity.onItemSelected , in order to pass the information to the Mactivity,the Mactivity will descide use which type to display ,and than pass this information to the DetainActivity or DetainFragment
listView.setOnItemClickListener(new AdapterView.OnItemClickListener() {
@Override
public void onItemClick(AdapterView<?> adapterView, View view, int position, long l) {
// CursorAdapter returns a cursor at the correct position for getItem(), or null
// if it cannot seek to that position.
Cursor cursor = (Cursor) adapterView.getItemAtPosition(position);
if (cursor != null) {
String locationSetting = Utility.getPreferredLocation(getActivity());
// Intent intent = new Intent(getActivity(), DetailActivity.class)
// .setData(WeatherContract.WeatherEntry.buildWeatherLocationWithDate(
// locationSetting, cursor.getLong(COL_WEATHER_DATE)
// ));
// startActivity(intent);
mainActivity.onItemSelected(WeatherContract.WeatherEntry.buildWeatherLocationWithDate(
locationSetting, cursor.getLong(COL_WEATHER_DATE)
));
}
}
});
We will not code in the what what ForecastFragment will do in onItemSelected .We will code it ath the Mainactivity.
step5:overide the onItemSelected method.
in this method ,we need to determine whast mode a we displaying,
if mobile mode:
just use the intent to carry the Uri and than start the activity by the intent
if tablet mode:
use Arrgument to send the Uri string
Fragment newFragment = new DetailFragment();
Bundle bundle=new Bundle();
bundle.putString("Uri", dateUri.toString());
newFragment.setArguments(bundle);
Hole example:
@Override
public void onItemSelected(Uri dateUri) {
if (mTwoPane) {
Log.d("at","onItemSelected");
FragmentManager fragmentManager = getSupportFragmentManager();
// Create new fragment and transaction
Fragment newFragment = new DetailFragment();
Bundle bundle=new Bundle();
bundle.putString("Uri", dateUri.toString());
newFragment.setArguments(bundle);
FragmentTransaction transaction = fragmentManager.beginTransaction();
// Replace whatever is in the fragment_container view with this fragment,
// and add the transaction to the back stack
transaction.replace(R.id.weather_detail_container, newFragment);
transaction.addToBackStack(null);
// Commit the transaction
transaction.commit();
} else {//one Pane
Intent intent = new Intent(this, DetailActivity.class)
.setData(dateUri);
startActivity(intent);
}
}
Step6, it is because the Uri may be in intent or in the Arrgument, not must be in the intent ,so we need to change the onCreateLoader
public Loader<Cursor> onCreateLoader(int id, Bundle args) {
Log.v(LOG_TAG, "In onCreateLoader");
Intent intent = getActivity().getIntent();
Uri uri = null;
if (intent.getData() != null) {
uri = intent.getData();
} else {
Bundle bundle = getArguments();
if (bundle != null) {
String s_uri = bundle.getString("Uri");
uri = Uri.parse(s_uri);
} else {
return null;
}
}
// Now create and return a CursorLoader that will take care of
// creating a Cursor for the data being displayed.
return new CursorLoader(
getActivity(),
uri,
FORECAST_COLUMNS,
null,
null,
null
);
}
Problem 2: how to replace a fragment call from a fragment
above can answer
Problem 3: how to show the corresponding detail fragment in the container
above can answer
Now in the tablet mode,when we change the location, the ForecastFragment will update automatically, however,the detail Fragemnt will not,we need to fix it.
Fix the auto update method in the table mode for the DetailFragment
code:
In addition to the instructions in the video, you can also begin to fix up the onResume method in MainActivity, by telling the DetailFragment to restart its’ loader if the location changed. To do so, add this code to theonResume in MainActivity.
@Override
protected void onResume() {
super.onResume();
String location = Utility.getPreferredLocation( this );
// update the location in our second pane using the fragment manager
if (location != null && !location.equals(mLocation)) {
ForecastFragment ff = (ForecastFragment)getSupportFragmentManager().findFragmentById(R.id.fragment_forecast);
if ( null != ff ) {
ff.onLocationChanged();
}
DetailFragment df = (DetailFragment)getSupportFragmentManager().findFragmentByTag(DETAILFRAGMENT_TAG);
if ( null != df ) {
df.onLocationChanged(location);
}
mLocation = location;
}
}
And add this to the DetailFragment, which will do the loader restarting.
void onLocationChanged( String newLocation ) {
// replace the uri, since the location has changed
Uri uri = mUri;
if (null != uri) {
long date = WeatherContract.WeatherEntry.getDateFromUri(uri);
Uri updatedUri = WeatherContract.WeatherEntry.buildWeatherLocationWithDate(newLocation, date);
mUri = updatedUri;
getLoaderManager().restartLoader(DETAIL_LOADER, null, this);
}
}
Also, now is a great time to remove the dummy data in the detail fragment.
This code is explained in the solution video, but to resolve a bug, you should add this code to your settings activity.
@TargetApi(Build.VERSION_CODES.JELLY_BEAN)
@Override
public Intent getParentActivityIntent() {
return super.getParentActivityIntent().addFlags(Intent.FLAG_ACTIVITY_CLEAR_TOP);
@Override
public Intent getParentActivityIntent() {
return super.getParentActivityIntent().addFlags(Intent.FLAG_ACTIVITY_CLEAR_TOP);
the main concept is ,when from the seeting activity back to the main activity,. first check is the location seeting changed, if changed, check if forectFragment and detail fragment are here? if appear, app download the new weather information the internet ,and than tell them the location is changed.
finally,getLoaderManager().restartLoader(FORECAST_LOADER, null, this);
to tell the cursor load again,because the SQL data is changed.
when forectFragment and detail fragment is toled the informationUpdate, call
getLoaderManager().restartLoader(FORECAST_LOADER, null, this);
to force the Cursor loader load again.
Problem:when we already set retCursor.setNotificationUri(getContext().getContentResolver(), uri);
and getContext().getContentResolver().notifyChange(uri, null); in the contentProvider, the cursor should be update automtically, why we need to force the cursor loader load again?
Answer:
because we use cursorloader, the curosr not directly get from the contentProvider.

why?
@TargetApi(Build.VERSION_CODES.JELLY_BEAN)
@Override
public Intent getParentActivityIntent() {
return super.getParentActivityIntent().addFlags(Intent.FLAG_ACTIVITY_CLEAR_TOP);
}
}
when we go to setting activity,than click up button,the MainActivity,if we use the above code,will check if the Main activity appear,if appear, don’t create a new one.
Helihight the item that you click in the list view
first ,set the list view is android:choiceMode="singleChoice"
second:,create a selector
<selector xmlns:android="http://schemas.android.com/apk/res/android">
<item android:drawable="@color/list_blue" android:state_activated="true"></item>
<item android:state_pressed="true"><ripple android:color="@color/list_grey"/></item>
<item android:drawable="@android:color/transparent" ></item>
</selector>
to be the iteam bacjground
Restore Scroll Position on Rotation on tablet mode
we need onSaveInstanceState!!!
if we use Cursor loader:
Step1
save the position of the iteam we clicked
public void onItemClick(AdapterView<?> adapterView, View view, int position, long l) {
// CursorAdapter returns a cursor at the correct position for getItem(), or null
// if it cannot seek to that position.
saved_position=position;
Step2
override the onSaveInstanceState
@Override
public void onSaveInstanceState(Bundle outState) {
outState.putInt(BUNDLE_POSITION_KEY,saved_position);
super.onSaveInstanceState(outState);
}
save the position into the Bundle
Step3
after rotate,onCreateView will run,so we can get back the saved_position.
if(savedInstanceState!=null){
saved_position=savedInstanceState.getInt(BUNDLE_POSITION_KEY);
}
the mainPoint is we nned to first check the saveedInstance is null? because may be do not have onSaveInstanceState before,than the savedInstanceStatewill be null.
step4
at onLoadFinished,
listView.smoothScrollToPosition(saved_position);
listView.setItemChecked(saved_position,true);
Scroll to the right position and heighlight the iteam.
Alternate Detail Layout
Because we wnat to have differentr layout in tablet,phone and land phone, so,we need three layout folders.

we need 3 different layout for the detailFragment
tablet
phone land
phone portrait
Table 1. Configuration qualifiers that allow you to provide special resources for different screen configurations.
Screen characteristic
|
Qualifier
|
Description
|
Size
|
small
|
Resources for small size screens.
|
normal
|
Resources for normal size screens. (This is the baseline size.)
| |
large
|
Resources for large size screens.
| |
xlarge
|
Resources for extra-large size screens.
| |
Density
|
ldpi
|
Resources for low-density (ldpi) screens (~120dpi).
|
mdpi
|
Resources for medium-density (mdpi) screens (~160dpi). (This is the baseline density.)
| |
hdpi
|
Resources for high-density (hdpi) screens (~240dpi).
| |
xhdpi
|
Resources for extra-high-density (xhdpi) screens (~320dpi).
| |
xxhdpi
|
Resources for extra-extra-high-density (xxhdpi) screens (~480dpi).
| |
xxxhdpi
|
Resources for extra-extra-extra-high-density (xxxhdpi) uses (~640dpi). Use this for the launcher icon only, see note above.
| |
nodpi
|
Resources for all densities. These are density-independent resources. The system does not scale resources tagged with this qualifier, regardless of the current screen's density.
| |
tvdpi
|
Resources for screens somewhere between mdpi and hdpi; approximately 213dpi. This is not considered a "primary" density group. It is mostly intended for televisions and most apps shouldn't need it—providing mdpi and hdpi resources is sufficient for most apps and the system will scale them as appropriate. If you find it necessary to provide tvdpi resources, you should size them at a factor of 1.33*mdpi. For example, a 100px x 100px image for mdpi screens should be 133px x 133px for tvdpi.
| |
Orientation
|
land
|
Resources for screens in the landscape orientation (wide aspect ratio).
|
port
|
Resources for screens in the portrait orientation (tall aspect ratio).
| |
Aspect ratio
|
long
|
Resources for screens that have a significantly taller or wider aspect ratio (when in portrait or landscape orientation, respectively) than the baseline screen configuration.
|
notlong
|
Resources for use screens that have an aspect ratio that is similar to the baseline screen configuration.
|
if > android 3.2
Table 2. New configuration qualifiers for screen size (introduced in Android 3.2).
Screen configuration
|
Qualifier values
|
Description
|
smallestWidth
|
sw<N>dp
Examples:
sw600dp
sw720dp
|
The fundamental size of a screen, as indicated by the shortest dimension of the available screen area. Specifically, the device's smallestWidth is the shortest of the screen's available height and width (you may also think of it as the "smallest possible width" for the screen). You can use this qualifier to ensure that, regardless of the screen's current orientation, your application's has at least <N> dps of width available for its UI.
For example, if your layout requires that its smallest dimension of screen area be at least 600 dp at all times, then you can use this qualifier to create the layout resources, res/layout-sw600dp/. The system will use these resources only when the smallest dimension of available screen is at least 600dp, regardless of whether the 600dp side is the user-perceived height or width. The smallestWidth is a fixed screen size characteristic of the device;the device's smallestWidth does not change when the screen's orientation changes.
The smallestWidth of a device takes into account screen decorations and system UI. For example, if the device has some persistent UI elements on the screen that account for space along the axis of the smallestWidth, the system declares the smallestWidth to be smaller than the actual screen size, because those are screen pixels not available for your UI.
This is an alternative to the generalized screen size qualifiers (small, normal, large, xlarge) that allows you to define a discrete number for the effective size available for your UI. Using smallestWidth to determine the general screen size is useful because width is often the driving factor in designing a layout. A UI will often scroll vertically, but have fairly hard constraints on the minimum space it needs horizontally. The available width is also the key factor in determining whether to use a one-pane layout for handsets or multi-pane layout for tablets. Thus, you likely care most about what the smallest possible width will be on each device.
|
Available screen width
|
w<N>dp
Examples:
w720dp
w1024dp
|
Specifies a minimum available width in dp units at which the resources should be used—defined by the <N> value. The system's corresponding value for the width changes when the screen's orientation switches between landscape and portrait to reflect the current actual width that's available for your UI.
This is often useful to determine whether to use a multi-pane layout, because even on a tablet device, you often won't want the same multi-pane layout for portrait orientation as you do for landscape. Thus, you can use this to specify the minimum width required for the layout, instead of using both the screen size and orientation qualifiers together.
|
Available screen height
|
h<N>dp
Examples:
h720dp
h1024dp
etc.
|
Specifies a minimum screen height in dp units at which the resources should be used—defined by the <N> value. The system's corresponding value for the height changes when the screen's orientation switches between landscape and portrait to reflect the current actual height that's available for your UI.
Using this to define the height required by your layout is useful in the same way as w<N>dp is for defining the required width, instead of using both the screen size and orientation qualifiers. However, most apps won't need this qualifier, considering that UIs often scroll vertically and are thus more flexible with how much height is available, whereas the width is more rigid.
|
System will see:
layout-sw600dp>layout-land>layout
,so tablet layout put in layout-sw600dp
phone-land layout put in layout-land
other put in basic layout
new ,we create 3 layout folder,SO,this is the time to create the layout.xml
now,we create fragment_detail_wide.xml to the layout-sw600dp and layout-land file.
here is the content
<LinearLayout xmlns:android="http://schemas.android.com/apk/res/android"
xmlns:tools="http://schemas.android.com/tools" android:layout_width="match_parent"
android:layout_height="match_parent" android:paddingLeft="@dimen/activity_horizontal_margin"
android:paddingRight="@dimen/activity_horizontal_margin"
android:paddingTop="@dimen/activity_vertical_margin"
android:paddingBottom="@dimen/activity_vertical_margin"
tools:context="com.example.android.sunshine.app.DetailActivity.DetailFragment">
<ScrollView
android:layout_width="match_parent"
android:layout_height="wrap_content"
android:id="@+id/scrollView" >
<LinearLayout
android:orientation="horizontal"
android:layout_width="match_parent"
android:layout_height="match_parent">
<LinearLayout
android:orientation="vertical"
android:layout_width="0dp"
android:layout_height="match_parent"
android:layout_weight="1">
<TextView
android:layout_width="wrap_content"
android:layout_height="wrap_content"
android:text="New Text"
android:id="@+id/detail_frienddateVIew" />
<TextView
android:layout_width="wrap_content"
android:layout_height="wrap_content"
android:text="New Text"
android:id="@+id/detail_dateView" />
</LinearLayout>
<LinearLayout
android:orientation="vertical"
android:layout_width="0dp"
android:layout_height="match_parent"
android:layout_weight="1">
<TextView
android:layout_width="wrap_content"
android:layout_height="wrap_content"
android:text="New Text"
android:id="@+id/detail_high" />
<TextView
android:layout_width="wrap_content"
android:layout_height="wrap_content"
android:text="New Text"
android:id="@+id/detailMin" />
<TextView
android:layout_width="wrap_content"
android:layout_height="wrap_content"
android:text="New Text"
android:id="@+id/detail_humadity" />
<TextView
android:layout_width="wrap_content"
android:layout_height="wrap_content"
android:text="New Text"
android:id="@+id/detail_wind" />
<TextView
android:layout_width="wrap_content"
android:layout_height="wrap_content"
android:text="New Text"
android:id="@+id/detail_presure" />
</LinearLayout>
<LinearLayout
android:orientation="vertical"
android:layout_width="0dp"
android:layout_height="match_parent"
android:layout_weight="1">
<ImageView
android:layout_width="match_parent"
android:layout_height="wrap_content"
android:id="@+id/detail_iconView"
android:src="@mipmap/ic_launcher" />
<TextView
android:layout_width="match_parent"
android:layout_height="wrap_content"
android:text="New Text"
android:gravity="center"
android:id="@+id/detail_weatherdesc" />
</LinearLayout>
</LinearLayout>
</ScrollView>
</LinearLayout>
However,the app will not use thid,it is because in our code.we only use R.layout.fragment_detail
Step1:create the value folder
for layout-sw600dp
create res/values-sw600dp
for layout-land
create res/values-land
Step2:create layout.xml in both file
<resources>
<item name="fragment_detail" type="layout">@layout/fragment_detail_wide</item>
</resources>
now,although we only use R.layout.fragment_detail,the system still can access fragment_detail_wide.xml
The concept is:
if we a in tablet,
access R.layout.fragment_detail,system first found,the value-sw600dp(it is because we are in tablet),find R.layout.fragment_detail re direct to layout/fragment_detail_wide
Than ,system try to find fragment_detail_wide.xml in layout-w600dp,find!!!,so use the fragment_detail_wide.xml in layout-w600dp
what can we do if we want in the tablet node ,the forecasdt at today like other day,not so the color icon?


ConceptL:Mainactivity find Fragment,tell fragment,fragment tell adapter
Now is the Visual part
go to
http://pomprogrammer.blogspot.com/2016/01/android-visual-part-make-app-more.html