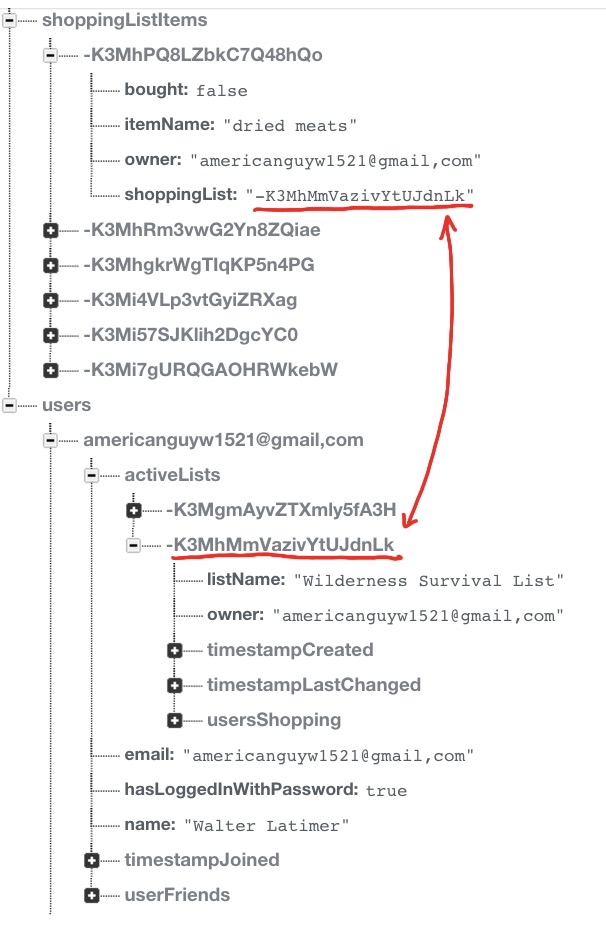
new version explan: http://litotom.com/2016/05/20/2016-firebase/
we want to buld a shopping App
we want to buld a shopping App
all the code in github:https://github.com/udacity/ShoppingListPlusPlus
start code:download it:https://github.com/udacity/ShoppingListPlusPlus/tree/1.00_version_0.1_start_code
Create a App on fire base
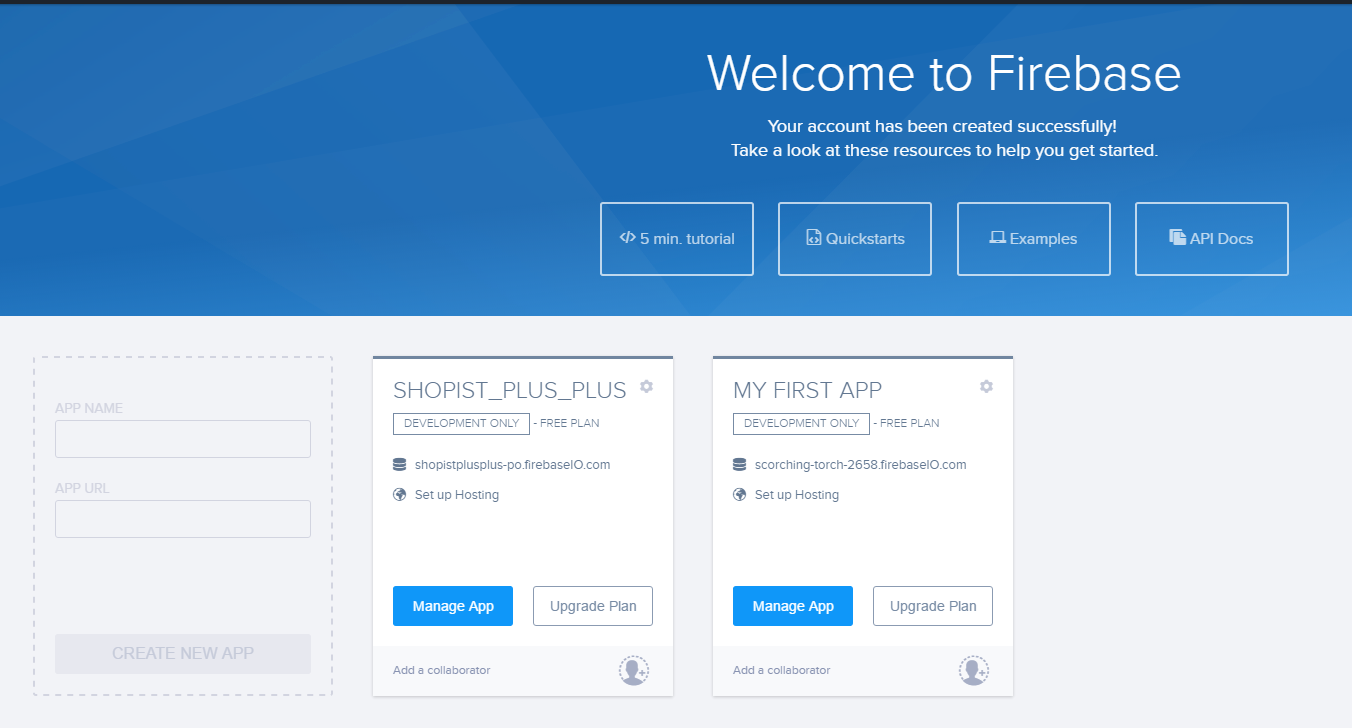
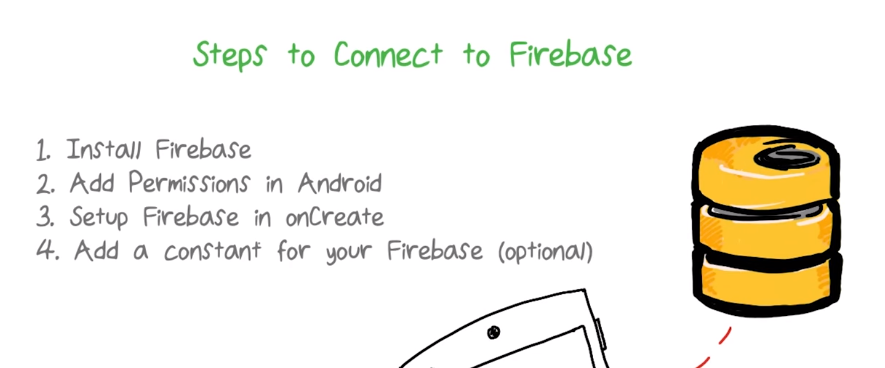
Connect to Firebase
1.
dependencies {
compile 'com.firebase:firebase-client-android:2.3.1+'
and
add the below because need to exclude the duplicate file
android {
...
packagingOptions {
exclude 'META-INF/LICENSE'
exclude 'META-INF/LICENSE-FIREBASE.txt'
exclude 'META-INF/NOTICE'
}
}
|
2
<uses-permission android:name="android.permission.INTERNET" />
|
3.
onCreate in ShoppingListApplication.java
public class ShoppingListApplication extends android.app.Application {
@Override
public void onCreate() {
super.onCreate();
Firebase.setAndroidContext(this);
// other setup code
}
}
|
4.do if you want to share the code on the github,and dpn’t want other people lnow your URL
in program
public static final String FIREBASE_URL= BuildConfig.UNIQUE_FIREBASE_ROOT_URL;
|
app gradle
buildTypes.each{
it.buildConfigField 'String','UNIQUE_FIREBASE_ROOT_URL' , UniqueFIREBaseRootUrl
}
|
grandle.properties
UniqueFIREBaseRootUrl="https://shopistplusplus-po.firebaseio.com/"
|
Write value to the Firbase
the data save in Firebase use key-value pair


Now,we want to cretae a Lista name and save on Firebase
in AddListDialogFragment
public void addShoppingList() {
Firebase ref=new Firebase(Constants.FIREBASE_URL);
ref.child("listName").setValue(mEditTextListName.getText().toString());
}
|
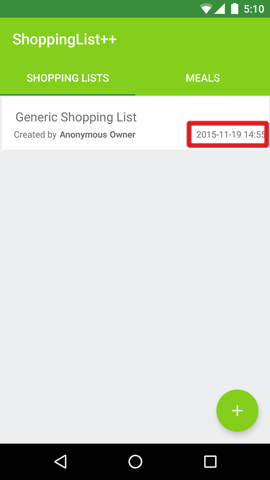
Finally,we can see the value on yhe Firebase data base

no need any async task and deal with thread!!!
Firebase Data Basics
save as Json:
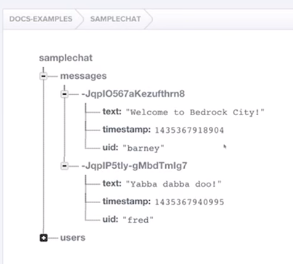
each key has its own link.
Firebase Terminology
Firebase App Backend - The Firebase application that you made on the website https://www.firebase.com/account/#/
Firebase Database - This entire JSON object which is part of the Firebase app backend.
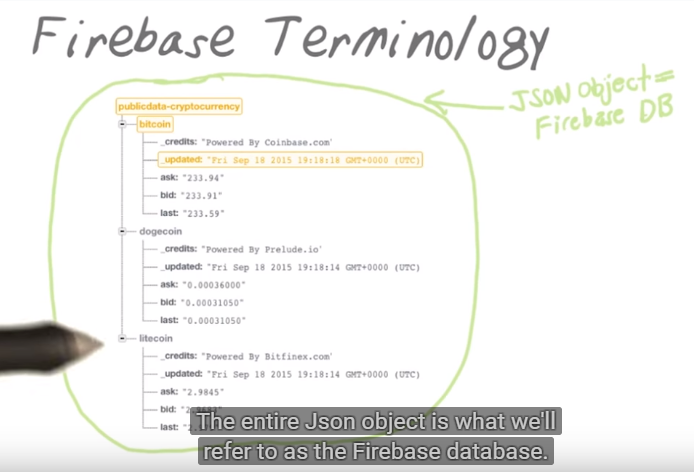
Key - A node name or key in Firebase. It is on the left of it's value.
List, Map, Collection - A key/value pair that has multiple children.

Location - URL location of a node in the Firebase database.
Node - A specific location that has a key/value pair.
Object - A key value pair that represents a key and all the data in an analogous Java object.
Property - A key/value pair that holds a single value.
Root Node - The top level node of a Firebase database. Its' location will be your base Firebase URL (the url you see when you first click on your Firebase App Backend).
Value - The actual value of a certain location in the Firebase database. This can be a string, number, boolean or a Firebase object.
Get dat from the database
Concpet
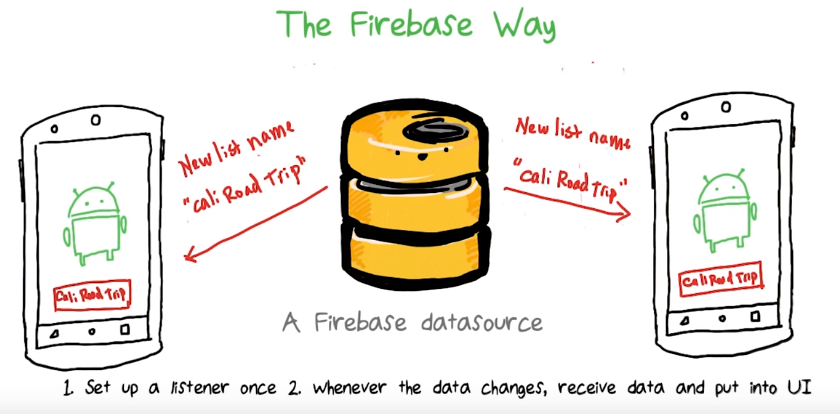
Firebase use listen method.
choose a node to listen
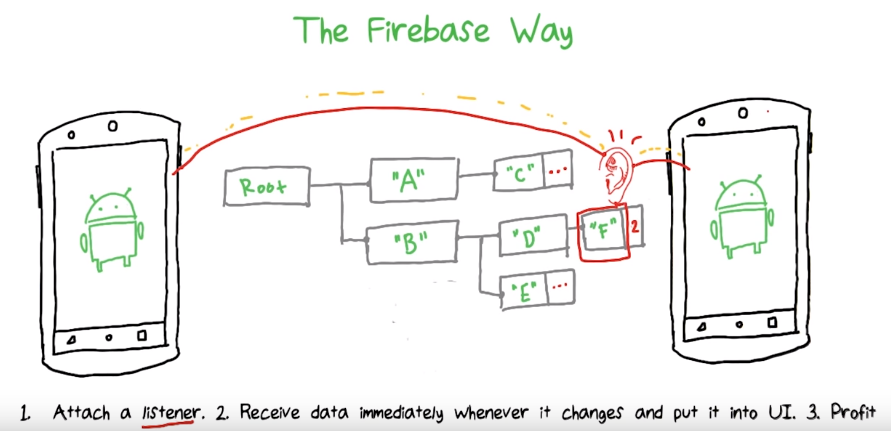

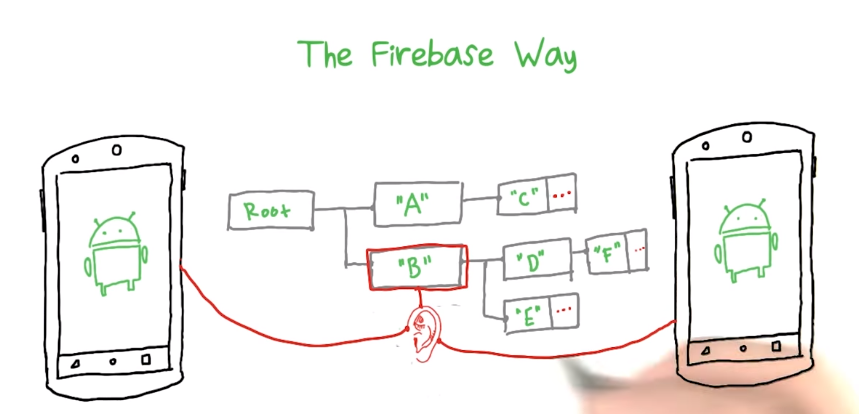
listen at B,E change, also sent to the other device
Code:
Firebase listNameRef = new Firebase(Constants.FIREBASE_URL).child("listName");
listNameRef.addValueEventListener(new ValueEventListener() {
@Override
public void onDataChange(DataSnapshot dataSnapshot) {
String name = (String) dataSnapshot.getValue();
mTextViewListName.setText(name);
}
@Override
public void onCancelled(FirebaseError firebaseError) {
}
});
|
explain .
add a listener to a node
when data change on this Node,onDataChange call
and will get the dataSnapshot

from the data scapshot,we got the value,and other information of the database start from the node we listen
Save a object on a Fire Base database
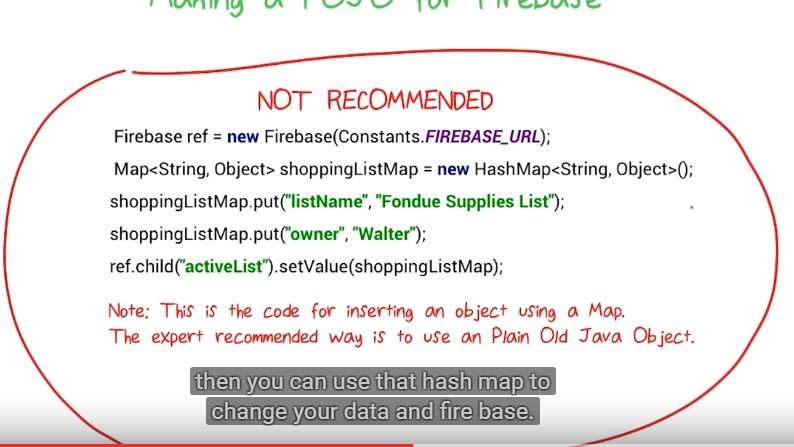
very not good
use Plain Old Java Objects

example:
public class ShoopingList {
String listname;
String owner;
public ShoopingList() {
}
public ShoopingList(String listname, String owner) {
listname = listname;
this.owner = owner;
}
public String getListname() {
return listname;
}
public String getOwner() {
return owner;
}
}
|
change the add Shop List
public void addShoppingList() {
Firebase ref = new Firebase(Constants.FIREBASE_URL);
String userEnterdName = mEditTextListName.getText().toString();
ShoopingList shoplist = new ShoopingList(userEnterdName, "AnonymousName");
ref.child("activeList").setValue(shoplist);
}
|
cahnge the read code
ShoopingList shoopinglist = dataSnapshot.getValue(ShoopingList.class);
mTextViewListName.setText(shoopinglist.getListname());
|
get back the ShoopingList object
in ShoppingListsFragment
public void onDataChange(DataSnapshot dataSnapshot) {
ShoopingList shoopinglist = dataSnapshot.getValue(ShoopingList.class);
mTextViewListName.setText(shoopinglist.getListname());
mTextViewCreatedBy.setText(shoopinglist.getOwner());
}
private void initializeScreen(View rootView) {
mListView = (ListView) rootView.findViewById(R.id.list_view_active_lists);
mTextViewListName = (TextView) rootView.findViewById(R.id.text_view_list_name);
mTextViewCreatedBy = (TextView) rootView.findViewById(R.id.text_view_created_by_user);
}
|
EX1 add Last Edited Timestamp Field Spec
notes
Use ServerValue.TIMESTAMP
Whenever you're trying to set the "current time" on Firebase you should pass Firebase the Map constant ServerValue.TIMESTAMP. When Firebase receives this map, it changes it to a long value representing the current time the data was recieved and saved in Firebase. You might be wondering why you shouldn't just get the time from the client. If you use a time you take from the client (such as a value from the Calendar class) it will always be the time that the data was sent from the client. Since the time it takes for data to travel from the client to server can vary wildly depending on the client's internet connection, the client side timestamp can be pretty inaccurate in relation to when the data was actually recorded in the server. For more information about ServerValue.TIMESTAMP you can read about it in the docs.
How to Use ServerValue.TIMESTAMP
Using ServerValue.TIMESTAMP in a POJO is currently not trivial. This is because the timestamp is passed into Firebase as a HashMap but it is converted to a long value on the server. This Stackoverflow post I wrote describes the issue in details and provides sample code which you can base your answer off of.
Code Snippets
|
Now ,we wnat to add the detail screen:
 V 0.2.01 Add The Detail Screen
Code Step 2.01_the_detail_screen-quiz
Main Goal
Add a Shopping List details screen to the app. This screen should display a single Shopping List object's information.
Specifications
Steps
Wireframes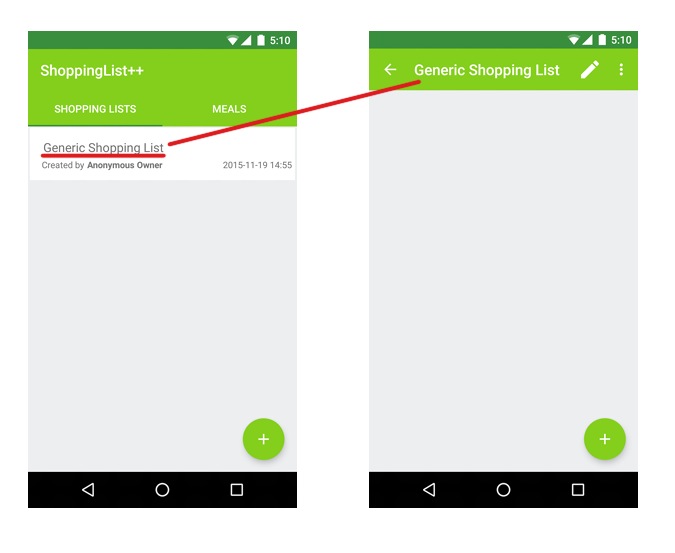 Hints and Tips
|
The 5 Write Methods
setValue( )
|
Write or replace data to a defined path, like messages/users/<username>
|
updateChildren( )
|
Update some of the keys for a defined path without replacing all of the data
|
push( )
|
Add to a list of data in your Firebase database. Every time you call push() Firebase generates a unique ID, like messages/users/<unique-user-id>/<username>
|
runTransaction( )
|
Use our transactions feature when working with complex data that could be corrupted by concurrent updates
|
Edit Shopping List Name
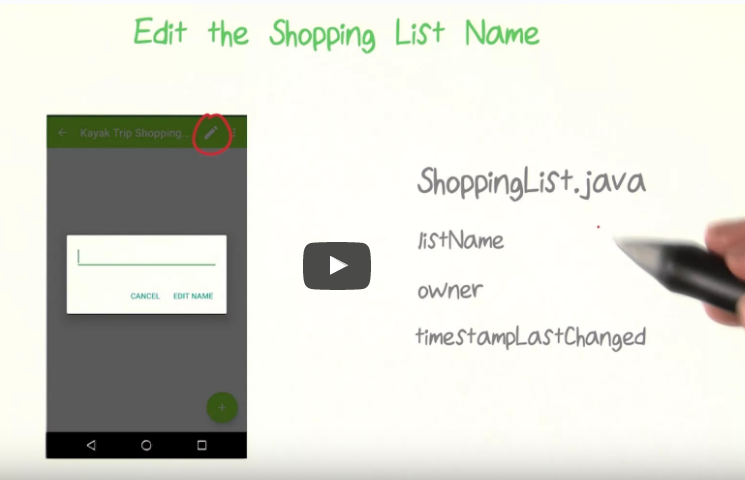
only list name and time stamplast will change
Using updateChildren
Using updateChildren
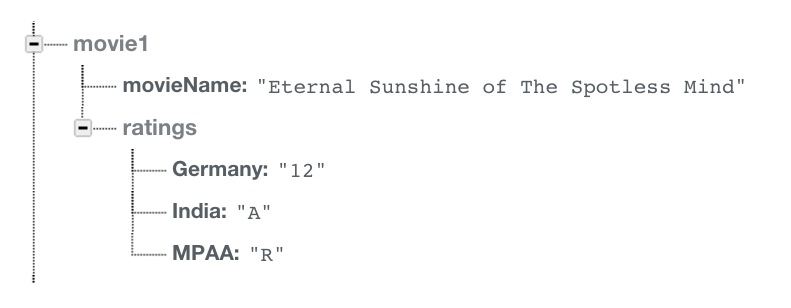
As mentioned you can use updateChildren to update the shopping list name. To do this you can either update a POJO for update via a hash map. In general it is better and recommended to stick to POJOs because it is easy to accidentally malform data when using hash maps. But when dealing with ServerValue.TIMESTAMP, you might find yourself needing to explicitly create a HashMap. When you have multiple "levels" of data in a hash map, you'll need to nest a hash map within a hash map. Here is how it would be done:
Firebase ref = new Firebase(Constants.FIREBASE_URL).child("movie1");
HashMap <String, Object> movieUpdatedProperties = new HashMap<>(); movieUpdatedProperties.put("movieName", "Eternal Sunshine of The Spotless Mind"); HashMap<String, Object> ratingsMap = new HashMap<>(); ratingsMap.put("MPAA", "R"); ratingsMap.put("India", "A"); ratingsMap.put("Germany", "12"); movieUpdatedProperties.put("ratings", ratingsMap); ref.updateChildren(movieUpdatedProperties);
becomes...
 |
Exercise of update Children
 V 0.2.03 Edit the List Name
Code Step 2.03_edit_shopping_list_name-quiz
Main Goal
Let the user edit the name of a shopping list on the shopping list details screen.
Specifications
Steps
Wireframes Technical Notes
Using updateChildren
As mentioned you can use updateChildren to update the shopping list name. To do this you can either update a POJO for update via a hash map. In general it is better and recommended to stick to POJOs because it is easy to accidentally malform data when using hash maps. But when dealing with ServerValue.TIMESTAMP, you might find yourself needing to explicitly create a HashMap. When you have multiple "levels" of data in a hash map, you'll need to nest a hash map within a hash map. Here is how it would be done:
Firebase ref = new Firebase(Constants.FIREBASE_URL).child("movie1");
HashMap <String, Object> movieUpdatedProperties = new HashMap<>(); movieUpdatedProperties.put("movieName", "Eternal Sunshine of The Spotless Mind"); HashMap<String, Object> ratingsMap = new HashMap<>(); ratingsMap.put("MPAA", "R"); ratingsMap.put("India", "A"); ratingsMap.put("Germany", "12"); movieUpdatedProperties.put("ratings", ratingsMap); ref.updateChildren(movieUpdatedProperties);
becomes...

Learn about ServerValue.TIMESTAMP
The Java constant Firebase.ServerValue.TIMESTAMP, gives the exact time when the data reaches and is stored in the server. This is used for the timestampLastChanged variable. You should read up on its' usage in the first On Your Own activity from version 0.1.
Hints and Tips
|
soultion is here:https://github.com/udacity/ShoppingListPlusPlus/tree/2.04_edit_shopping_list_name-solution
Completion Callbacks
the data save or not?


Have Differenet List
how ?

because push can :
Add to a list of data in your Firebase database. Every time you call push() Firebase generates a unique ID, like messages/users/<unique-user-id>/<username>
What does push do?

it only gererated the key,show we need to use set to add the value
The code of implement the push
Firebase ref = new Firebase(Constants.FIREBASE_URL);
ref.child(“activeLists”).push().setValue(new ShopplisgList()).
//the ShopplisgList is a object that content a the list name an other property
|
EX Add a New Shopping List
V 0.2.05 Add a New Shopping List
Code Step 2.05_add_a_new_shopping_list-quiz
Main Goal
When the user presses the green + button to add a new list, it should create an entirely new list and add it to a list of shopping lists in the Firebase database. These lists should keep track of when they were created.
Specifications
Steps
Data schema
When you're done the data schema should look something like this:
 Technical Notes
How Push IDs are generated
Hints and Tips
Code Snippets
Here is some generic code adding a Message POJO to a database, using push:
Firebase newRef = rootRef.push();
Message m = new Message("Lyla", "Hello World"); newPostRef.setValue(m); |
read will have some problem
The 3 Ways to Add Read Listeners
- addValueEventListener
- addChildEventListener
- addListenerForSingleValueEvent
addValueEventListener
it listener a node,if under the node,hsa any value changed(include the children),it resturn the whole node snapshot
for example.if listen at posts, when author:”gracehop change to ”gracehop2, we will get the snapshot include the whole node,include JRHTHaKuITFIhnj02kE and JRHTHaIs-jNPLXOQivY
addChildEventListener
if listen at posts,when author:”gracehop change to ”gracehop2,only return the snapshot of JRHTHaIs-jNPLXOQivY,it is because only the children JRHTHaIs-jNPLXOQivY has change,JRHTHaKuITFIhnj02kE no change
addListenerForSingleValueEvent
almost equal to addValueEventListener,but only just make only one read
Conclusion of read and write

Event Guarantees in FireBase
1.Event and local state change
all chang do in yout app locally,will immediately fire event
eaample:
when A change to A1,will have a Event “A child node waschanged ready to fire, however there is no connectivity now,so can sed out.
 when connectivity is reestablished,the event fire to the firebase database
2.Eventual consistency

3.event order

a single cient write 3 different in order,other client will receive the event in the same order
4.Vlue event trigger last
if listen for the same location

Debugging with Log Level Debug
public class ShoppingListApplication extends android.app.Application {
@Override
public void onCreate() {
super.onCreate();
/* Initialize Firebase */
Firebase.setAndroidContext(this);
Firebase.getDefaultConfig().setLogLevel(Logger.Level.DEBUG);
}
}
|
show the Log at debug level
05-04 21:28:14.188 3431-3431/com.udacity.firebase.shoppinglistplusplus I/AppCompatDelegate: The Activity's LayoutInflater already has a Factory installed so we can not install AppCompat's
05-04 21:28:14.267 3431-3453/com.udacity.firebase.shoppinglistplusplus W/EGL_emulation: eglSurfaceAttrib not implemented
05-04 21:28:14.267 3431-3453/com.udacity.firebase.shoppinglistplusplus W/OpenGLRenderer: Failed to set EGL_SWAP_BEHAVIOR on surface 0xa181e060, error=EGL_SUCCESS
05-04 21:28:20.320 3431-3457/com.udacity.firebase.shoppinglistplusplus D/RepoOperation: set: /activeLists/-KGvx6QlJsdnrbAZWp5H
05-04 21:28:20.320 3431-3457/com.udacity.firebase.shoppinglistplusplus D/DataOperation: set: /activeLists/-KGvx6QlJsdnrbAZWp5H {
listName=AKB
owner=Anonymous Owner
timestampCreated={
timestamp={.sv=timestamp}
}
timestampLastChanged={
timestamp={.sv=timestamp}
}
}
05-04 21:28:20.321 3431-3457/com.udacity.firebase.shoppinglistplusplus D/Connection: conn_1 - Sending data: {d={a=p, r=2, b={d={owner=Anonymous Owner, listName=AKB, timestampLastChanged={timestamp={.sv=timestamp}}, timestampCreated={timestamp={.sv=timestamp}}}, p=/activeLists/-KGvx6QlJsdnrbAZWp5H}}, t=d}
|
Firebase UI and Lists
has change,Firebase DB update the Firebase array,Firebase array notify dataset changed to the FirebaseLIst Adapter,FirebaseLIst Adapter control how to show the data in a list view
use FirebaseListAdapter

we need to overwite the populateView method
Important code
1.Create a layou file that use to show the iteam,R.layout.single_active_list
2. craete a adapter class extends FirebaseListAdapter<ShoppingList>
public class ActiveListAdapter extends FirebaseListAdapter<ShoppingList> {
/**
* Public constructor that initializes private instance variables when adapter is created
*/
public ActiveListAdapter(Activity activity, Class<ShoppingList> modelClass, int modelLayout,
Query ref) {
super(activity, modelClass, modelLayout, ref);
this.mActivity = activity;
}
/**
* Protected method that populates the view attached to the adapter (list_view_active_lists)
* with items inflated from single_active_list.xml
* populateView also handles data changes and updates the listView accordingly
*/
@Override
protected void populateView(View view, ShoppingList list) {
// TODO This is where you need to populate the single_active_list layout with
// the data in the current shopping list. It should be similar to what you
// were displaying in ShoppingListsFragment
TextView tvListName = (TextView) view.findViewById(R.id.text_view_list_name);
TextView tvCreatedbyName = (TextView) view.findViewById(R.id.text_view_created_by_user);
tvListName.setText(list.getListName());
tvCreatedbyName.setText(list.getOwner());
}
}
|
3.set the adapter to the List View
Firebase refListName = new Firebase(Constants.FIREBASE_URL).child(Constants.FIREBASE_LOCATION_ACTIVE_LISTS);
ActiveListAdapter adapter = new ActiveListAdapter(getActivity(), ShoppingList.class, R.layout.single_active_list, refListName);
mListView.setAdapter(adapter);
|
4. clean up when activity destory
@Override
protected void onDestroy() {
super.onDestroy();
adapter .cleanup();
}
|
EX Add a FirebaseListAdapter
 V 0.2.07 Add a FirebaseListAdapter
Code Step 2.07_the_firebase_list_adapter_repo-quiz
Main Goal
Using the FirebaseUI library, add a list view containing all of the ShoppingLists in your Firebase database.
Specifications
Wireframes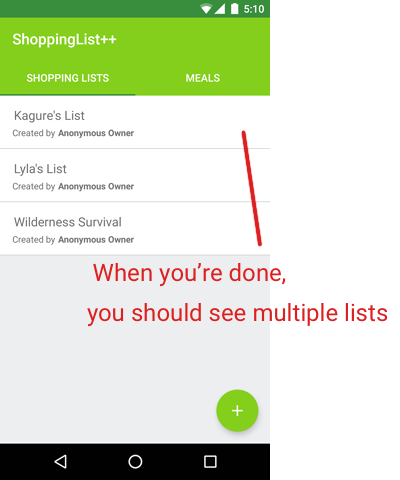 |
This is the anser :https://github.com/udacity/ShoppingListPlusPlus/tree/2.08_the_firebase_list_adapter_repo-solution
but now,it can’t click,think about why?
we can set a setOnItemClickListener to the Lisview,than get the ShoppingList object directly at the Detailactivity.
However !!!!
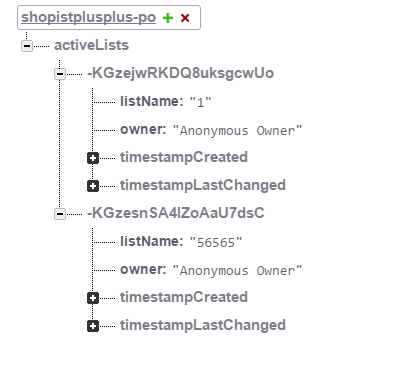
the tabkle like this now,if we want to get the shopping list object that have name “56565”,we need to know it s pushID.
How to get the pushID when using FirebaseListAdapter and Listview?
get the pushID when using FirebaseListAdapter and Listview
how
above as a example:
if we use activeList/activeLists as a location,the FirebaseListAdapter will get A array,every iteam in this array,Has a key(-KGzejwRKDQ8uksgcwUo) and a value (a shopping List object)
we can see FirebaseListAdapter has a method,call getRef(int position),can get back the FireBase at different position in the array,than use get Key get the key
public void onItemClick(AdapterView<?> parent, View view, int position, long id) {
Toast.makeText(getContext(), "Key" + " " + mActiveListAdapter.getRef(position).getKey(), Toast.LENGTH_SHORT).show();
|
EX
V 0.2.09 Send Over the Push ID
Code Step 2.09_send_over_the_push_id_spec-quiz
Main Goal
The user should be able to select any shopping list in the list view and then be taken to the detail screen for the shopping list they selected.
Specifications
Wireframes Hints and Tips
SKIP TO QUIZ
Quiz: Send Over The Push ID Spec
 SOLUTION - V 0.2.10 Send Over the Push ID
Code Diff 2.10_send_over_the_push_id_spec-solution
Main Goal
The user should be able to select any shopping list in the list view and then be taken to the detail screen for the shopping list they selected.
|
Remove A Shopping List
we only can remove the Shopping List from the Firebase database ,than the array hold by FireBase adapterFirebaseListAdapter will automatically sync to the Firebase database.Moreover,we have no method to access the array hold by the FirebaseListAdapter.

we call removeValue
Firebase ref = new Firebase(Constants.FIREBASE_URL_ACTIVE_LISTS).child(mListID);
ref.removeValue();
|
the value of -KGzesnSA4lZoAaU7dsC will delete
thevalue of -KGzesnSA4lZoAaU7dsC become null,show will will not see the key -KGzesnSA4lZoAaU7dsC in the table too!!!
EX
 V 0.2.11 Remove a Shopping List
Code Step 2.11_removing_a_shopping_list-quiz
Main Goal
Add the ability to delete the shopping list from the list detail screen.
Specifications
Wireframes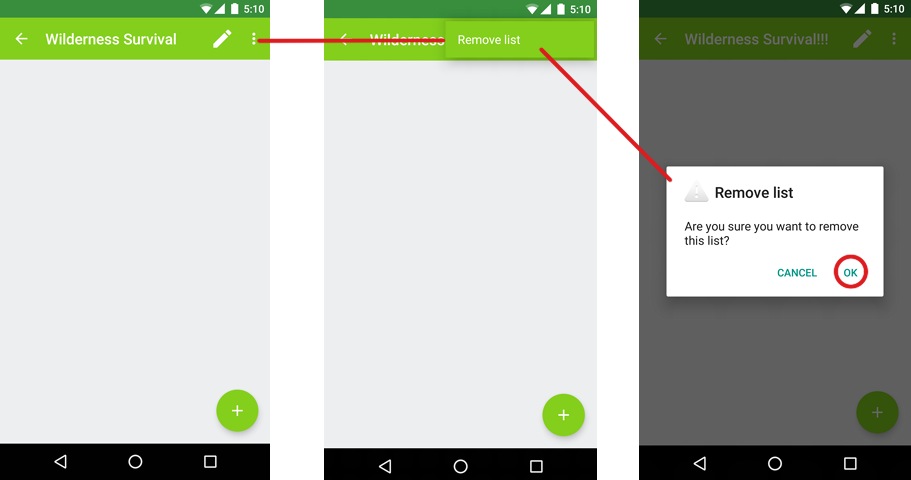 Hints and Tips
SKIP TO QUIZ
|
The iteam
create the object to represent to Iteam
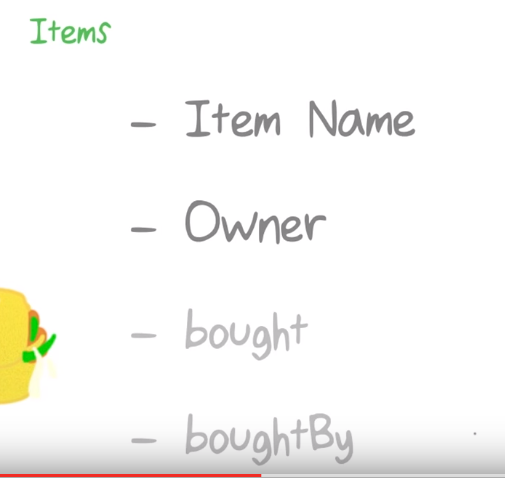

answer:https://github.com/udacity/ShoppingListPlusPlus/compare/2.13_items-quiz...2.14_items-solution
where to add the List item
A

B
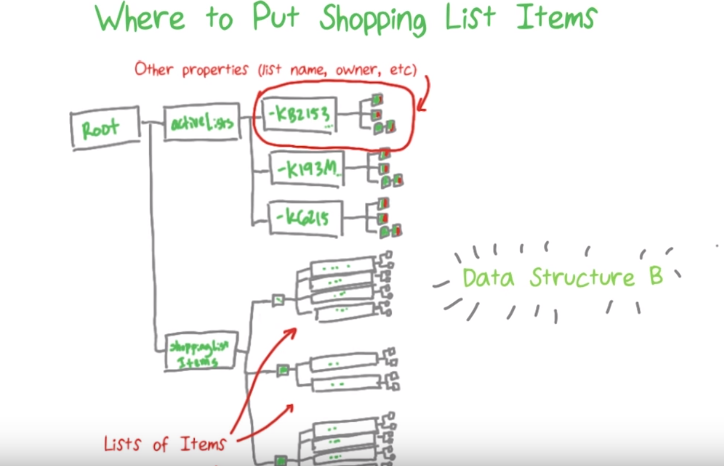
Question:
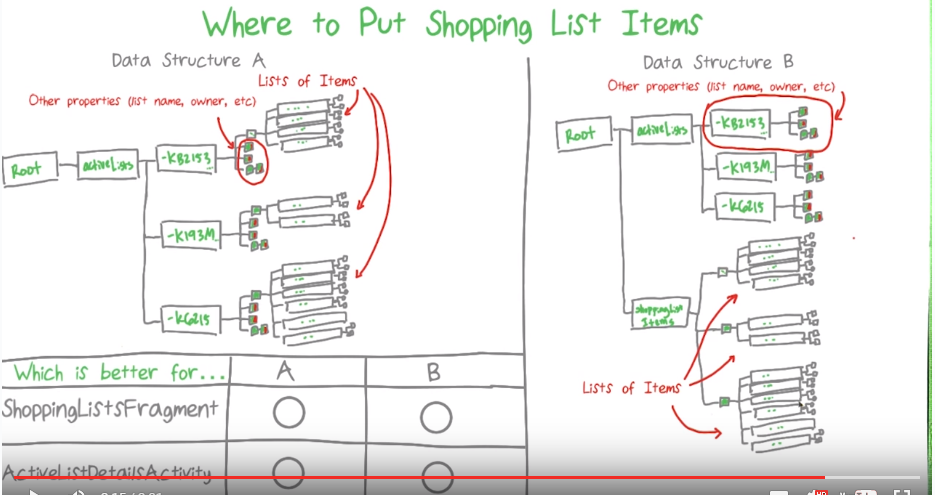
answer is:
ShoppingListsFragment B,it is becasue ShoppingListsFragment only need the Shopping list information ,use B will get little information sent from server to app.If it use A, the data that sent form server to app will more.
ActivelistDetailsActivity A,it is because it need the information the list and list iteam,if use B, need to add tow listener.
Overall,we should use B,it is becasue if the data is very big,the bad effect for send big data form FireBase database to app is bigger than add two listener,the listener is light.
Add Items to the List Spec
see this first,How to update at different location::https://www.firebase.com/blog/2015-09-24-atomic-writes-and-more.html
 V 0.2.15 Add Items to the List Detail Screen
Code Step 2.15_add_items_to_the_list_detail-quiz
Main Goal
Any user can add items, which are associated with a specific shopping list, to the Firebase database. These items are displayed on the Shopping List Details screen.
Specifications
Wireframes Data Schema
When you're done the data schema should look something like this:
 Technical Notes
Atomic Writes and Using ObjectMapper
For consistency, you might want to update multiple places in your Firebase database, all at the exact same momement. This is known as an atomic write, because all the locations in our database are updated at the same time and the write command is sent as one operation to the server. This is superior to calling setValue multiple times. This is because there is a small chance that something will happen when you're calling setValue multiple times (such as your phone losing internet connectivity) and that not all operations will make it to the database. This would cause data inconsistency.
Updating data in multiple location in a database automically can be done using the updateChildren method, as described here.updateChildren, though, currently doesn't support POJO's in the same way setValue does. Therefore, I have a work around that allows us to convert POJOs into Maps so that they can be used as part of a call to updateChildren. This uses Jackson'sObjectMapper class, which provides an easy way to convert a POJO style objects into Maps. Here is an example:
Message chatMessagePOJO = new Message("Lyla", "Hello World");
HashMap<String, Object> chatMessageMap = (HashMap<String, Object>) new ObjectMapper().convertValue(chatMessagePOJO, Map.class);
Once you've converted the data to a Map, it can be added to the HashMap passed to updateChildren. Note that if it's possible to do so without creating potential inconsistency issues, passing a POJO using setValue is always preferable to doing this conversion,
Passing Null to setValue and updateChildren
Note that passing null to setValue and updateChildren remove the value at that location. It is essentially the same as callingremoveValue.
Hints and Tips
SKIP TO QUIZ
|
Remove Event Listeners
why?if not remove,will make the phone warm,slow,memory lake.
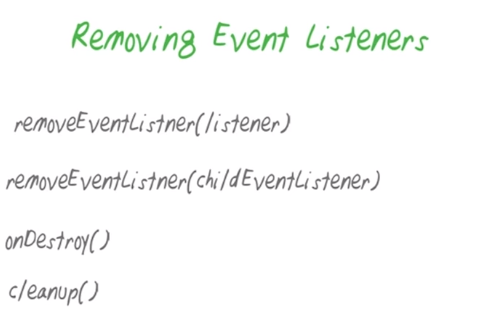
list adapter need to be clean up
remove at onDestroy
mActiveListRefListener = mActiveListRef.addValueEventListener(new ValueEventListener() {
|
Firebase authenciation

can use above acount to login
or
use emaill and password to login


when login, a Token will create
The below is the Authentication

createUser is create a new account with emaill and password
Enable Email and Password Login Provider
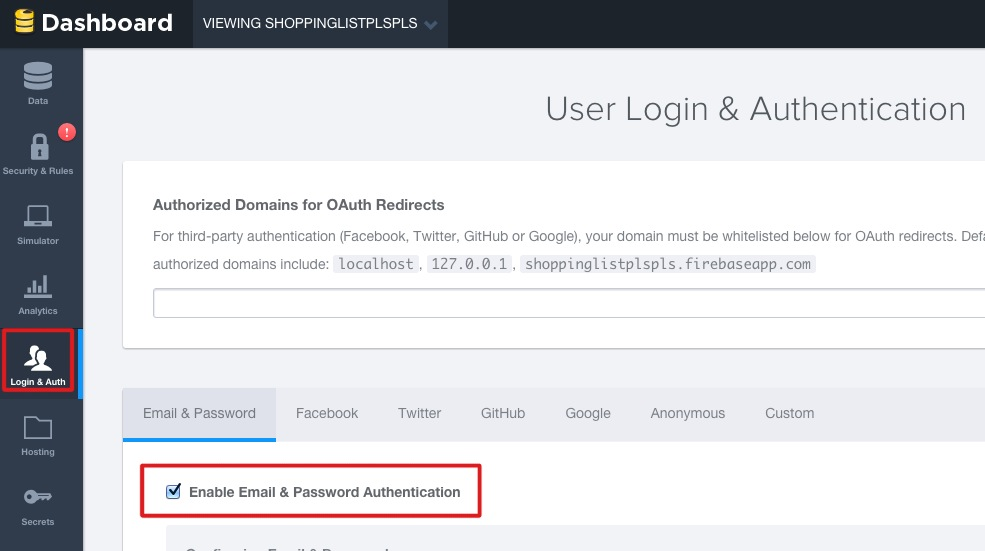
Create a user with email and password
when success lohgin,onSuccess excute,but we should not log in the use here,we should have a sperate activity to do that.
if login has error,onError will execute.
the error list:
the code that create a account with Email and password
Create a progress a dialog
mAuthProgressDialog mAuthProgressDialog = new ProgressDialog(this);
mAuthProgressDialog.setTitle(getString(R.string.progress_dialog_loading));
mAuthProgressDialog.setMessage(getString(R.string.progress_dialog_authenticating_with_firebase));
mAuthProgressDialog.setCancelable(false);
//show it
mAuthProgressDialog.show();
// dismiss it
mAuthProgressDialog.dismiss();
|
Check the input erro at the client side
email:
boolean isEmailValid(CharSequence email) {
return android.util.Patterns.EMAIL_ADDRESS.matcher(email).matches();
}
|
user name:
password:
TextView set error
mEditTextUsernameCreate.setError("Name should not empty");
|
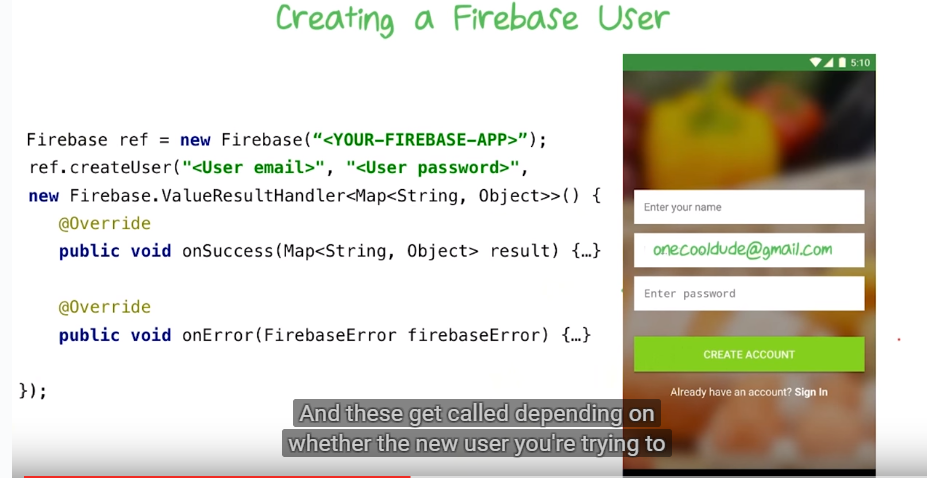
Creat the user
Firebase ref = new Firebase("https://<YOUR-FIREBASE-APP>.firebaseio.com");
ref.createUser("bobtony@firebase.com", "correcthorsebatterystaple", new Firebase ref = new Firebase("https://<YOUR-FIREBASE-APP>.firebaseio.com");
ref.createUser("bobtony@firebase.com", "correcthorsebatterystaple", new Firebase.ValueResultHandler<Map<String, Object>>() {
@Override
public void onSuccess(Map<String, Object> result) {
System.out.println("Successfully created user account with uid: " + result.get("uid"));
}
@Override
public void onError(FirebaseError firebaseError) {
// there was an error
}
});
|
EX
 V 0.3.01 Create a Firebase User
Code Step 3.01_creating_a_user-quiz
Main Goal
Finish the Create Account screen by adding the functionality to create a new user in the Firebase credentials store using Firebase's email and password provider.
Specifications
Wireframes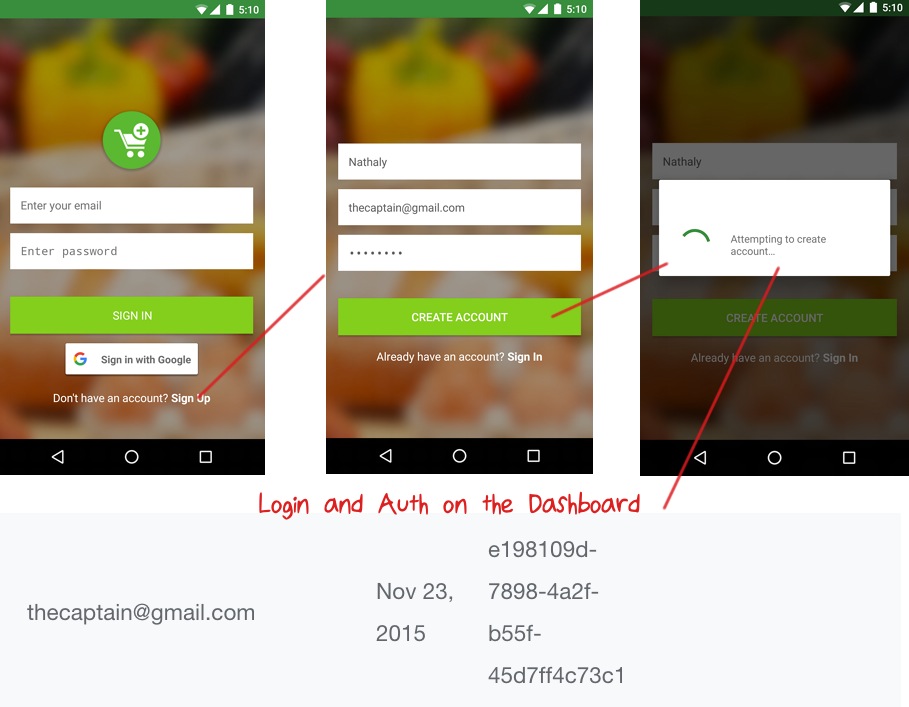 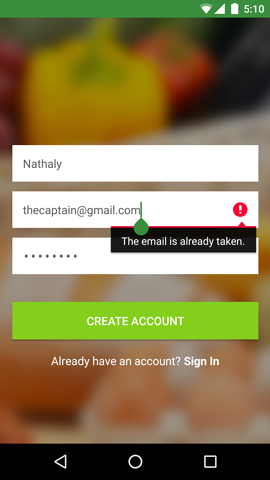 Technical Notes
Make sure you Enable to Email and Password provider
Use Google's Patterns to Match the email address
Check that the email matches Google's Patterns.EMAIL_ADDRESS. This should be a client side check that is done before any Firebase code.
setError
TextView's setError is a good way to visually show the user if something they typed in a EditText is wrong.
Hints and Tips
Code Snippets
Here is some generic user creation code:
Firebase ref = new Firebase("https://<YOUR-FIREBASE-APP>.firebaseio.com");
ref.createUser("bobtony@firebase.com", "correcthorsebatterystaple", new Firebase.ValueResultHandler<Map<String, Object>>() { @Override public void onSuccess(Map<String, Object> result) { System.out.println("Successfully created user account with uid: " + result.get("uid")); } @Override public void onError(FirebaseError firebaseError) { // there was an error } }); |
Logging In
Overview

we nly need to do is call authWithPasseord() and get thr AuthData object,other is do by Firease
code in login

some useful method in AuthData

getProvider told whick method to login,google,facengithub?
In code :Logging In
Firebase ref = new Firebase(Constants.FIREBASE_URL);
ref.authWithPassword(email, password, new Firebase.AuthResultHandler() {
@Override
public void onAuthenticated(AuthData authData) {
mAuthProgressDialog.dismiss();
Intent intent = new Intent(LoginActivity.this, MainActivity.class);
intent.setFlags(Intent.FLAG_ACTIVITY_NEW_TASK | Intent.FLAG_ACTIVITY_CLEAR_TASK);
startActivity(intent);
finish();
startActivity(intent);
}
@Override
public void onAuthenticationError(FirebaseError firebaseError) {
mAuthProgressDialog.dismiss();
Snackbar.make(activityloginLayout, firebaseError.getMessage(), Snackbar.LENGTH_SHORT).show();
}
});
|
EX:Log the user into Firebase using the Email and Password Provider.
 V 0.3.03 Logging In
Code Step 3.03_logging_in-quiz
Main Goal
Log the user into Firebase using the Email and Password Provider.
Specifications
Wireframes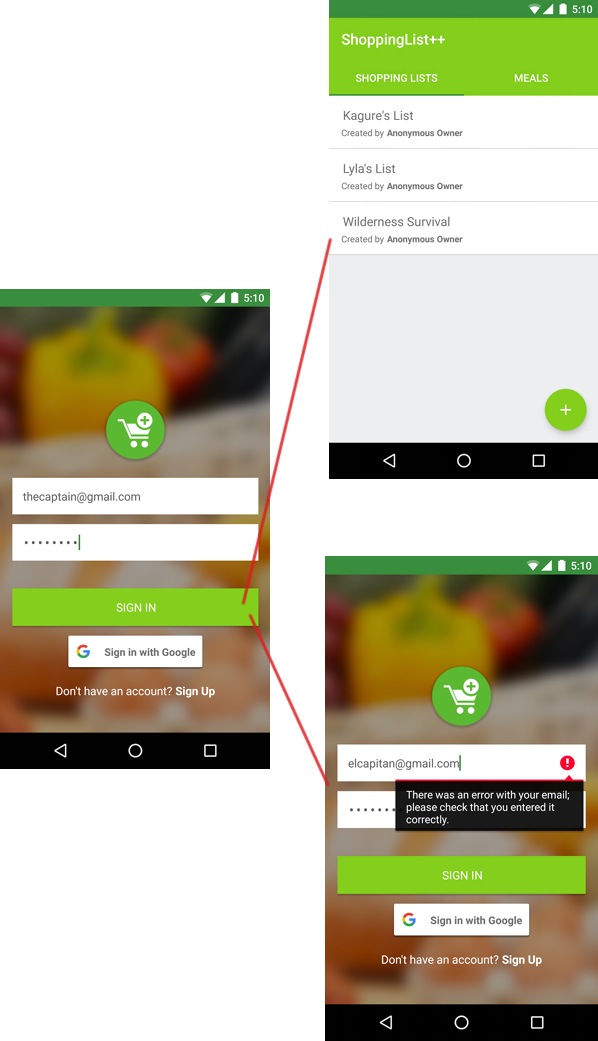 Hints and Tips
Code Snippets
Generic login code:
Firebase ref = new Firebase("https://<YOUR-FIREBASE-APP>.firebaseio.com");
ref.authWithPassword("bobtony@firebase.com", "correcthorsebatterystaple", new Firebase.AuthResultHandler() { @Override public void onAuthenticated(AuthData authData) { System.out.println("User ID: " + authData.getUid() + ", Provider: " + authData.getProvider()); } @Override public void onAuthenticationError(FirebaseError firebaseError) { // there was an error } }); |
Log in with Google+
Configuring Google Login
Let's walk through how to set up Google login. To incorperate Google login, you'll do two things. First is to make a configuration file for your project (this involves making a "Google App" and passing along a Android Sigining Certificate). Then you will go into the Firebase backend and give it the Client ID for you new Google application.
Generate the google-services.json Configuration File
Follow the first half of the instructions on the Google Developer webpage to get a google-services configuration file. You will need to:
After you are done adding the configuration file, you do NOT need to complete the other steps on the Google Developer webpage. You can move to the next section, "Add the Client ID to Firebase" now.
Add the Client ID to Firebase
Next, as described in the Firebase Google login documentation, head on over to the Login & Authsection in your App Dashboard. Enable Google authentication and then copy your Google application Client ID into the Firebase.
|
Goal:

codee:
Gradle File
classpath 'com.google.gms:google-services:1.5.0'
|
add the plugin to your app-level build.gradle:
apply plugin: 'com.google.gms.google-services'
|
Then in your app-level build.gradle file, declare Google Play Services as a dependency:
apply plugin: 'com.android.application'
...
dependencies {
compile 'com.google.android.gms:play-services:7.5.0'
}
|
Update the Manifest File
In your AndroidManifest.xml add the following permissions.
<uses-permission android:name="android.permission.GET_ACCOUNTS" />
<uses-permission android:name="android.permission.USE_CREDENTIALS" />
|
How to get the token,also can see:https://gist.github.com/ianbarber/9607551
/**
* Represents Sign in screen and functionality of the app
*/
public class LoginActivity extends BaseActivity {
private static final String LOG_TAG = LoginActivity.class.getSimpleName();
/* A dialog that is presented until the Firebase authentication finished. */
private ProgressDialog mAuthProgressDialog;
/* References to the Firebase */
private Firebase mFirebaseRef;
private EditText mEditTextEmailInput, mEditTextPasswordInput;
/**
* Variables related to Google Login
*/
/* A flag indicating that a PendingIntent is in progress and prevents us from starting further intents. */
private boolean mGoogleIntentInProgress;
/* Request code used to invoke sign in user interactions for Google+ */
public static final int RC_GOOGLE_LOGIN = 1;
/* A Google account object that is populated if the user signs in with Google */
GoogleSignInAccount mGoogleAccount;
@Override
protected void onCreate(Bundle savedInstanceState) {
super.onCreate(savedInstanceState);
setContentView(R.layout.activity_login);
/**
* Create Firebase references
*/
mFirebaseRef = new Firebase(Constants.FIREBASE_URL);
/**
* Link layout elements from XML and setup progress dialog
*/
initializeScreen();
/**
* Call signInPassword() when user taps "Done" keyboard action
*/
mEditTextPasswordInput.setOnEditorActionListener(new TextView.OnEditorActionListener() {
@Override
public boolean onEditorAction(TextView textView, int actionId, KeyEvent keyEvent) {
if (actionId == EditorInfo.IME_ACTION_DONE || keyEvent.getAction() == KeyEvent.ACTION_DOWN) {
signInPassword();
}
return true;
}
});
}
@Override
protected void onResume() {
super.onResume();
}
@Override
public void onPause() {
super.onPause();
}
/**
* Override onCreateOptionsMenu to inflate nothing
*
* @param menu The menu with which nothing will happen
*/
@Override
public boolean onCreateOptionsMenu(Menu menu) {
return true;
}
/**
* Sign in with Password provider when user clicks sign in button
*/
public void onSignInPressed(View view) {
signInPassword();
}
/**
* Open CreateAccountActivity when user taps on "Sign up" TextView
*/
public void onSignUpPressed(View view) {
Intent intent = new Intent(LoginActivity.this, CreateAccountActivity.class);
startActivity(intent);
}
/**
* Link layout elements from XML and setup the progress dialog
*/
public void initializeScreen() {
mEditTextEmailInput = (EditText) findViewById(R.id.edit_text_email);
mEditTextPasswordInput = (EditText) findViewById(R.id.edit_text_password);
LinearLayout linearLayoutLoginActivity = (LinearLayout) findViewById(R.id.linear_layout_login_activity);
initializeBackground(linearLayoutLoginActivity);
/* Setup the progress dialog that is displayed later when authenticating with Firebase */
mAuthProgressDialog = new ProgressDialog(this);
mAuthProgressDialog.setTitle(getString(R.string.progress_dialog_loading));
mAuthProgressDialog.setMessage(getString(R.string.progress_dialog_authenticating_with_firebase));
mAuthProgressDialog.setCancelable(false);
/* Setup Google Sign In */
setupGoogleSignIn();
}
/**
* Sign in with Password provider (used when user taps "Done" action on keyboard)
*/
public void signInPassword() {
String email = mEditTextEmailInput.getText().toString();
String password = mEditTextPasswordInput.getText().toString();
/**
* If email and password are not empty show progress dialog and try to authenticate
*/
if (email.equals("")) {
mEditTextEmailInput.setError(getString(R.string.error_cannot_be_empty));
return;
}
if (password.equals("")) {
mEditTextPasswordInput.setError(getString(R.string.error_cannot_be_empty));
return;
}
mAuthProgressDialog.show();
mFirebaseRef.authWithPassword(email, password, new MyAuthResultHandler(Constants.PASSWORD_PROVIDER));
}
/**
* Handle user authentication that was initiated with mFirebaseRef.authWithPassword
* or mFirebaseRef.authWithOAuthToken
*/
private class MyAuthResultHandler implements Firebase.AuthResultHandler {
private final String provider;
public MyAuthResultHandler(String provider) {
this.provider = provider;
}
/**
* On successful authentication call setAuthenticatedUser if it was not already
* called in
*/
@Override
public void onAuthenticated(AuthData authData) {
mAuthProgressDialog.dismiss();
Log.i(LOG_TAG, provider + " " + getString(R.string.log_message_auth_successful));
if (authData != null) {
/* Go to main activity */
Intent intent = new Intent(LoginActivity.this, MainActivity.class);
intent.setFlags(Intent.FLAG_ACTIVITY_NEW_TASK | Intent.FLAG_ACTIVITY_CLEAR_TASK);
startActivity(intent);
finish();
}
}
@Override
public void onAuthenticationError(FirebaseError firebaseError) {
mAuthProgressDialog.dismiss();
/**
* Use utility method to check the network connection state
* Show "No network connection" if there is no connection
* Show Firebase specific error message otherwise
*/
switch (firebaseError.getCode()) {
case FirebaseError.INVALID_EMAIL:
case FirebaseError.USER_DOES_NOT_EXIST:
mEditTextEmailInput.setError(getString(R.string.error_message_email_issue));
break;
case FirebaseError.INVALID_PASSWORD:
mEditTextPasswordInput.setError(firebaseError.getMessage());
break;
case FirebaseError.NETWORK_ERROR:
showErrorToast(getString(R.string.error_message_failed_sign_in_no_network));
break;
default:
showErrorToast(firebaseError.toString());
}
}
}
/**
* Helper method that makes sure a user is created if the user
* logs in with Firebase's email/password provider.
*
* @param authData AuthData object returned from onAuthenticated
*/
private void setAuthenticatedUserPasswordProvider(AuthData authData) {
}
/**
* Helper method that makes sure a user is created if the user
* logs in with Firebase's Google login provider.
*
* @param authData AuthData object returned from onAuthenticated
*/
private void setAuthenticatedUserGoogle(AuthData authData) {
}
/**
* Show error toast to users
*/
private void showErrorToast(String message) {
Toast.makeText(LoginActivity.this, message, Toast.LENGTH_LONG).show();
}
/**
* Signs you into ShoppingList++ using the Google Login Provider
*
* @param token A Google OAuth access token returned from Google
*/
private void loginWithGoogle(String token) {
// TODO This method gets called once the "boiler plate" code below gets a token
// from google. Use this token and a specific Firebase method to login the user
// with google.
}
/**
* GOOGLE SIGN IN CODE
*
* This code is mostly boiler plate from
* https://developers.google.com/identity/sign-in/android/start-integrating
* and
* https://github.com/googlesamples/google-services/blob/master/android/signin/app/src/main/java/com/google/samples/quickstart/signin/SignInActivity.java
*
* The big picture steps are:
* 1. User clicks the sign in with Google button
* 2. An intent is started for sign in.
* - If the connection fails it is caught in the onConnectionFailed callback
* - If it finishes, onActivityResult is called with the correct request code.
* 3. If the sign in was successful, set the mGoogleAccount to the current account and
* then call get GoogleOAuthTokenAndLogin
* 4. getGoogleOAuthTokenAndLogin launches an AsyncTask to get an OAuth2 token from Google.
* 5. Once this token is retrieved it is available to you in the onPostExecute method of
* the AsyncTask. **This is the token required by Firebase**
*/
/* Sets up the Google Sign In Button : https://developers.google.com/android/reference/com/google/android/gms/common/SignInButton */
private void setupGoogleSignIn() {
SignInButton signInButton = (SignInButton)findViewById(R.id.login_with_google);
signInButton.setSize(SignInButton.SIZE_WIDE);
signInButton.setOnClickListener(new View.OnClickListener() {
@Override
public void onClick(View v) {
onSignInGooglePressed(v);
}
});
}
/**
* Sign in with Google plus when user clicks "Sign in with Google" textView (button)
*/
public void onSignInGooglePressed(View view) {
Intent signInIntent = Auth.GoogleSignInApi.getSignInIntent(mGoogleApiClient);
startActivityForResult(signInIntent, RC_GOOGLE_LOGIN);
mAuthProgressDialog.show();
}
@Override
public void onConnectionFailed(ConnectionResult result) {
/**
* An unresolvable error has occurred and Google APIs (including Sign-In) will not
* be available.
*/
mAuthProgressDialog.dismiss();
showErrorToast(result.toString());
}
/**
* This callback is triggered when any startActivityForResult finishes. The requestCode maps to
* the value passed into startActivityForResult.
*/
@Override
public void onActivityResult(int requestCode, int resultCode, Intent data) {
super.onActivityResult(requestCode, resultCode, data);
/* Result returned from launching the Intent from GoogleSignInApi.getSignInIntent(...); */
if (requestCode == RC_GOOGLE_LOGIN) {
GoogleSignInResult result = Auth.GoogleSignInApi.getSignInResultFromIntent(data);
handleSignInResult(result);
}
}
private void handleSignInResult(GoogleSignInResult result) {
Log.d(LOG_TAG, "handleSignInResult:" + result.isSuccess());
if (result.isSuccess()) {
/* Signed in successfully, get the OAuth token */
mGoogleAccount = result.getSignInAccount();
getGoogleOAuthTokenAndLogin();
} else {
if (result.getStatus().getStatusCode() == GoogleSignInStatusCodes.SIGN_IN_CANCELLED) {
showErrorToast("The sign in was cancelled. Make sure you're connected to the internet and try again.");
} else {
showErrorToast("Error handling the sign in: " + result.getStatus().getStatusMessage());
}
mAuthProgressDialog.dismiss();
}
}
/**
* Gets the GoogleAuthToken and logs in.
*/
private void getGoogleOAuthTokenAndLogin() {
/* Get OAuth token in Background */
AsyncTask<Void, Void, String> task = new AsyncTask<Void, Void, String>() {
String mErrorMessage = null;
@Override
protected String doInBackground(Void... params) {
String token = null;
try {
String scope = String.format(getString(R.string.oauth2_format), new Scope(Scopes.PROFILE)) + " email";
token = GoogleAuthUtil.getToken(LoginActivity.this, mGoogleAccount.getEmail(), scope);
} catch (IOException transientEx) {
/* Network or server error */
Log.e(LOG_TAG, getString(R.string.google_error_auth_with_google) + transientEx);
mErrorMessage = getString(R.string.google_error_network_error) + transientEx.getMessage();
} catch (UserRecoverableAuthException e) {
Log.w(LOG_TAG, getString(R.string.google_error_recoverable_oauth_error) + e.toString());
/* We probably need to ask for permissions, so start the intent if there is none pending */
if (!mGoogleIntentInProgress) {
mGoogleIntentInProgress = true;
Intent recover = e.getIntent();
startActivityForResult(recover, RC_GOOGLE_LOGIN);
}
} catch (GoogleAuthException authEx) {
/* The call is not ever expected to succeed assuming you have already verified that
* Google Play services is installed. */
Log.e(LOG_TAG, " " + authEx.getMessage(), authEx);
mErrorMessage = getString(R.string.google_error_auth_with_google) + authEx.getMessage();
}
return token;
}
@Override
protected void onPostExecute(String token) {
mAuthProgressDialog.dismiss();
if (token != null) {
/* Successfully got OAuth token, now login with Google */
loginWithGoogle(token);
} else if (mErrorMessage != null) {
showErrorToast(mErrorMessage);
}
}
};
task.execute();
}
}
|
sigin code
Firebase ref = new Firebase("https://<YOUR-FIREBASE-APP>.firebaseio.com");
ref.authWithOAuthToken("google", "<OAuth Token>", new Firebase.AuthResultHandler() {
@Override
public void onAuthenticated(AuthData authData) {
// the Google user is now authenticated with your Firebase app
}
@Override
public void onAuthenticationError(FirebaseError firebaseError) {
// there was an error
}
});
|
EX Logging In with Google
V 0.3.05 Logging In with Google
Code Step 3.05_add_google_login-quiz
Main Goal
Log the user into Firebase using the Google OAuth Provider.
Specifications
Wireframes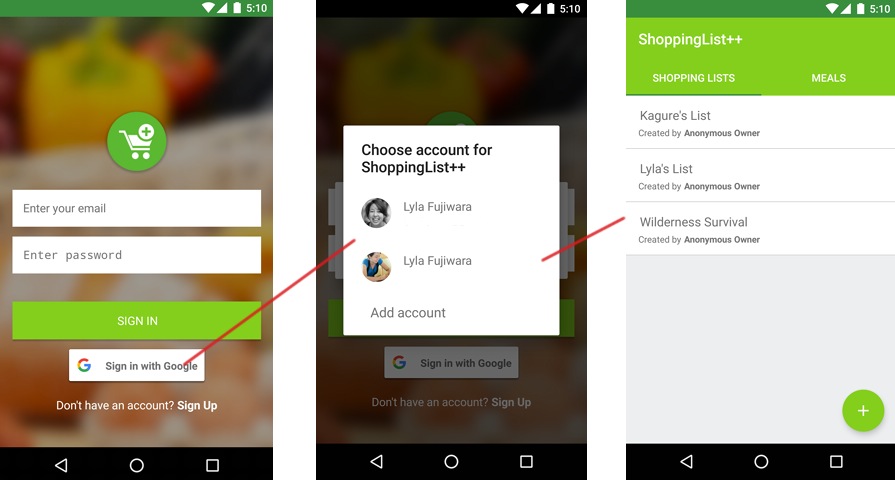 Hints and TipsCode Snippets
Updates to Gradle File
Add the dependency to your project's top-level build.gradle:
classpath 'com.google.gms:google-services:1.5.0'
Then add the plugin to your app-level build.gradle:
apply plugin: 'com.google.gms.google-services'
Then in your app-level build.gradle file, declare Google Play Services as a dependency:
apply plugin: 'com.android.application'
... dependencies { compile 'com.google.android.gms:play-services:7.5.0' }
Update the Manifest File
In your AndroidManifest.xml add the following permissions.
<uses-permission android:name="android.permission.GET_ACCOUNTS" />
<uses-permission android:name="android.permission.USE_CREDENTIALS" />
Code for Google sign in
Firebase ref = new Firebase("https://<YOUR-FIREBASE-APP>.firebaseio.com");
ref.authWithOAuthToken("google", "<OAuth Token>", new Firebase.AuthResultHandler() { @Override public void onAuthenticated(AuthData authData) { // the Google user is now authenticated with your Firebase app } @Override public void onAuthenticationError(FirebaseError firebaseError) { // there was an error } });
Firebase Example Code for Google Login
Checkout the google authentication example that is part of the FirebaseUI library if you want to see a fully coded login example.
|
After login ,how can we get the user data(the AuthData object)
server mathod can get the AuthData object
1.AuthResultHandler.onAuthenticated(AuthData authData) {
this method can get the AuthData as soon as lohin.
but some time ,we will move to other activity in the app,so get use some time
2.Listerners,addAuthStateListener(),like the normal listener in firebase
rmoveAuthStateListener() to remove
when change,will call again
3.getAuth()
Store user data
the AuthData not store the all information of the user

It must only give the information in left side!!
so,we need to save the other user data in the firebase data base
Code:
User.java
public class User {
// TODO Create a user POJO with name, email and time joined.
private String email;
private String name;
private HashMap<String,Object> timestampJoined;
public User() {
}
public User(String email, String name) {
this.email = email;
this.name = name;
this.timestampJoined=new HashMap<>();
timestampJoined.put(Constants.FIREBASE_PROPERTY_TIMESTAMP, ServerValue.TIMESTAMP);
}
public String getEmail() {
return email;
}
public String getName() {
return name;
}
public Object getTimestampJoined() {
return timestampJoined;
}
}
|
get the user UID

mFirebaseRef.createUser(mUserEmail, mPassword, new Firebase.ValueResultHandler<Map<String, Object>>() {
@Override
public void onSuccess(Map<String, Object> result) {
/* Dismiss the progress dialog */
mAuthProgressDialog.dismiss();
Log.i(LOG_TAG, getString(R.string.log_message_auth_successful));
// TODO Use your User POJO to create the user data if they don't already exist.
// You can call the createUserInFirebaseHelper helper method and put
// the code for creating the user there.
String uid = result.get("uid").toString();
// Toast.makeText(CreateAccountActivity.this,uid,Toast.LENGTH_SHORT).show();
createUserInFirebaseHelper(uid);
}
|
use the UID to save the user and prevent the same user

final Firebase ref = new Firebase(Constants.FIREBASE_URL_SUSER).child(uid);
ref.addListenerForSingleValueEvent(new ValueEventListener() {
@Override
public void onDataChange(DataSnapshot dataSnapshot) {
if (dataSnapshot.getValue() == null) {
User user = new User(mUserEmail, mUserName);
ref.setValue(user);
}
}
@Override
public void onCancelled(FirebaseError firebaseError) {
}
});
|
Explain,first read the UID location,if the value is null,that mean no this user exist in the Database,so ,we can create this user and add it into the database
EX use email and password login,and save the use data
 V 0.3.07 User Data for the Email and Password Provider
Code Step 3.07_user_data_with_email/password-quiz
Main Goal
When a user is created in Firebase via the Email and Password provider, also create a user in our own Firebase database.
Specifications
WireFrames and Data Schema Hints and Tips
|
The problem of Google provider and Email/Password provider use thsame Email
we should consider they were the same user

User Data Google Provider and create user
EX User Data for the Google Provider
When the same user use google account(with same email) login,will create another new user account in FireBase(Have different UID),we don’t want this, so we can use Email,the Gmail.All the use to use Email as a ID,Not the UID
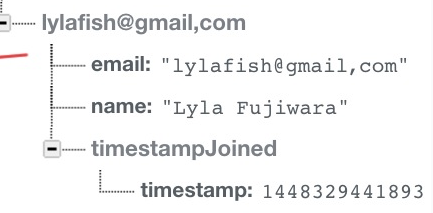
However, here has a problem. The key can not have periods (.) . we can use “, ” to replace “.”
public static String encodeEmail(String userEmail) {
return userEmail.replace(".", ",");
}
|
 V 0.3.09 User Data for the Google Provider
Code Step 3.09_user_data_with_google-quiz
Main Goal
When a user logs in with Google via Firebase, also create a user in our own Firebase database.
Specifications
WireFrames and Data Schema Technical Notes
Associating Multiple Login Services
If you want to read up more on the options for associating multiple login services, check out this Stackoverflow post.
Encoding the Email
Firebase does not support having periods within their key names. Because of this, storing the email address as a key is a little tricky. What you can do is a simple replace that turns all "." into ",". I'm calling this encoding the email. You can copy a gist for a method that will do this below.
Hints and Tips
Code Snippets
encodeEmail Utility Method
public static String encodeEmail(String userEmail) {
return userEmail.replace(".", ","); }
SKIP TO QUIZ
|
need check is the google account connected?see the soultion
Logout and Kick Off in the FireBase
whta is Kickoff?
a user can’t log in forever,set at here

above picture is 24 hours,than kick off
what will happen after kick off?

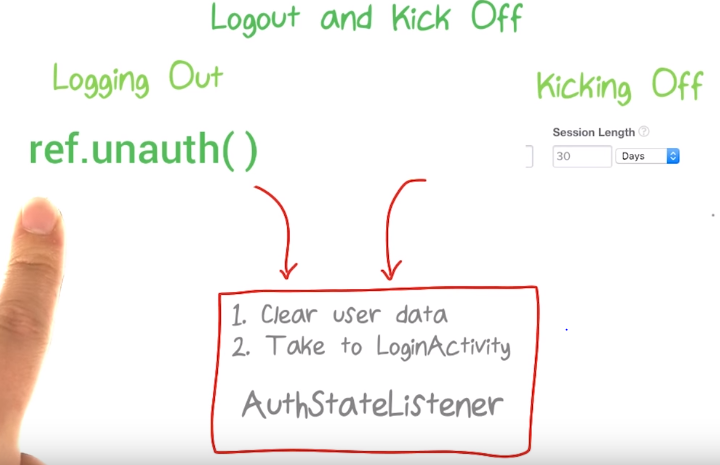
Log out code
ref.unauth();
|
Listen to the AuthState change
Firebase ref = new Firebase("https://<YOUR-FIREBASE-APP>.firebaseio.com");
ref.addAuthStateListener(new Firebase.AuthStateListener() {
@Override
public void onAuthStateChanged(AuthData authData) {
if (authData != null) {
// user is logged in
} else {
// user is not logged in
}
}
});
|
rember to remove the listener
public void onDestroy() {
// TODO don't forget to remove the auth listener!
ref.removeAuthStateListener(authListener);
super.onDestroy();
}
|
the code that log out if the provider is Google+,Signs out the current signed-in user if any. It also clears the account previously selected by the user and a future sign in attempt will require the user pick an account again.
Auth.GoogleSignInApi.signOut(mGoogleApiClient).setResultCallback(
+ new ResultCallback<Status>() {
+ @Override
+ public void onResult(Status status) {
+ //nothing
+ }
+ });
+ }
|
EX Logout and Kick Off
 V 0.3.13 Logging Out and Kicking Off
Code Step 3.13_logging_out_and_kicking_off-quiz
Main Goal
Provide a login button to log the user out and automatically log the user out if they haven't logged in for a month.
Specifications
Wireframes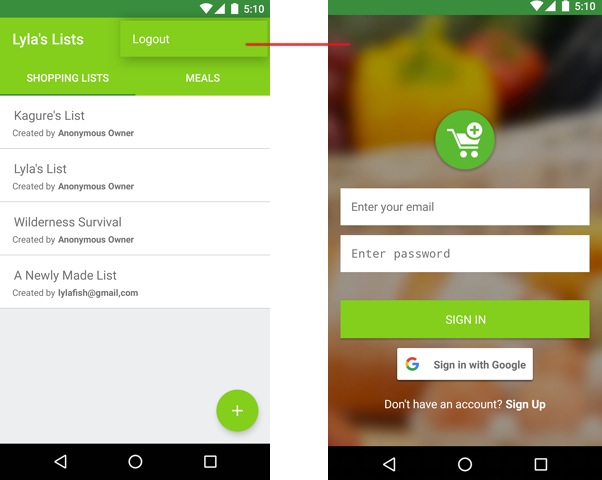 Hints and Tips
Code Snippets
Snippet for an AuthStateListener:
Firebase ref = new Firebase("https://<YOUR-FIREBASE-APP>.firebaseio.com");
ref.addAuthStateListener(new Firebase.AuthStateListener() { @Override public void onAuthStateChanged(AuthData authData) { if (authData != null) { // user is logged in } else { // user is not logged in } } }); |
List Owner Permissions
we can login now,so we can know who is the user,van control who can modified the List now.
ex
 V 0.3.15 List Owner Permissions
Code Step 3.15_owner_list_permissions-quiz
Main Goal
Only the owner should be able to see the menu for removing the list and the button for editing the name.
Specifications
Wireframes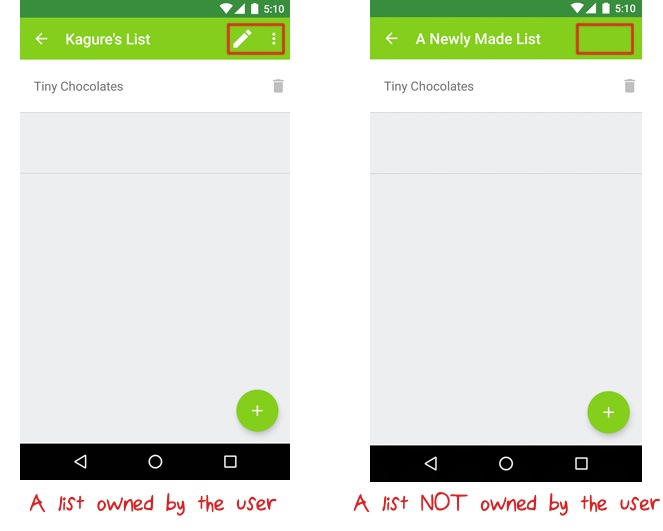 Technical Notes
Firebase Rules and Permissions
Right now we are only talking about half of the steps you need to fully create user permissions. Here, you are editing the client side of the app. In version 0.5 of the app you'll be implementing server-side permissions using Firebase's robust Security and Permissions rules. These permissions will allow you to do things like make a user who is not the owner unable to remove lists or rename the shopping list, on the server side. In any production app, you'll need to do both client side UI changes and server side permissions. I'll come back to this in version 0.5, but if you're curiosity is piqued, you can check out the official docs.
Hints and Tips
|
Check Off Items
 V 0.3.19 Check Off Items
Code Step 3.19_check_off_items-quiz
Main Goal
Allow users to check off on un-check items that have been purchased.
Specifications
Wireframes Hints and Tips
Code Snippets
A strike through can be achieved with the following code:
textViewItemName.setPaintFlags(textViewItemName.getPaintFlags() | Paint.STRIKE_THRU_TEXT_FLAG);
It can be removed with:
textViewItemName.setPaintFlags(textViewItemName.getPaintFlags() & (~Paint.STRIKE_THRU_TEXT_FLAG));
SKIP TO QUIZ
|
Shopping Mode
 V 0.3.21 Shopping Mode
Code Step 3.21_shopping_mode-quiz
Main Goal
Integrate a "Shopping Mode" that allows a user to signal that they are currently in the store. Users can only buy or unbuy items when "shopping".
Specifications
Wireframes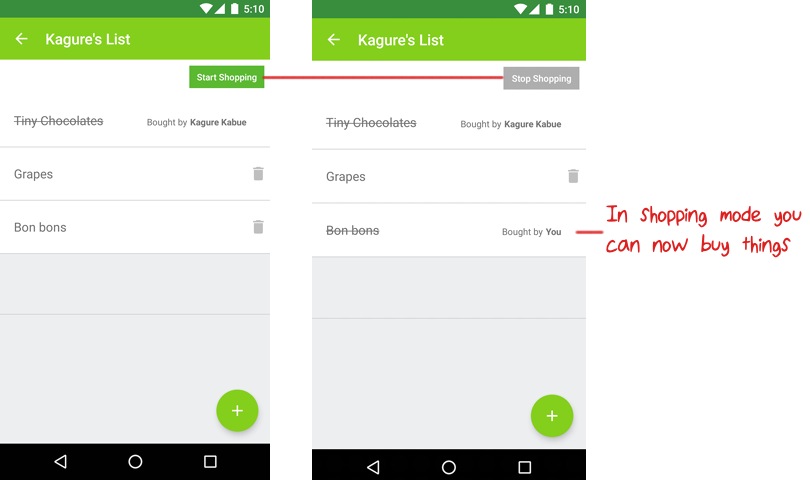 Hints and Tips
Code Snippets
The following code can be used to correctly color the shopping mode button.
Shopping Mode Off
mButtonShopping.setBackgroundColor(ContextCompat.getColor(ActiveListDetailsActivity.this, R.color.dark_grey));
Shopping Mode On
mButtonShopping.setBackgroundColor(ContextCompat.getColor(ActiveListDetailsActivity.this, R.color.primary_dark))
|
Who's at the Store
 V 0.3.23 Who's at the Store
Code Step 3.23_who's_shopping-quiz
Main Goal
Display users who are currently shopping on a shopping list.
Specifications
Wireframes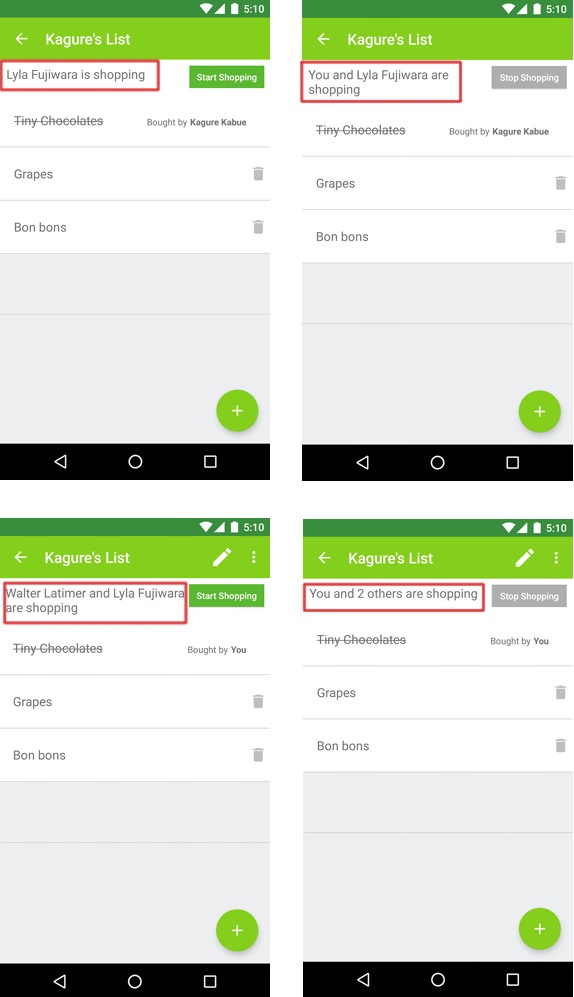 Hints and Tips
SKIP TO QUIZ
|
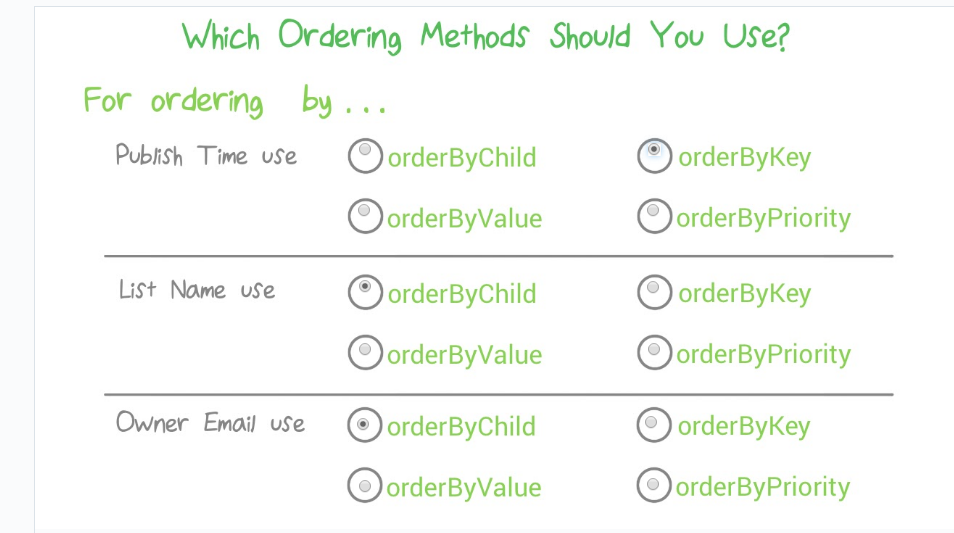
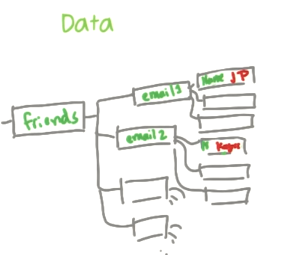
Structure the data scheme in FireBase
(sort ,query,filter,and share)
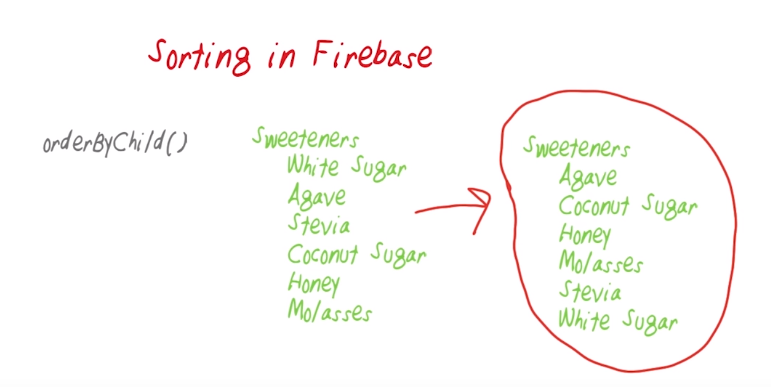
Sorting in Firebase
We can order data in four ways: by child key, by key name, by value, or by priority
example
|
orderByChild(key)()
order nodes by a common child key by passing that key to orderByChild()
For example, to read all dinosaurs ordered by height
orderByKey()
order nodes by their keys using the orderByKey() method
example: at "https://dinosaur-facts.firebaseio.com/dinosaurs" reads all dinosaurs in alphabetical order:
Ordering by value
We can order nodes by the value of their child keys using the orderByValue() method. Let's say the dinosaurs are having a dino sports competition
{
"scores": {
"bruhathkayosaurus" : 55,
"lambeosaurus" : 21,
"linhenykus" : 80,
"pterodactyl" : 93,
"stegosaurus" : 5,
"triceratops" : 22
}
}
|
Ordering by priority
not suggest to use
order of different value
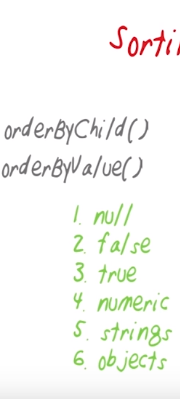

only can sort by a key at a time
EX

important:PushiD is create by the time,so when we sort the push ID,it is the same with sort by create time.
answer:
code:
Firebase activeListsRef = new Firebase(Constants.FIREBASE_URL_ACTIVE_LISTS);
Query query3 = activeListsRef.orderByKey();
mActiveListAdapter = new ActiveListAdapter(getActivity(), ShoppingList.class,
R.layout.single_active_list, query3, mEncodedEmail);
|
EX Sorting with orderBy
 V 0.4.01 Sorting with orderBy
Code Step 4.01_sorting_with_orderby-quiz
Main Goal
Add the ability to open up a settings activity and change the default sort order of the shopping lists on theShoppingListsFragment screen.
Specifications
Wireframes Technical Notes
Performance Note
As a general tip, if you already have the required data, it is better to re-order that data client-side on the Android phone. This saves a query to the server. You should always be on the lookout for ways to minimize how many times you communicate with the Firebase database.
That said, we’re not doing this in the beta version of ShoppingList++ for a few reasons:
Hints and Tips
SKIP TO QUIZ
|
Separate Bought Items

can sort the true and false
 V 0.4.03 Separate the bought and unbought items
Code Step 4.03_separate_bought_and_unbought-quiz
Main Goal
Seperate the bought and unbought items in real time when users buy and unbuy items.
Specifications
Wireframes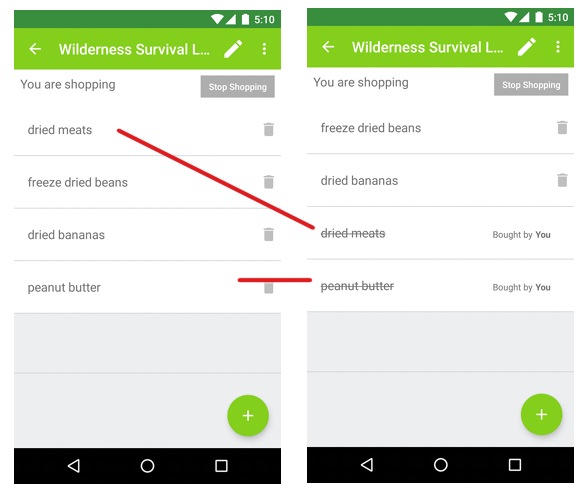 Hints and Tips
|
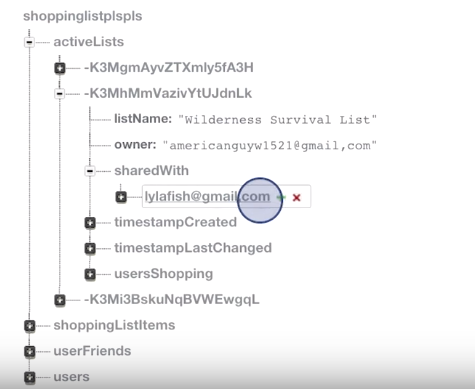
Share the list and set the list privacy
see this:https://youtu.be/w_s4ACIt-a0
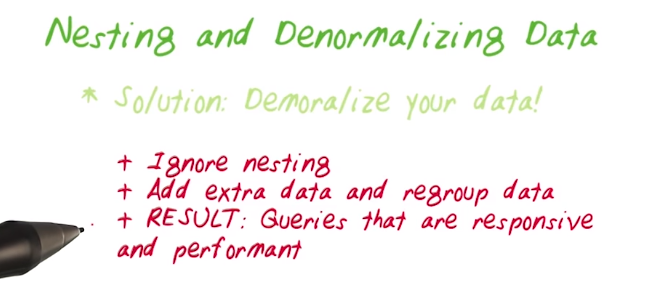
Nests are Bad in non SQL database
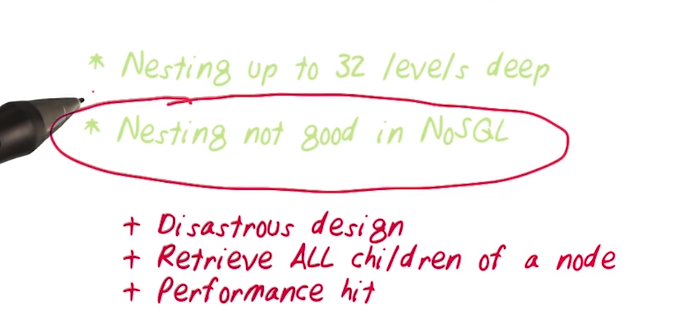
soultion is denormalizing the data
for example

the above picture is the fatabase of a chat room
if we want to get the name of the room (dev team) of all the room,we also need to download the messages of the room,this will be very big data
improved
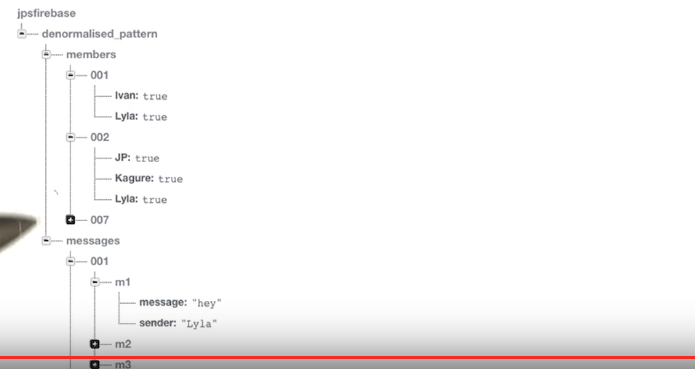
message is save in a sperate table
Tips to structure the database
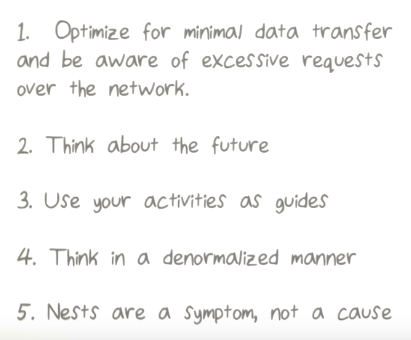
6. The space is checp,but the use thime is not(explain later)
- Optimize for minimal data transfer and be aware of excessive request over the network
for example
we wnat ot show the user name
database like this
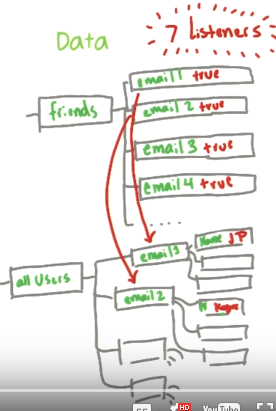
we need to & listener to read the data,1 listener at the locaion driends,to get all the email,each email need a listener, to get the name
if improved like this
only need one listener
2.Thinjk about the future
have 10000 user? iteam? normally not over than 100
3 use the activity as a guide
wil we need the information at the same time?if no,do denormlized
EX How to improve
Quiz: How To Fix Nests
Suggestion 1
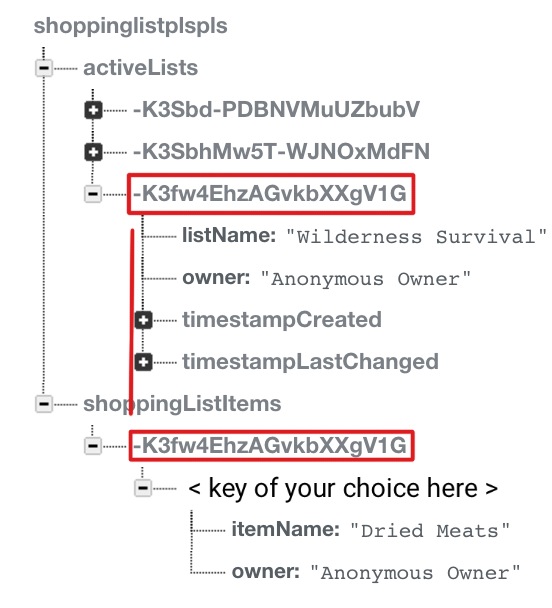
Explanation: Move shopping list items into a large list of items, here called shoppingListItems. Each item has a push id, and then store within the item is the push id shopping list it is associated with.
JSON Example File: shoppinglistplusplus.json
Suggestion 2
Explanation: Move shopping list items into sub lists of items. The parent list is named shoppingListitems and each child list has the key of the push id of the shopping list the items are associated with. This is essentially the same as suggestion 1 except the data is divided into items associated with each list. This mirrors our "past" data design for shopping list ++ described here.

JSON Example File: shoppinglistplusplus.json
Suggestion 3
Explanation: Move the list of users shopping on a list to the top node. Then have them organized under the push ids of the shopping list that they are a part of. This is shown here in the table usersShopping.

JSON Example File: shoppinglistplusplus.json
Suggestion 4
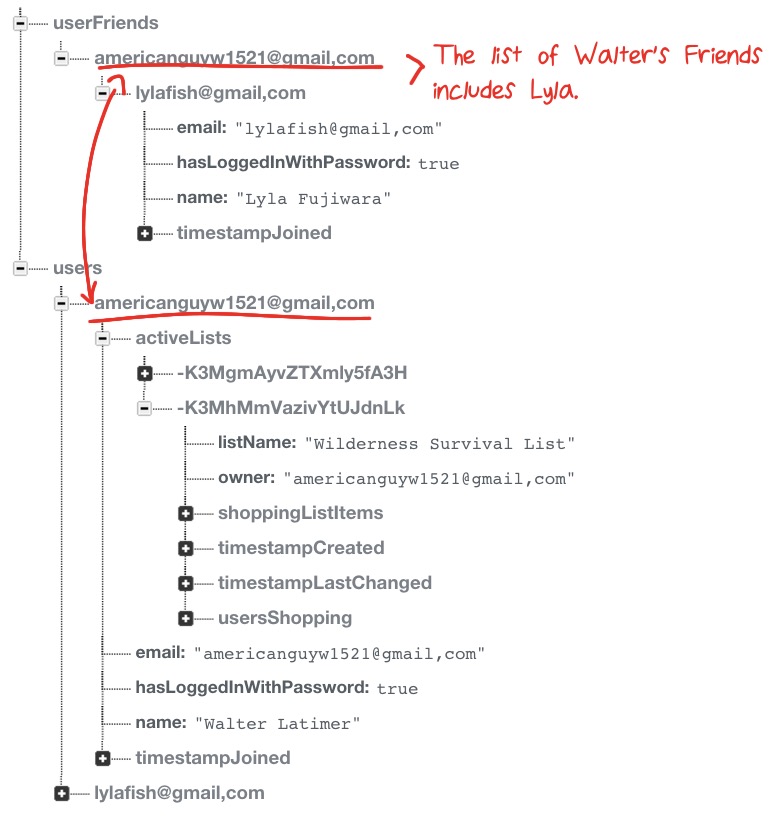
Explanation: Move the list of users who are friends with each user to the top node. This is part of the sharing flow described here.
JSON Example File: shoppinglistplusplus.json
Suggestion 5
Explanation: Move the shopping lists out of the users node. This moves the shopping lists to under the root node.

JSON Example File: shoppinglistplusplus.json
|

Different relationship in a data base
1 to 1

1 to many

many to many

Many to Many in Firebase,has problem
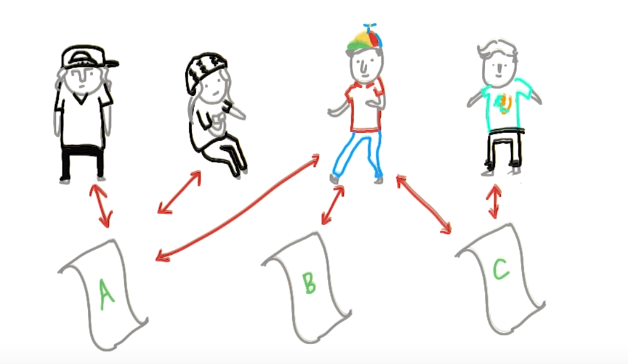
Firebase provide quick sort and filterning method.
First problem
when we want to show the list that a user have,we need to search the owner is the thousand of List,than search shared with in the thousand of list again,it is the numer is too much,need tim
Second problem
we need to cimbine the two search result.
what can we improve?
For these type of Many to Many relationship,we can use redudency data to make it more efficient,
for example:
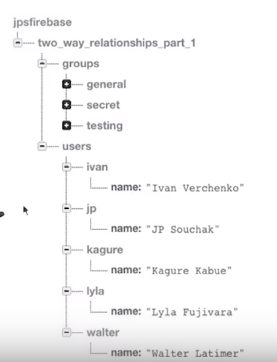
at the above database,if i want ot know all the groups that a user in,i need to download all the groups information,and found is the user in.,this is not a good way.
improved database:
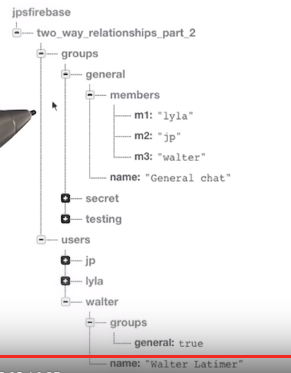
in this database,the user save which group do they in. Although have redudency data(users and hroup save the same data),byt more efficiency.The space is checp,but the use thime is not
for update multiple location at the same time,we should use updateChildren
Range Queries
startAt(),endAt(),equalTo()
How to use?
example:
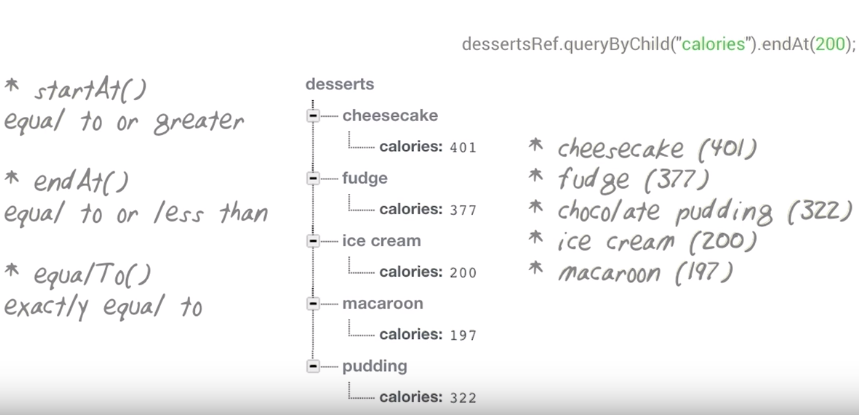
can use combined

Exercise:
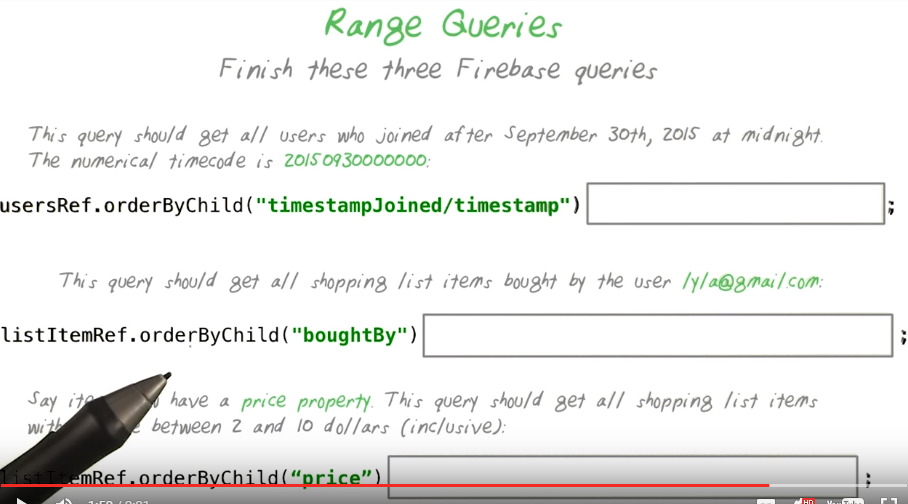
Answer:

Query use in English


result:
explain:https://www.youtube.com/watch?v=OseBuMTXY8Y&feature=youtu.behttps://youtu.be/OseBuMTXY8Y:https://youtu.be/OseBuMTXY8Yhttps://youtu.be/OseBuMTXY8Y

EX:

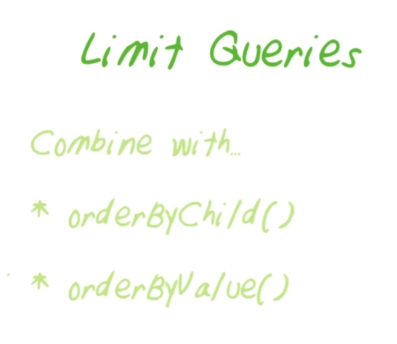
Limit Queries
no need for the all answer
limitToFirst
limitToLast

where to use?
EX of Searching
 V 0.4.13 Searching
Code Step 4.13_searching-quiz
Main Goal
Add an autocomplete search textbox when selecting friends emails on the AddFriendActivity.
Specifications
Wireframes Technical Notes
Changing the Query
There is no easy way to change the underlying query for a FirebaseListAdapter. The easiest way to deal with this is to make a new adapter every time the query changes. Performance wise, it would make more sense to cache all users and filter client side. But in your situation, you can remake the adapter. We'll approach it this way for two reasons:
For the final production code, you'd want to revisit this part of the app.
Hints and Tips
Code Snippets
ref.orderByChild(“listName”).startAt("do").endAt("do~").limitToFirst(10);
|
Ofline access in FireBase
at default,the data that get before the phone offline,will cache locally,every thing we do to the data,will quennung,when connect again,the event send to the server.
see the example:
however,when the listener clean,the cache is cleaned too:
example here:https://youtu.be/qjUO3wUDclA
we can not clean up the cache when remove the listener.
two method can help us.
1.setPersistenceEnabled
Firebase.getDefaultConfig().setPersistenceEnabled(true);
|
prevent the data will cleanup when the listener is clean up

Firebase client automatically keeps a queue of all write operations that are performed while our application is offline
Bad side:
1.use more disk space
2.if offline ,and use a lot of addListernerForSingleValueEvent,it query to the local data,come online ,will not query again,will get the old data
2.keepSynced
can 預先get the data,although they do not have listener for
Firebase scoresRef = new Firebase("https://dinosaur-facts.firebaseio.com/scores");
scoresRef.keepSynced(true);
|
Bad side:
use more memory
EX
 V 0.5.01 Add Simple Offline Functionality
Code Step 5.01_simple_off-line-quiz
Main Goal
The app should cache all user changes made offline.
Specifications
Technical Notes
Testing Offline
You can test if your solution works by putting the phone into airplane mode. Remember, if you're on a single screen and make changes, Firebase will automatically cache these changes without you needing to implement any code. What it will not do is keep data around when listeners are cleaned up. You should be cleaning up your listeners whenever you move away from an activity. Thus, if you don't change any code, you will start noticing data disappearing when you move around and back to different activies when offline. Data is also not cached between app restarts automatically, so you should test your code by restarting your app. If it still shows the changes you made while offline, on an app restart, you know that the data is cached locally.
Hints and Tips
|
Securing data(not yet)