Gradle for Android and Java
Basic of gradle

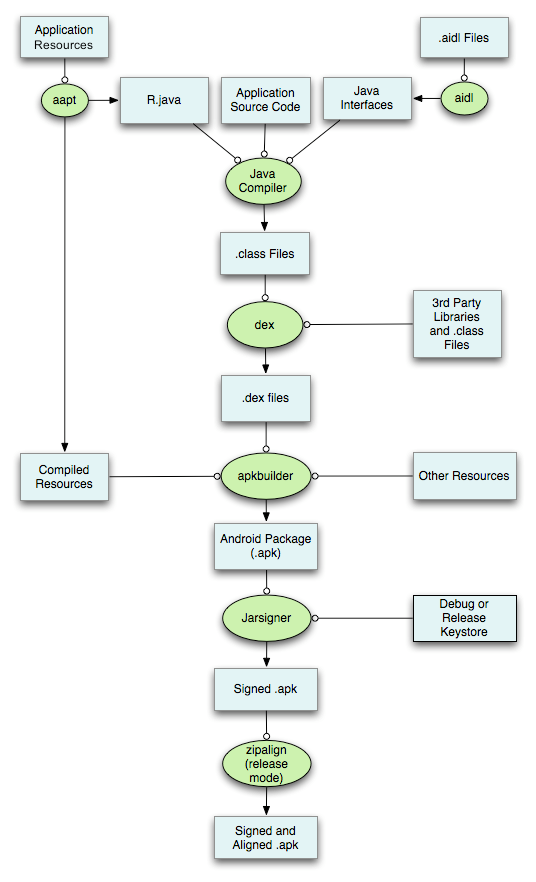
android build like this.
Grandle can help us to build different version for the app,like debug vision,relax version,paid and free version.
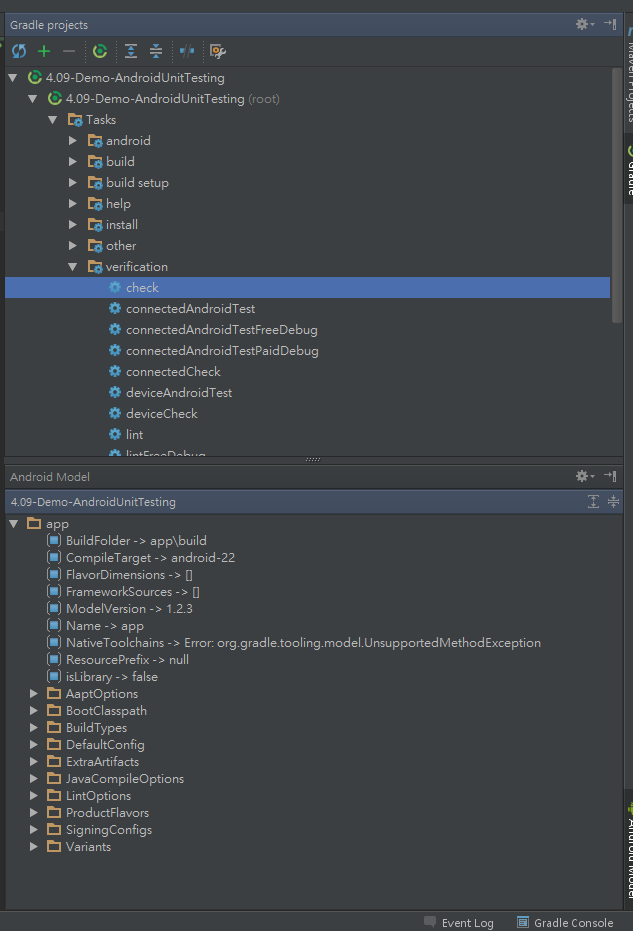
Intro to Gradle Tasks
Command
stop Daemon
|
gradle --stop
|
start the task
|
gradle (task name)
|
local installation of Gradle
/*
Whenever we're working with an existing Gradle project, we'll be using the
wrapper, because that way we can ensure that everyone working on the project
is using the same version of Gradle.
If you want to create a new Gradle project, however, you'll need a local
installation of Gradle. First make sure you have an installation of by running
$ java -version
The output should be something like:
java version "1.8.0_51"
Java(TM) SE Runtime Environment (build 1.8.0_51-b16)
Java HotSpot(TM) 64-Bit Server VM (build 25.51-b03, mixed mode)
If not, skip below to find Java installation instructions.
There are a bunch of ways to install Gradle. If you're on Mac and use Homebrew
(and if you don't you really should), you can install Gradle with
$ brew install gradle
Another option for Mac and Linux users is to head over to http://sdkman.io/
and install the Software Development Kit Manager, and use that to install
Gradle. If neither of those options appeals to you, we'll go through the manual
installation process for both Windows and Mac.
To install Gradle manually, we need to do three things. First we need to
download Gradle. Next we need to put it where we want it on our machine. And
finally we need to let the system know where to find it. We'll do the Mac
instructions first. Skip below for the Windows instructions
******************* Mac/Linux Instructions *************
First, head over to https://gradle.org/gradle-download/, and download the latest
version of Gradle. Note that we want the complete distribution. Next, we'll
unzip Gradle and move it to where we want it to live. Our recommendation is in
`/usr/local/gradle`. Then we need to add some lines to our .bash_profile file
(generally found in your home directory) to tell the system where to find our
new installation of Gradle. You can do all these steps manually, but the
easiest way is to paste the whole big block of instructions below into your
terminal. Note that you may need to change the version number on the first and
third lines. This command also adds an environment variable that turns on the
Gradle daemon by default. Note that you may need to run the following command
with `sudo` out in front.
unzip ~/Downloads/gradle-2.11-all.zip -d /usr/local/gradle/ &&\
echo '# Adding Gradle to system path
export GRADLE_HOME=/usr/local/gradle/gradle-2.11
PATH=$GRADLE_HOME/bin:$PATH
export PATH
# Turning on the Gradle daemon by default
export GRADLE_OPTS="-Dorg.gradle.daemon=true" >> ~/.bash_profile &&\
source ~/.bash_profile
******************* Windows Instructions *******************
First, head over to https://gradle.org/gradle-download/, and download the latest
version of Gradle. Note that we want the complete distribution. Next, we'll
unzip Gradle and move it to where we want it to live. Our recommendation is in
`C:\gradle-2.11`.
To tell Windows where to find Gradle, we need to add an environment variable.
Navigate to the Control Panel > System > Advanced system settings > Advanced >
Environment Variables... > System variables > New...
Set the variable name to: GRADLE_HOME Set the variable value to the location
you unzipped Gradle if you followed our suggestion it should be: C:\gradle-2.11
Then edit the PATH user variable by appending: ;%GRADLE_HOME%\bin\
Your path will then look something like:
<a bunch of directories>;%GRADLE_HOME%\bin\
When you're done, run `gradle --version` to ensure the installation is
complete.
Finally, let's add a properties file to tell Gradle to use the daemon by
default. All we need to do is put a file named `gradle.properties` in
C:\Users\<your username>\.gradle, and add the line `org.gradle.daemon=true`.
******************* When you're done *******************
Once you've installed Gradle, you no longer need to use the wrapper script,
and you can simply use the `gradle` command. To see if Gradle was installed
successfully, try running
$ gradle --version
To see the effect of the Gradle daemon, first run
$ gradle --stop
to ensure the daemon is stopped, then run the `helloWorld` task using,need to go onto the folder that have build.gradle first ,the helloWorld content in this file.
$ gradle helloWorld
and note how long it takes. Then run the `helloWorld` task again and see how
much faster the second run is.
*/
task helloWorld << {
println "Hello, World!"
}
/*
************ Java Installation Instructions **********
These instructions will explain how to get the Java Development Kit set up on
your machine. There are three phases. First we need to download the JDK, then
we need to move the downloaded files to where we want them to live, and
finally we need to tell the system where to find your new installation.
Before following these instructions, check to make sure you haven't already
installed Java by running `java -version`. If the output is something like the
following:
java version "1.8.0_51"
Java(TM) SE Runtime Environment (build 1.8.0_51-b16)
Java HotSpot(TM) 64-Bit Server VM (build 25.51-b03, mixed mode)
then you're already good to go!
*********** Mac Instructions *********
To download the JDK, visit
http://www.oracle.com/technetwork/java/javase/downloads/index.html
Click on the JDK Download button, click on the radio button to accept the
license agreement, and download the Mac OS X x64 package. At the time of this
writing the most recent package was: jdk-8u51-macosx-x64.dmg
To tell OS X where to find java, we need to set a couple environment
variables. The easiest way to do this is to run the following at the terminal:
echo "# Java environment variables
export JAVA_HOME=$(/usr/libexec/java_home)
export JDK_HOME=$(/usr/libexec/java_home)
" >> ~/.bash_profile&&\
source ~/.bash_profile
Now you're done! You can now test your Java installation by running `java
-version`.
Awesome work! You can now complete your Gradle installation!
*********** Windows Instructions *********
To download the JDK, visit:
http://www.oracle.com/technetwork/java/javase/downloads/index.html
Click on the JDK Download button, click on the radio button to accept the
license agreement, and download the Windows x64 package. At the time this was
written, the most recent package was: jdk-8u51-windows-x64.exe
Run the installer, installing to the default location. At the time of this
writing that was: C:\Program Files\Java\jdk1.8.0_51\
To tell Windows where to find Java, we need to add an environment variable.
Navigate to the Control Panel > System > Advanced system settings > Advanced >
Environment Variables... > System variables > New...
The variable name should be : JAVA_HOME
The variable value should be your install location. At the time of this
writing it should be: C:\Program Files\Java\jdk1.8.0_51
You can now test your Java installation by running
$ java -version
Awesome work! You can now complete your Gradle installation!
*/
Gradle Build Scripts
the language call Groovy
Groovy Fundamentals
1.empty task
task groovy << {}
2.simple task
task groovy << {}
println "fuck you"
run: gradle groovy
3.valid Java is also valid Groovy, and we can interoperates with Java, as
well as access the standard library.
task groovy << {}
class JavaGreeter {
public void sayHello() {
System.out.println("Hello Java!");
}
}
JavaGreeter greeter = new JavaGreeter()
greeter.sayHello()
run: still is gradle groovy
4.dynamically typed, which means type checking happens at runtime(don't need to declare the types of variables)
def foo = 6.5
println "foo has value: $foo"
$ mean vairable
5.calculate
${5 + 6}
println "Let's do some math. 5 + 6 = ${5 + 6}"
6.get the type
de foo=6
${foo.class}
7.Function
`println` keyword is just a shortcut for `System.out.println`
def doubleIt(n) {
n + n // Note we don't need a return statement
}
foo = 5
println "doubleIt($foo) = ${doubleIt(foo)}"
example:
task groovy << {}
def doubleIt(n){
n+n
}
def foo=6
println "double(foo)=${doubleIt(foo)}"
8.function don’t need to use parentheses with at least
one argument,just like println
def noArgs() {
println "Called the no args function"
}
def oneArg(x) {
println "Called the 1 arg function with $x"
x
}
def twoArgs(x, y) {
println "Called the 2 arg function with $x and $y"
x + y
}
oneArg 500 // Look, Ma! No parentheses!
twoArgs 200, 300
noArgs()
//noArgs // Doesn't work
//twoArgs oneArg 500, 200 // Also doesn't work as it's ambiguous
twoArgs oneArg(500), 200 // Fixed the ambiguity
twoArgs (“asdsa d”,”aaa a”) can
but
twoArgs “asdsa d”,”aaa a” can’t
Groovy Closures and Objects
Groovy has another way to declare functions called closures. Closures have
two interesting features. First, they are just values that can be assigned to
a variable, just like a number or a string. Second, they can capture variables
from the scope in which they're declared.
Explian for the First feacture
def myClosure = {
println "Hello from a closure"
println "The value of foo is
}
Explian for the Second feacture
def foo = "One million dollars"
def myClosure = {
println "Hello from a closure"
println "The value of foo is $foo"
}
like a vairable to assign
myClosure()//run
def bar = myClosure
def baz = bar
baz()
Closures have a different notation for arguments
def a={x,y->
def b=x+y
println "$b"}
a(1,2)
functions that take functions as arguments
def applyTwice(func, arg){
func(func(arg))
}
func is a vairable hold a function.
like:
def func ={x->x+x}
List
def myList = ["Gradle", "Groovy", "Android"]
use function with a list,.each
def printItem = {item -> println "List item: $item"}
myList.each(printItem)
declaring the closure in-line
myList.each{println "Compactly printing each list item: $it"}
the it is must
Create a new list of your candies in all caps:collect
collect:
The collect() method in Groovy can be used to iterate over collections and transform each element of the collection. The transformation is defined in as a closure and is passed to the collect() method.
example:
task lists << {
def candyList = ["Tomatoes","Carrots","Spinach","Radishes","Beef"]
def cap=candyList.collect{it.toUpperCase()}
cap.each{ println "$it"}
}
Simplified syntax for declaring classes
automatically generates
getters and setters for class properties.
class GroovyGreeter {
String greeting = "Default greeting"
def printGreeting(){println "Greeting: $greeting"}
}
def myGroovyGreeter = new GroovyGreeter()
myGroovyGreeter.printGreeting()
myGroovyGreeter.greeting = "My custom greeting"
myGroovyGreeter.printGreeting()
Closures use with a delegate object
The last Groovy feature we'll cover is that closures can have a delegate
object. Any variables or methods referenced in the closure that don't have a
local definition are then evaluated against the closure's delegate. Let's make
a closure that will access the property and method of our GroovyGreeter class.
object. Any variables or methods referenced in the closure that don't have a
local definition are then evaluated against the closure's delegate. Let's make
a closure that will access the property and method of our GroovyGreeter class.
class GroovyGreeter {
String greeting = "Default greeting"
def printGreeting(){println "Greeting: $greeting"}
}
def myGroovyGreeter = new GroovyGreeter()
def greetingClosure = {
greeting = "Setting the greeting from a closure"
printGreeting()
}
greetingClosure()
it is not work now, because we do not def the greeting and printGreeting.
so,we need
greetingClosure.delegate = myGroovyGreeter
greetingClosure() // This works as `greeting` is a property of the delegate
Task Configuration
just like a Closures use with a delegate object
the entire build script delegates to a project object
the concept like:
buildscript={
…………….
}
buildscript.delegate=project
the project object has a method called `task` for declaring
tasks. It accepts a name of a new task and a configuration closure, which
we'll talk about shortly.
project.task("myTask1")
/*
Since the entire build script delegates to `project`, we can leave that
off.
*/
task("myTask2")
/*
Because Groovy syntax is awesome, we can leave off the parentheses.
*/
task "myTask3"
the above is just give the task a name
/*
This next part is a little tricky. Gradle uses an advanced Groovy feature to
change how the syntax of task declaration is compiled. The upshot is that we
can knock off the quotes.
For more info, check out Mark's post on Stack Overflow here:
http://stackoverflow.com/questions/27584463/understing-the-groovy-syntax-in-a-gradle-task-definition
*/
task myTask4
^^^^^ this is t the standard way to declare a task. Since the task is a Groovy
object we can set its properties and access its methods. Let's add a
description and a group to this task.
myTask4.description = "This is what's shown in the task list"
myTask4.group = "This is the heading for this task in the task list,"
/*
The most important property of a task is the list of actions it will perform.
Instead of setting the `actions` property of our task, we can add a closure to
the end of the list using the `doLast` method.
{is a closure}
*/
1.
myTask4.doLast {println "Do this last"}
/*
We can also add actions to the start of the list using `doFirst`.
*/
2.
myTask4.doFirst {println "Do this first"}
/*
We can also add actions using the `leftShift` operator.
*/
3.
myTask4.leftShift {println "Do this even more last"}
/*
We can also declare a task and give it an action in a single stroke. This is a
very common pattern.
*/
4.
myTask4 << {println "Do this last of all"}
the above is decare the task first,and then setting its properties afterwards,but we can give the task a configuration closure when it's declared.
configuration closure when it's declared
have different way
task myTask6 {
description "Here's a task with a configuration block"
group "Some group"
doLast {
println "Here's the action"
}
}
task myTask7 {
description("Description") // Function call works
//description "Description" // This is identical to the line above
group = "Some group" // Assignment also works
doLast { // We can also omit the parentheses, because Groovy syntax
println "Here's the action"
}
}
task myTask8(description: "Another description") << {
println "Doing something"
}
Task Dependencies and Ordering
We'll discuss three ways to configure the relationships between tasks:
`dependsOn`, `finalizedBy`, and `mustRunAfter`.
1.dependsOn
Task A `dependsOn` task B if task A can't do its work without task B having
done its work.
task putOnSocks {
doLast {
println "Putting on Socks."
}
}
task putOnShoes {
dependsOn "putOnSocks"
doLast {
println "Putting on Shoes."
}
}
so, when run gradle putOnShoes ,the system will run putOnSocks than putOnShoes .
One thing to note is that if you run `gradle tasks`, you won't see
`putOnSocks`. That's because Gradle assumes that `putOnSocks` exists only to
help `putOnShoes` do its job. You can still see the `putOnSocks` task by
running `gradle tasks -all`.
2.finalizedBy
Task A is `finalizedBy` task B if every time task A runs, task B should be run
afterwards.
task eatBreakfast {
finalizedBy "brushYourTeeth"
doLast{
println "Om nom nom breakfast!"
}
}
task brushYourTeeth {
doLast {
println "Brushie Brushie Brushie."
}
}
gradle eatBreakfast ,system will eatBreakfast ->brushYourTeeth
3.mustRunAfter
The use case for `mustRunAfter` is slightly less obvious. Say we have a long
running process that's unlikely to fail, like deploying some artifact to a
continuous integration server, and we also have a short running task that is
likely to fail, like running unit tests. Those two tasks don't have any
dependency relationship, but if we're running both, we would really like the
unit tests to run before the integration tests.,because run short than long.
example, let's consider showering and putting
on a fragrance(香水) like perfume or cologne. Putting on a fragrance doesn't require
showering, and showering doesn't require putting on a fragrance, but if we're
going to both take a shower and also put on a fragrance, we should take the
shower first.
example:
task takeShower {
doLast {
println "Taking a shower."
}
}
task putOnFragrance {
shouldRunAfter "takeShower"
doLast{
println "Smellin' fresh!"
}
}
when we run gradle takeShower or gradle putOnFragrance,it is normal,only run itself.
However!!!!!!
Run two tsak at the same time,
gradle putOnFragrance takeShower or gradle takeShower putOnFragrance
must run takeShower first.
More complicated example
depon on multi task on different task
task getReady {
// Remember that when assigning a collection to a property, we need the
// equals sign
dependsOn = ["takeShower", "eatBreakfast", "putOnShoes"]
}
we will find that the order is eatBreakfast>brushTeeth>putOnSocks>putOnShoes>takeShower
the 3 task is order in 字母次序
putOnShoes.mustRunAfter takeShower
than before shower,will not put on shoes.
dependOn set by the name
task getEquipped {
dependsOn tasks.matching{ task -> task.name.startsWith("putOn")}
doLast {
println "All geared up!"
}
}
Typed Tasks
Gradle DSL Reference:https://docs.gradle.org/current/dsl/
Gradle has different typed task to handle different thing.No need us to do all the thing.
below will talk about some typed tasksvvvvvvvvvvvvvvvvvvvv
Interacting With The File System
1.Copy
The simplest example is simply to
copy the contents of one folder into another. We use the Copy task's "from"
method to add sources and the "into" method to specify the destination. This
copy task will copy the contents of the "images" directory into the "build"
directory.
*/
task copyImages(type: Copy) {
from 'images'
into 'build'
}
2.Copy:specify files to include or exclude
task copyJpegs(type: Copy) {
from 'images'
include '*.jpg'
into 'build'
}
3.Copy:single Copy task to copy from multiple sources
task copyImageFolders(type: Copy) {
from('images') {
include '*.jpg'
into 'jpeg'
}
from('images') {
include '*.gif'
into 'gif'
}
into 'build'
}
the meaning of above code:
.jpg to jpeg,.gif to gif folder jpeg and gif into build
4.Zip
task zipImages(type:Zip) {
baseName 'images'
destinationDir file('build')
from 'images'
}
"baseName" and "destinationDir"
properties to tell Gradle what to name the archive and where to create it
5.Zip to different folder
task zipImageFolders(type: Zip) {
baseName = 'images'
destinationDir = file('build')
from('images') {
include '*.jpg'
into 'jpeg'
}
from('images') {
include '*.gif'
into 'gif'
}
}
6.Delete
task deleteBuild(type: Delete) {
delete 'build'
}
Exercise:
Q
/*
In this series of exercies you'll be configuring tasks to copy and delete
files as well as build archives. This example contains some sample files
that you'll be using to complete the exercises below.
Exercises:
1. Create a task named "copyWeb". This task should perform the following:
a) Copy files from "src/web" to a folder "build/web".
b) Copy all .txt files from "src/docs" to folder "build/web/help".
2. Create a task named "bundleWeb". This task should perform the following:
a) Create a zip file located in the "build" folder named "web.zip".
b) Include all the files copied by the "copyWeb" task except the
"images" directory.
3. Create a task named "unpackBundle". This task should perform the following:
a) Expand the zip file created by the "bundleWeb" task.
b) Copy the contents to a folder "build/exploded".
HINT: There isn't an UnZip task, so what task type do you need?
4. Create a task named "deleteHelp". This task should perform the following:
a) Delete the "help" folder created by the "copyWeb" task.
*/
Answer:
/*
Solution:
*/
task copyWeb(type: Copy) {
from 'src/web'
from('src/docs') {
include '*.txt'
into 'help'
}
into 'build/web'
}
task bundleWeb(type: Zip, dependsOn: copyWeb) {
baseName = 'web'
destinationDir = file('build')
from 'build/web'
exclude 'images/**'
}
task unpackBundle(type: Copy, dependsOn: bundleWeb) {
from zipTree('build/web.zip')
into 'build/exploded'
}
task deleteHelp(type: Delete, dependsOn: copyWeb) {
delete 'build/web/help'
}
Incremental Builds
not every time build from zero to 100,can only build the change part,this is Incremental Builds
for example,change the layout file,no need to compile the code again
if the task run again and again and the input no changed,and the out put still here,the gradle will skip,and siad UP TO date
Parameterising Your Build
make other people more easy to change the build,although they are not the gradle Master.
How?
There are two main ways to do
this: 1.a gradle.properties file, 2.command line arguments.
1.a gradle.properties file
Let's create a task that prints a greeting.
*/
task printGreeting << {
println greeting
}
/* If we just run that as is, we get the following error:
* What went wrong:
Execution failed for task ':printGreeting'.
> Could not find property 'greeting' on task ':printGreeting'.
Oh right. We need to pass in the value of the greeting we want to use. Let's
first do this using a gradle.properties file. We'll create that file, and add
the line:
greeting = "Hello from a properties file"
2.command line arguments.
gradle -Pgreeting="Hello from the command line" pG
Note that the `greeting` property is now defined in two places, the
gradle.properties file, and from the command line. The command line value
overrides the value in the properties file.
-P is a flag
have the third way
and that's from inside the build
script. We can pass a closure to project.ext (for "extra properties") to
define properties with the same syntax as in the gradle.properties file. Note
that properties defined this way shadow all other definitions.
*/
task printGreeting << {
println greeting
}
ext {
greeting = "Hello from inside the build script"
}
/*
3>2>1
Creating Custom Task Types
class HelloTask extends DefaultTask {
@TaskAction
void doAction() {
println 'Hello World'
//here is the thing that this task type you want to do
}
}
how to run?
like
task copyImages(type: Copy) {
from 'images'
into 'build'
}
task hello(type:HelloTask )
How to adding properties
class HelloTask extends DefaultTask {
String firstName
//def firstName is ok too
@TaskAction
void doAction() {
println 'Hello World,$firstName'
//here is the thing that this task type you want to do
}
}
/*
Let's use our new configurable task to print a custom value out to the
console.
*/
task helloName(type: HelloNameTask) {
firstName = 'Jeremy'
}
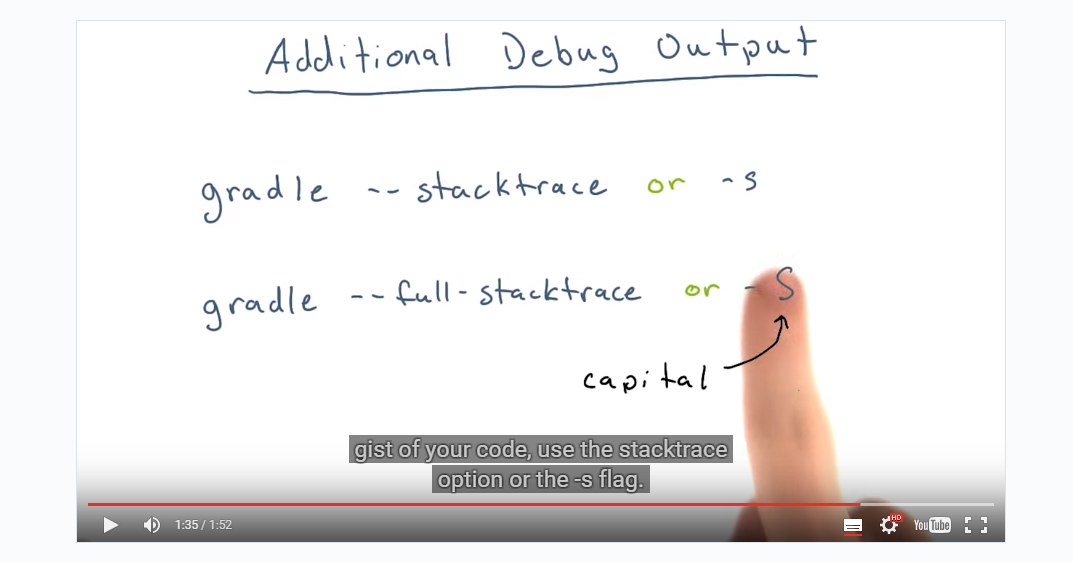
Troubleshooting and Logging

println=quiet
Gradle of Java
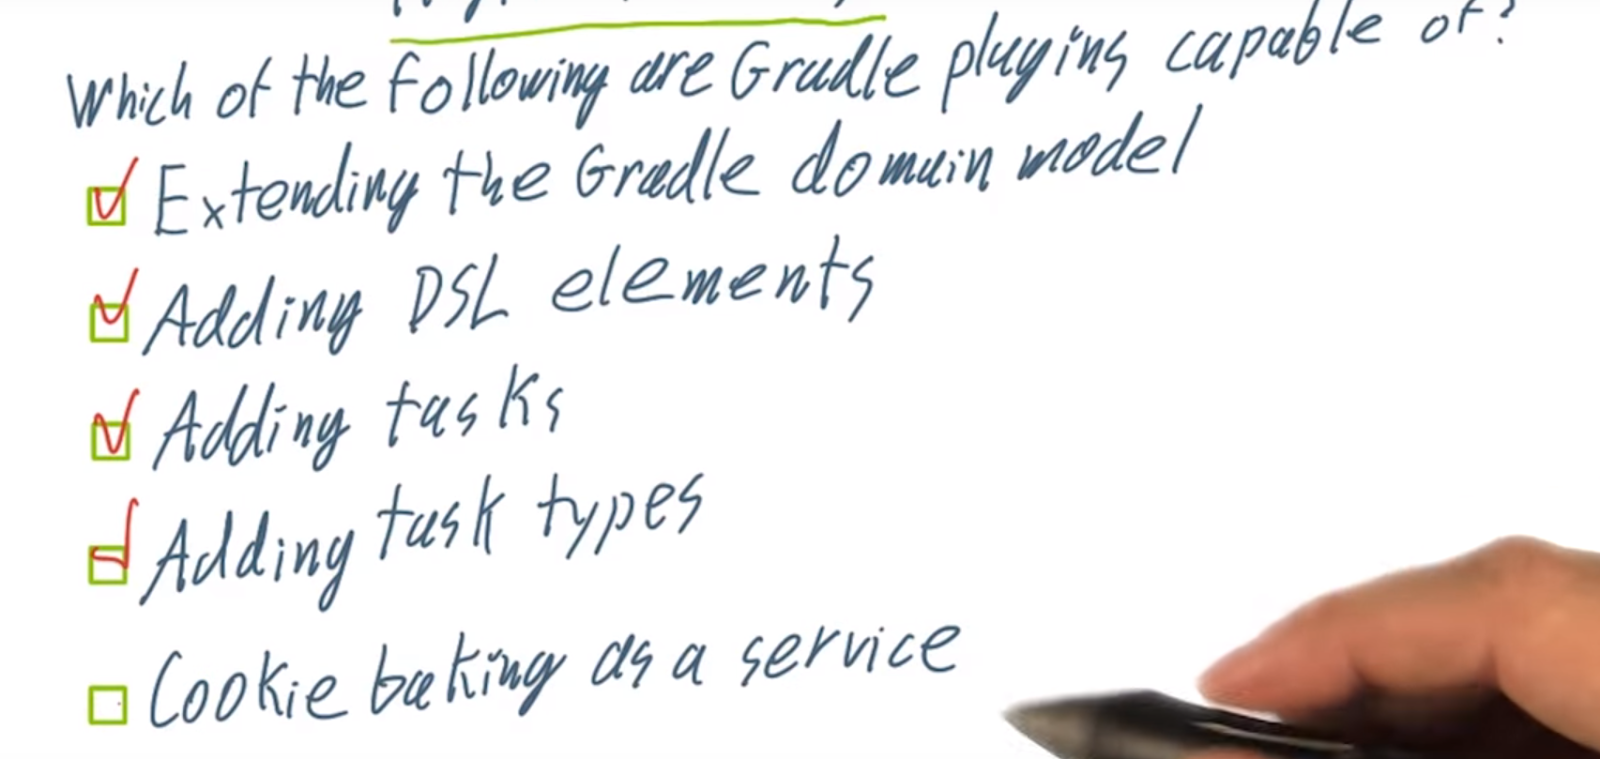
Gradle Plugins
can do
Java Build Tasks

gradle use with Java have serval task,make by plugin

Applying the Java Plugin
1.how to apply the plugin
than run:
gradle tasks
u will see many task that the plugin have.
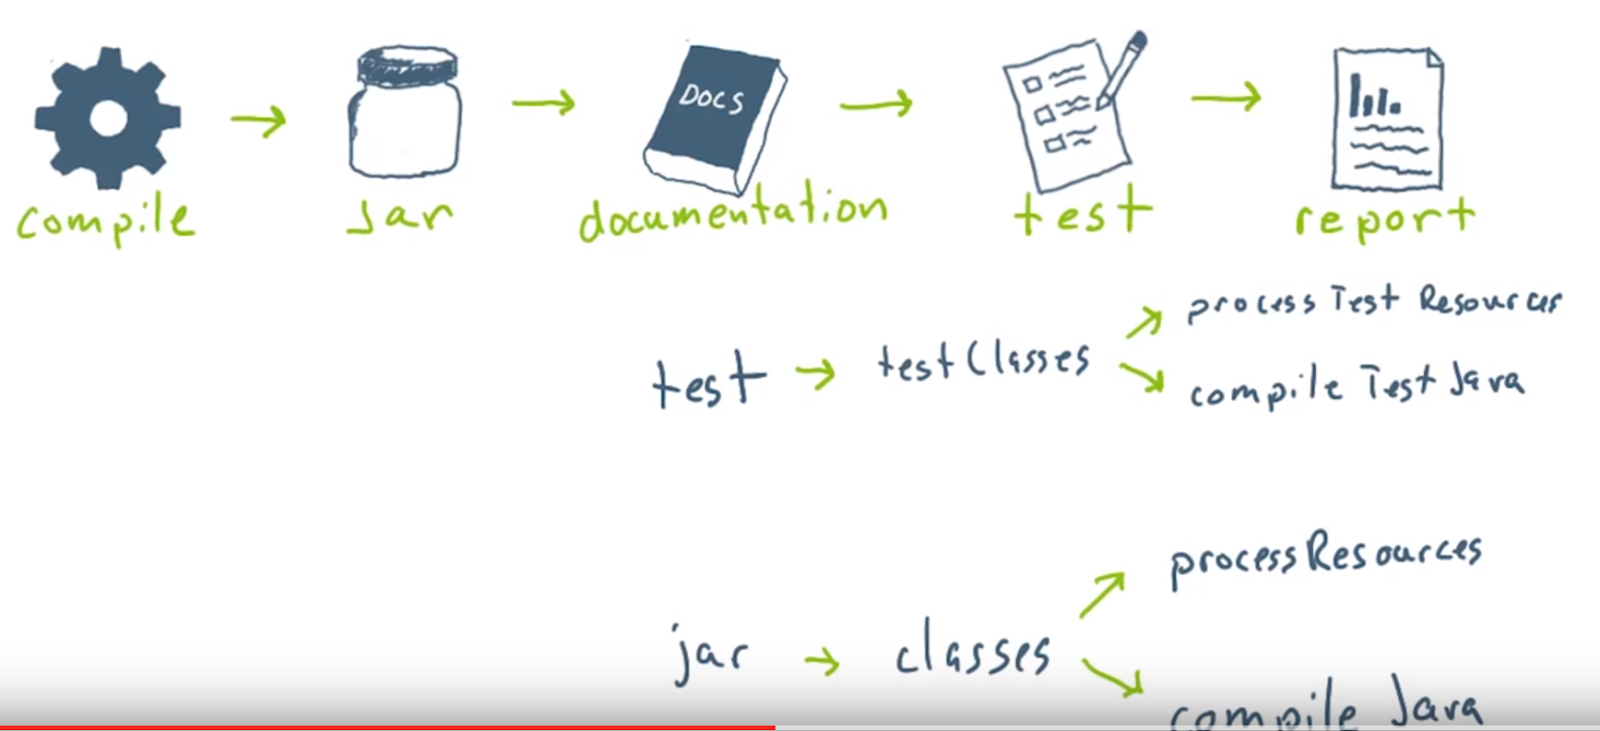
There are four main tasks we'll use most often: assemble, check, build, and clean.
assemble creates the output we're interested in. This is usually a JAR, but
can also be more interesting artifacts. Check runs any tests we've set up.
Build depends on both assemble and check. Finally, clean deletes all the build
output.
2.Assemble
try run gradle assemble
Looking at the newly created /build directory, we see where our compiled
Person.class, and we can also find our JAR.
problem
How did Gradle know where to find my source code?
because gradle assumes that your Java sources live in a folder named
`src/main/java`
How to run the java program we just build?
task execute(type: JavaExec) {
main = "com.udacity.gradle.Person"
// We'll talk about this shortly
classpath = sourceSets.main.runtimeClasspath
}
explain :
`main` property tells the JavaExec task the path of your main class
classpath? take later
3.Conventions and Configuration(about the default setting)
Gradle think the default is like this

source is in src/main/java
test is in src/test/java
4.Javaplugin reference
if have some thing need to solvew,saw them
5.Java Task Dependencies

see the above website get get
6.Configure the Java Plugin
Exercise:
1. Apply the Java plugin to your project.
2. Modify the 'jar' task to add a manifest attribute named
'Implementation-Version' with a value of '1.0'.
3. Configure the main source set so that it includes the 'java' directory
as an additional source directory.
4. Use the gradle command-line to build your JAR file.
5. Confirm that the build JAR contains classes from the 'java' source
directory.
Answer:
/*1*/
apply plugin: "java"
/*2*/
sourceCompatibility = 1.5
version = '1.0'
jar {
manifest {
attributes 'Implementation-Title': 'Gradle Quickstart',
'Implementation-Version': version
}
}
/*3*/
sourceSets {
main {
java {
srcDir 'java'
}
}
}
7.Repositories and Dependencies
ref:
what is Repositories and Dependencies?
Gradle needs to know about the things that your project needs to build or run, in order to find them. We call these incoming files the dependencies of the project
Most projects are not completely self-contained. They need files built by other projects in order to be compiled or tested and so on. Gradle allows you to tell it what the dependencies of your project are, so that it can take care of finding these dependencies,
dependencies might need to be downloaded from a remote Maven or Ivy repository, or located in a local directory, or may need to be built by another project in the same multi-project build. We call this process dependency resolution.
Sometime,the dependencies have their own dependencies ,For example, Hibernate core requires several other libraries to be present on the classpath with it runs.Gradle will handle these.
External dependencies
in build.gradle
dependencies {
compile group: 'org.hibernate', name: 'hibernate-core', version: '3.6.7.Final'
}
An external dependency is identified using group, name and version attributes. Depending on which kind of repository you are using, group and version may be optional.
The shortcut form for declaring external dependencies looks like “group:name:version”.
shortcut form
build.gradle
dependencies {
compile 'org.hibernate:hibernate-core:3.6.7.Final'
}
if add the local file
dependencies {
runtime files('libs/a.jar', 'libs/b.jar')
runtime fileTree(dir: 'libs', include: '*.jar')
}
runtime files('libs/a.jar', 'libs/b.jar')
runtime fileTree(dir: 'libs', include: '*.jar')
}
the first one add two jar file
the second one add all he jar in the libs file
but,How does Gradle find the files for external dependencies?
Gradle looks for them in a repository. A repository is really just a collection of files, organized by group, name and version. Gradle understands several different repository formats, such as Maven and Ivy, and several different ways of accessing the repository, such as using the local file system or HTTP.
By default, Gradle does not define any repositories. You need to define at least one before you can use external dependencies. One option is use the Maven central repository:
build.gradle
repositories {
mavenCentral()
}
other example~
Or a remote Maven repository:
Example 7.5. Usage of a remote Maven repository
build.gradle
repositories {
maven {
url "http://repo.mycompany.com/maven2"
}
}
Or a remote Ivy repository:
Example 7.6. Usage of a remote Ivy directory
build.gradle
repositories {
ivy {
url "http://repo.mycompany.com/repo"
}
}
You can also have repositories on the local file system. This works for both Maven and Ivy repositories.
Example 7.7. Usage of a local Ivy directory
build.gradle
repositories {
ivy {
// URL can refer to a local directory
url "../local-repo"
}
}
8.Dependency Reports
a two ways to visualize dependencies:
a traditional dependency
report showing the complete graph of dependencies, including transitive dependencies(the dependency use by dependencies)
dependency insight
report showing how a particular dependency is included in your project.
if we have code:
apply plugin: 'java'
repositories {
mavenCentral()
}
dependencies {
compile 'org.springframework:spring-core:4.1.1.RELEASE'
}
How to generate dependency report?
gradle dependencies
To see the
dependencies for a particular configuration we can use the '--configuration'
command-line option.
gradle dependencies --configuration runtime
how to create dependency insight report
To run the 'dependencyInsight' task we need to specify the
dependency we're interested in using the '--dependency' command-line option.
Let's run an insight report on the 'commons-logging' dependency.
$ gradle dependencyInsight --dependency commons-logging
We mentioned that one of main usages of dependency reports is to help identify
dependency conflicts. Let's know introduce a conflict and see how this affects
the output of our reports. Let's add an explicit dependency to version 1.2 of
the 'commons-logging' library to our project.
*/
dependencies {
compile 'commons-logging:commons-logging:1.2'
}
/*
Let's start by running the dependencies task again.
$ gradle dependencies
'commons-logging' is now listed twice in our dependency report. You can see
that our project depends on version 1.2, where as 'spring-core' depends on
version 1.1.3. This introduces a conflict, which Gradle will then attempt to
resolve. By default, Gradle resolves version conflicts to the newest version,
in this case 1.2. In our report this is indicated with the arrow, showing us
that version 1.2 is being chosen over 1.1.3.
We can get similar information from the dependency insight report.
$ gradle dependencyInsight --dependency commons-logging
Again we can see that the commons-logging is shown twice, once as a direct dependency of compile, and once as a transitive dependency of spring core.
9.Configurations
Logically related dependencies are grouped into configurations. So far we've
been adding dependencies to the 'compile' configuration, but the Java plugin
creates other configurations as well, such as runtime, testCompile and
testRuntime.
show,we add our dependencies to the different Configurations(a group of dependencies )
compile
The dependencies required to compile the production source of the project.
runtime
The dependencies required by the production classes at runtime. By default, also includes the compile time dependencies.
testCompile
The dependencies required to compile the test source of the project. By default, also includes the compiled production classes and the compile time dependencies.
testRuntime
The dependencies required to run the tests. By default, also includes the compile, runtime and test compile dependencies.
example:
dependencies {
compile 'commons-logging:commons-logging:1.1.3'
testCompile 'junit:junit:4.12'
}
above mean add dependency 'commons-logging:commons-logging:1.1.3' to compile Configurations
add dependency 'junit:junit:4.12' to testCompile Configurations
10.Create a Custom Configuration
we can define our own Configuration.
*/
configurations {
custom
}
dependencies {
custom 'com.google.guava:guava:18.0'
}
/*
We can run a dependency report to see that we have a new project configuration
named 'custom' with the 'guava' dependency.
$ gradle dependencies
Configurations are really just fancy file collections and can be used anywhere
a file collection can be used, such as in Copy tasks. This is useful if we
want to download some dependencies from a remote repository and bundle them in
our project somehow.
*/
task copyDependencies(type: Copy) {
from configurations.custom
into 'build/libs'
}
run
gradle dependencies
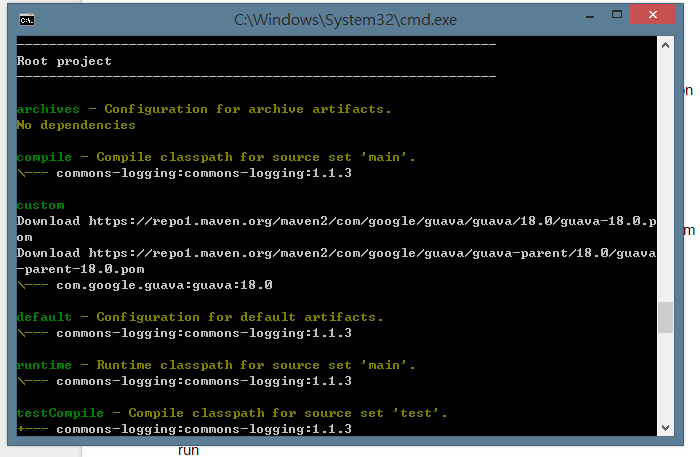
the custom one run.
the name:

Exercise:
/*
In this series of exercises we will be working with configurations. We've
provided some source code that requires some additional dependencies in order
to properly compile.
Exercises:
1. Create a new configuration called 'deps'.
2. Make the 'compile' configuration extend from the 'deps' configuration.
3. Add a dependency to the latest version of Google's 'guava' library to
the 'deps' configuration.
4. Build the project and ensure there are no errors.
5. Add a task called 'zipDeps' that creates a Zip file including all the
files from the 'deps' configuration. Assign a baseName of 'dependencyArchive'
and a classifier of 'deps' to the archive.
6. Run the 'zipDeps' task and confirm it includes the 'guava' JAR.
Hint: Take a look at the Configuration DSL Reference page for how to make
one configuration extend from another.
https://docs.gradle.org/current/dsl/org.gradle.api.artifacts.Configuration.html
*/
apply plugin: 'java'
repositories {
mavenCentral()
}
/*1*/
configurations {
deps
}
/*2*/
configurations {
compile {
extendsFrom deps
}
}
/*3*/
dependencies {
deps 'com.google.guava:guava:19.0'
}
/*5*/
task zipDeps(type:Zip) {
baseName 'dependencyArchive'
classifier 'deps'
from configurations.deps
}
11.Automated Testing
Test has two type:Unit test and Integration test
Unit test test the individiual function and method.
Integration test
which individual software modules are combined (library,environment)and tested as a group. It occurs after unit testing
in build file
apply plugin: 'java'
repositories {
mavenCentral()
}
dependencies {
testCompile 'junit:junit:4.12'
}
the code create for testing is put at
'src/test/java'
Running our tests is easy, just run the 'test' task.
$ gradle test
than
we can see the report in
build/reports/tests/index.html
12.Finding Gradle Plugins
13.Advanced Gradle Wrapper
Most tools require installation on your computer before you can use them. If the installation is easy, you may think that’s fine. But it can be an unnecessary burden on the users of the build. Equally importantly, will the user install the right version of the tool for the build? What if they’re building an old version of the software?
Gradle Wrapper (henceforth referred to as the “Wrapper”) solves both these problems
if use gradle wrapper,other peole no need to install the Gradle before run the gradle,it will down the version of gradle we defined.
The Gradle wrapper is comprised of four files. A JAR, a properties file, and a
pair of scripts, a shell script for Unix and Mac, and a batch script for
Windows.
How to create a gradle Wrapper?
gradle wrapper
than is ok
The wrapper scripts are placed in the root of your project directory and the other files
in the 'gradle/wrapper' directory.
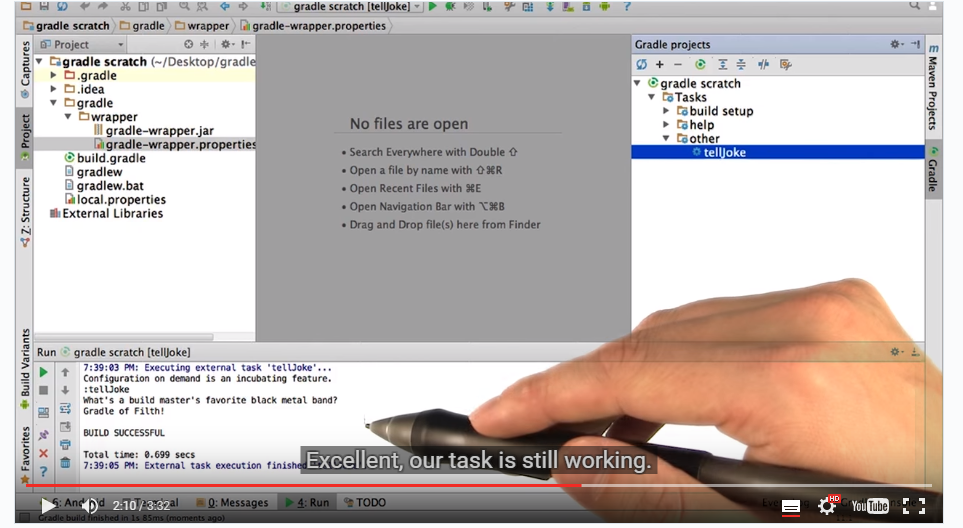
than run the wrapper
gradle.bat tasks
u will see the tasks inside the
run
gradle.bat sayHello
configure what version of Gradle
wrapper {
gradleVersion = '2.0'
}
If we haven't already downloaded this particular version of Gradle, the
wrapper will do so for us. Let's run the wrapper with the '--version' option
to confirm we are using the correct version.
$ ./gradlew --version
As you can see, the wrapper is now using version 2.2 of Gradle. This
information is saved in the gradle-wrapper.properties file in the
'gradle/wrapper' directory. We can also set the wrapper version by modifying
this file. Let's set the version back to 2.3 by changing the value of of the
`distributionUrl` property.
Let's run the wrapper with the '--version' option and verify the
result.
$ ./gradlew --version
The version is now 2.3.
This is a really important feature, as it allows us to
centrally control what version of Gradle is used to build our project. In
practice, the Gradle wrapper files, to include the scripts, jar and properties
file, will be committed to source control. This serves two main functions.
First, it means that everything that is needed to get up and running with
development of our project is included in the source repository. Second, it
means that the Gradle version is also version controlled, which eliminates the
possibility that a developer encounters problems with the build due to using
the wrong version of Gradle.
*/
Android Studio, Gradle, and Variants
1.The Application(Java) Plugin
run the java program with gradle
the java file is in
C:\Udacity\Gradle\3.02-Exercise-ImportAJavaProject\src\main\java\com\udacity\gradle
in build.gradle:
apply plugin: "java"
apply plugin: "application"
mainClassName = "com.udacity.gradle.JokeTeller"
than :
grandle run
21.The Android Plugin
In a Android project,we can see two build.gradle,on is in
project build.gradle
C:\Udacity\Project 3\Football_Scores-Starting_myversion\Football_Scores-master
another one is in
app build.gradle
C:\Udacity\Project 3\Football_Scores-Starting_myversion\Football_Scores-master\app
in project build.gradle
// Top-level build file where you can add configuration options common to all sub-projects/modules.
buildscript {
repositories {
jcenter()
}
dependencies {
classpath 'com.android.tools.build:gradle:1.5.0'
// NOTE: Do not place your application dependencies here; they belong
// in the individual module build.gradle files
}
}
allprojects {
repositories {
jcenter()
}
}
|
this is a multi project build,Android app project is a sub project
classpath 'com.android.tools.build:gradle:1.5.0' add the android plugin
allprojects {
repositories {
jcenter()
}
}
responsible to add the jcenter repositories to all the sub project
in app build.gradle
apply plugin: 'com.android.application'
android {
compileSdkVersion 21
buildToolsVersion "21.1.2"
defaultConfig {
applicationId "barqsoft.footballscores"
minSdkVersion 10
targetSdkVersion 21
versionCode 1
versionName "1.0"
}
buildTypes {
release {
minifyEnabled false
proguardFiles getDefaultProguardFile('proguard-android.txt'), 'proguard-rules.pro'
}
}
}
dependencies {
compile fileTree(dir: 'libs', include: ['*.jar'])
compile 'com.android.support:appcompat-v7:21.0.3'
compile 'com.android.support:support-v4:21.0.3'
compile 'com.facebook.stetho:stetho:1.3.1'
}
|
apply plugin: 'com.android.application' it apply the android plugin fetch from Jcenter
The Gradle can build the build different version of the same app
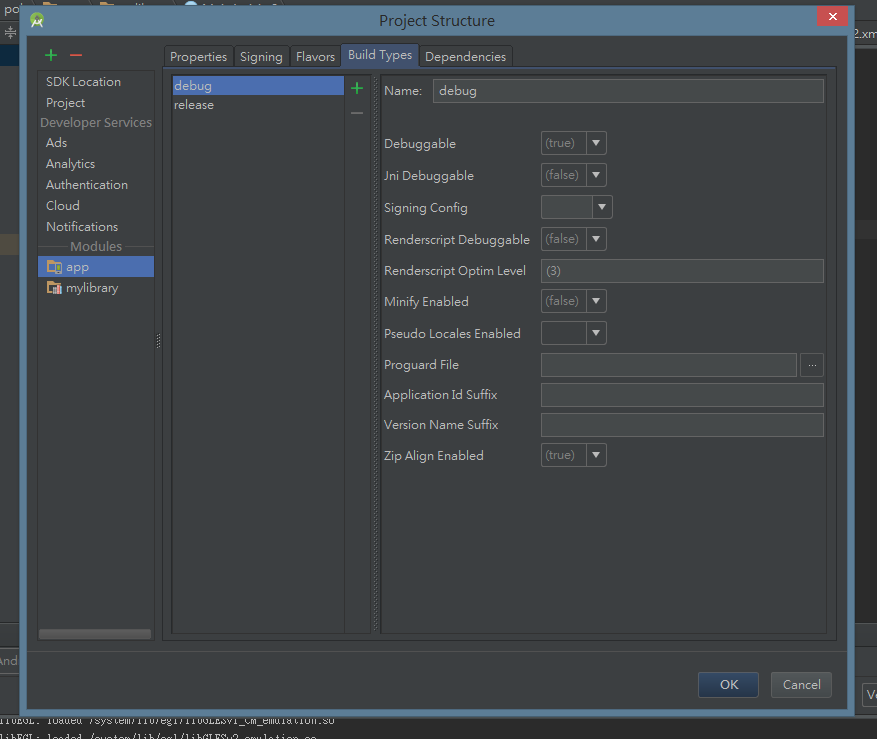
How to Configuring Build Types
we set in the build.gradle
apply plugin: 'com.android.application'
android {
compileSdkVersion 22
buildToolsVersion "22.0.1"
defaultConfig {
applicationId "com.example.udacity.myapplication"
minSdkVersion 10
targetSdkVersion 22
versionCode 1
versionName "1.0"
}
buildTypes {
release {
minifyEnabled false
proguardFiles getDefaultProguardFile('proguard-android.txt'), 'proguard-rules.pro'
}
}
}
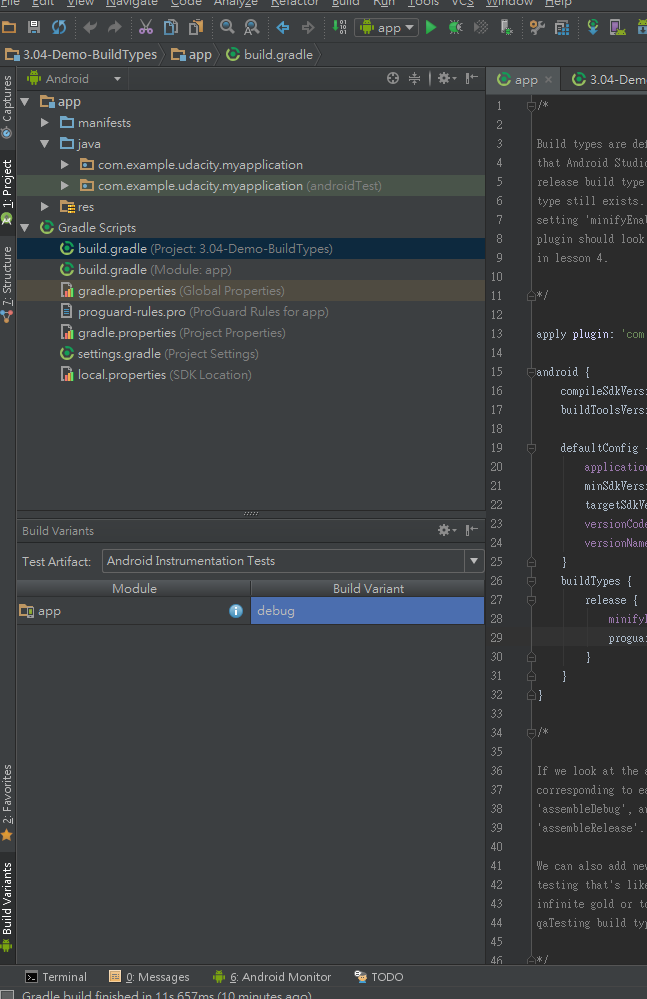
/*
If we look at the available tasks for our project, you'll see tasks
corresponding to each build type. We can generate the debug APK by running
'assembleDebug', and similarly we get the release APK by running
'assembleRelease'.
We can also add new build types of our own, and want to make a build for QA
testing that's like the release build, except it bundles in cheats for
infinite gold or to skip levels, or whatever. We can easily declare a
qaTesting build types in the `buildTypes { }` script block.
*/
android {
buildTypes {
qaTesting
}
}
dependencies {
compile fileTree(dir: 'libs', include: ['*.jar'])
compile 'com.android.support:appcompat-v7:22.0.0'
}
|
we can see that Build types are defined in the `buildTypes { }` script block. The block only have release,do not have deBug,but the debu build type still here.
we can define our own build type:
android {
buildTypes {
qaTesting
}
}
How to choose the Build type?
To create a debug build type
ref:
Properties:
example:
buildTypes {
release {
minifyEnabled false
proguardFiles getDefaultProguardFile('proguard-android.txt'), 'proguard-rules.pro'
}
debug {
debuggable true
}
}
|
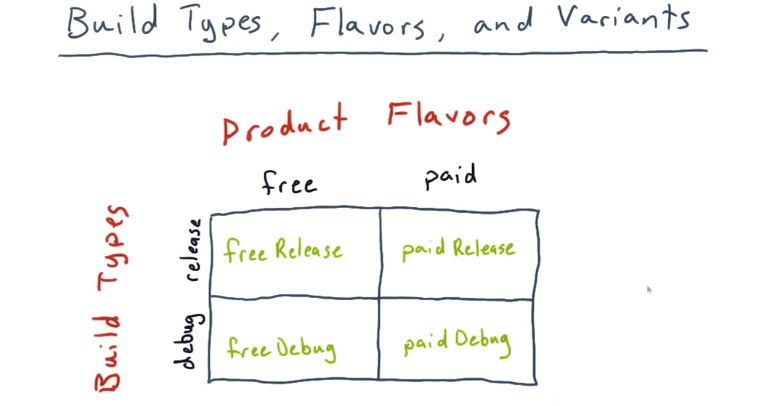
Different build type for different resource(Resource Merging)
Product flavors are declared using a productFlavors DSL container:
android { .... productFlavors { flavor1 { ... } flavor2 { ... } }}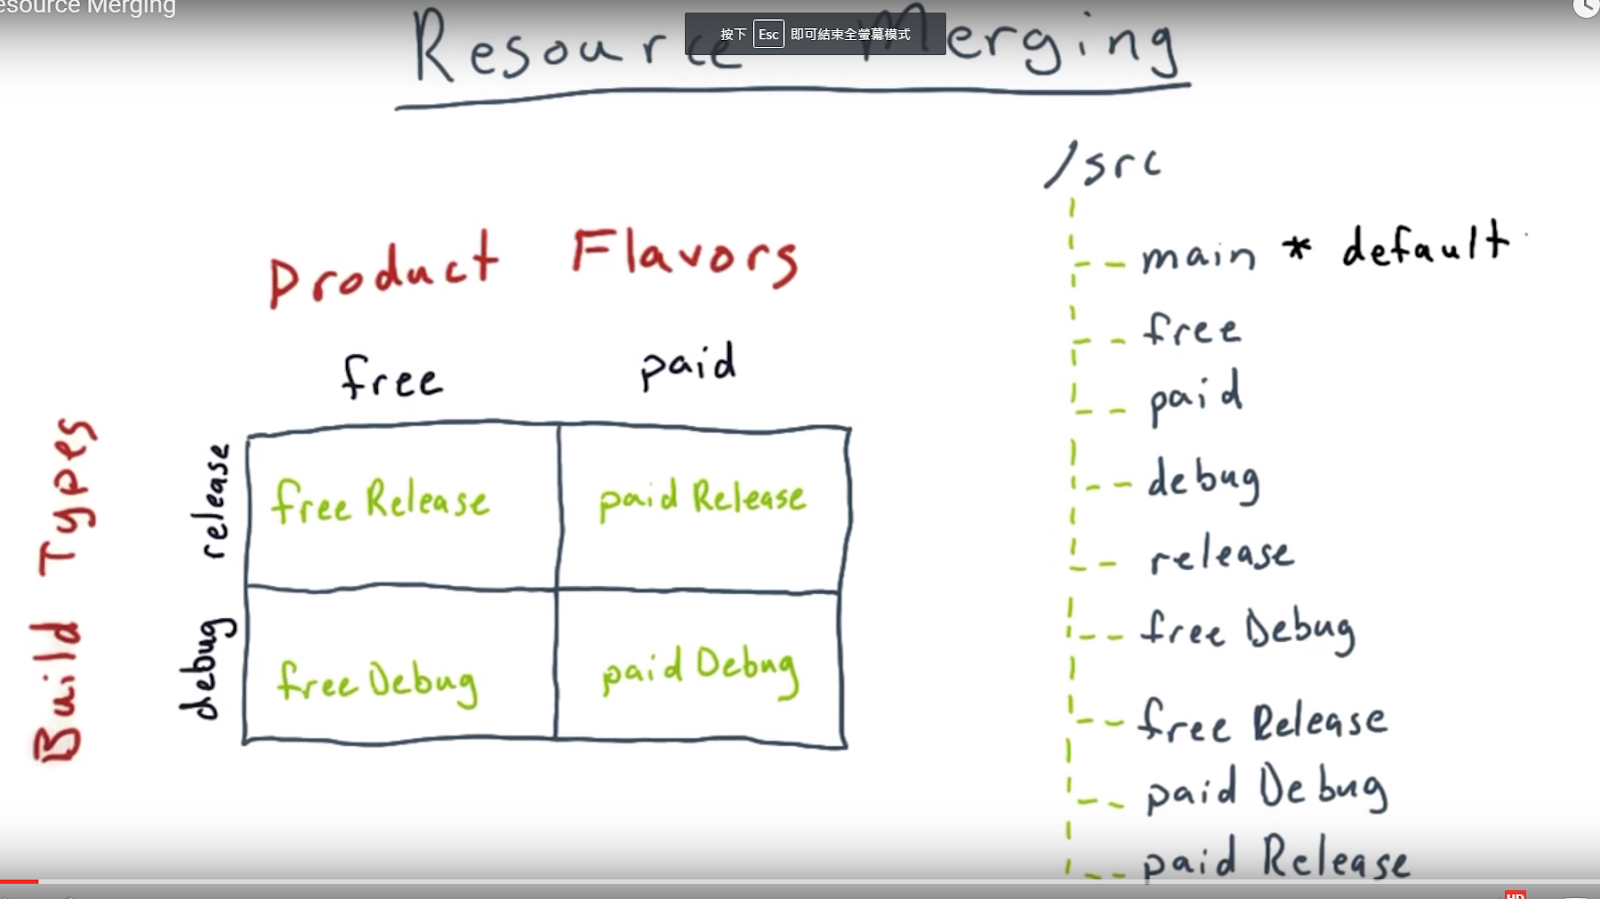
from the above picture,we can see that we have 4 type of build type,if we only want some resource and code that only appear on some type,we can put it in different src folder.
we can use this picture to see waht resource will use
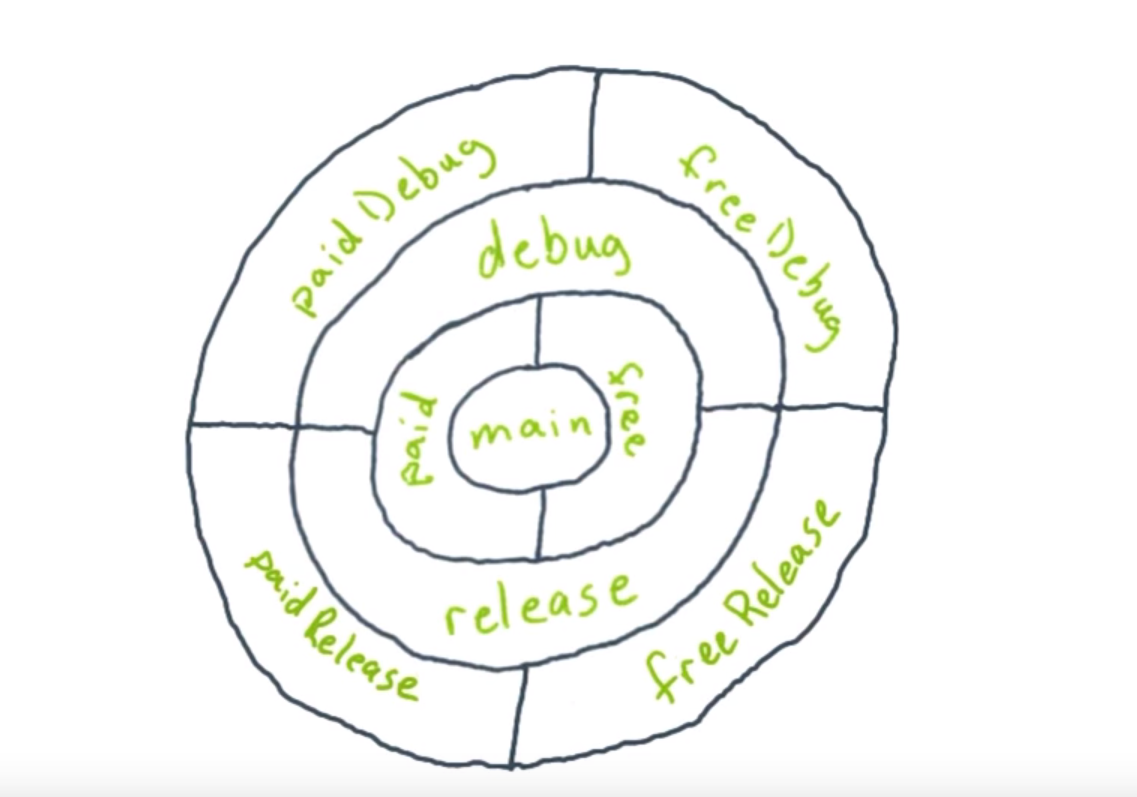
if we buil a paid debug
start,from main>paid>debug>paidDebug
if the same resource have more than one configuration,gradle will use the most specificed one,that mean paid overwirte main,debug overwrite paid,and so on.
but java code can do that!!!we should not have the same class definication that have multiple variants.
String xml amd manifest can
Now,to try create different build type of a app
ref:
before,we use buildTypes to make a dubug and release typeof app,How about we want a free version and a Paid version?we need productFlavors.
In addition to build types, product flavors are another way for us to describe
variants of our application in our build. Flavors are similar to build types
except they are typically used to create different versions of our app that
users might install. A very common example is creating both a free and paid
version of your app.
However, he Android plugin does not create any product flavors for us default. If we
want to declare some flavors we do so just like we do with build types, except
that we place them in a `productFlavors { }` script block.
before ad the productFlavors

Now add the productFlavors:
apply plugin: 'com.android.application'
android {
compileSdkVersion 22
buildToolsVersion "22.0.1"
defaultConfig {
applicationId "com.example.udacity.declaringflavors"
minSdkVersion 10
targetSdkVersion 22
versionCode 1
versionName "1.0"
}
buildTypes {
release {
minifyEnabled false
proguardFiles getDefaultProguardFile('proguard-android.txt'), 'proguard-rules.pro'
}
}
productFlavors {
free {
applicationId "com.example.udacity.declaringflavors.free"
}
paid {
applicationId "com.example.udacity.declaringflavors.paid"
}
}
}
|
than we can add the Strin.xml for the pad version

other version is use the same way!!!
How about the java code?
Different java code in different build type
the orginal code:
now the app is only can show a toast when click the button,we want to make a paid version ,when we click the button,start a now activity
productFlavors {
free {
applicationId "com.udacity.gradle.flavorspecificactivity.free"
}
paid {
applicationId "com.udacity.gradle.flavorspecificactivity.paid"
}
}
|
step1.
it is because we name the two Flavor is free and paid,so we copy the main file than cahnge the name to paid and free

Step2
now we can see the problem,, when we choose free, because gradle will load both main nd free java code,because the javacode can’t overwritten ,the both have the Mainactivity class,so has error.But ,which on should i delete? The one in main or in free? If the code is the same in free and paid,than del the code in free,opposite,del the code in free.
Than dell the layout
Step3
finally,process the value xml.,shredel the value in free and paid,if not share,del the main
important:
some time, after you del the xml file,you will get error,re open the Android Studio is ok.
Per-Variant Dependency Configurations

the free and paid has its own compile,show we can set the dependency
example:
in free version,we use the google ads,so we nedd google play service,but in paid version,we don’t need.so have below.
dependencies {
compile fileTree(dir: 'libs', include: ['*.jar'])
compile 'com.android.support:appcompat-v7:22.1.1'
freeCompile 'com.google.android.gms:play-services:7.0.0'
}
Advanced android build
Library Overview
library hold some function that can be use by multi app.
library had two type
1.Java library,jar,
2.Android library ,aar
The main different is
aar,can have its own resource,manifests,layout,fragment,own R.file……
but jar can use on non Android project
Multi-Project Builds

we aleays have more than one sub project ,so we can put the same function and code into the library that use by more than one sub project
Creating a Java Library
example:
step1 add a modul
this time,we add a modul
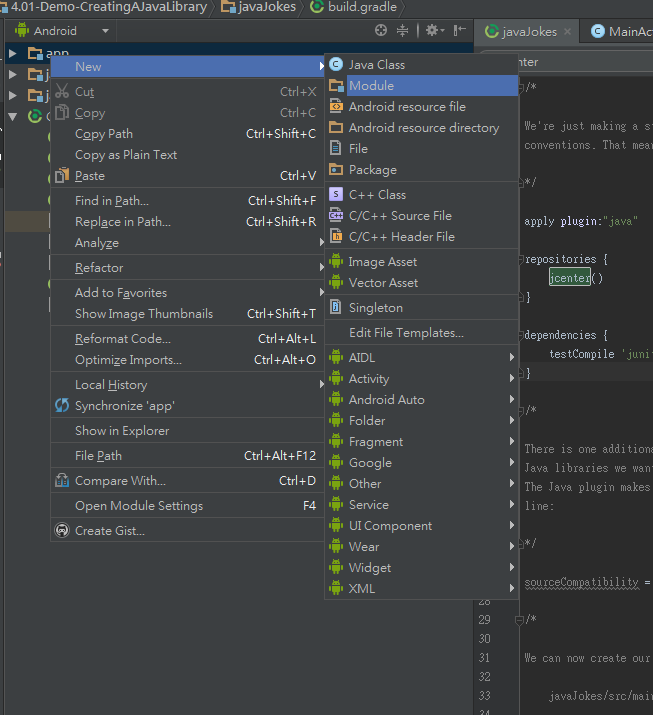
step2,select A java library

The modul and class also call JavaJokes2
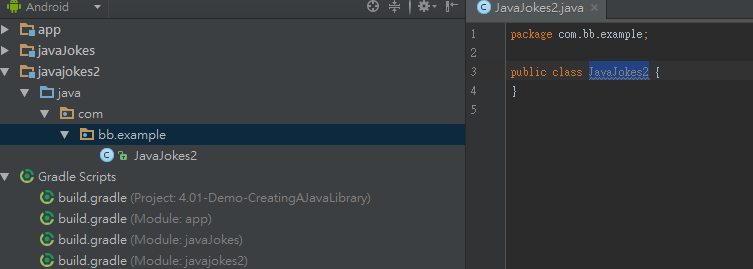
step3.change the build.gradle of JavaJokes 2
apply plugin:"java"
repositories {
jcenter()
}
dependencies {
testCompile 'junit:junit:4.11'
}
it is because we need to use junit at TestCompile,so have
dependencies {
testCompile 'junit:junit:4.11'
}
and the dependencies find in repositories ,so have
repositories {
jcenter()
}
and the gradle is for java,so have
apply plugin:"java"
/*
There is one additional wrinkle, however. Android doesn't yet run Java 8, so any
Java libraries we want to use on Android will need to be compiled with Java 7.
The Java plugin makes this very easy to configure. We just need the following
line:
*/
sourceCompatibility = 1.7
step4,let the project know javajokes2

the app javajokes2 is the sub project of the Project,but the project don’t know the javajokes2,
we need to modified the settings.gradle
include ':app', ':javajokes2'
now,the project know javajokes2'.
Step5.make when app module compile,compile the javajokes2' module too.
in build.gradle:
dependencies {
compile fileTree(dir: 'libs', include: ['*.jar'])
compile 'com.android.support:appcompat-v7:22.1.1'
compile project(':javajokes2')
}
Step6 use it in the app modul java code
import com.bb.example.JavaJokes2;
Creating an Android Library
just same with the Creating a Java Library,but choose Android library
important!!!!
the layout should not have the same name,ifyes,may be will load other layout.
That mean,in the library,use R.layout.activity_main2,in the app use R.layout.activity_main
in the build .gradle file of tow Android module.
compileSdkVersion 23
buildToolsVersion "23.0.2"
should be the same
Application Signing
all android need to sign,and than put onto the google play store.
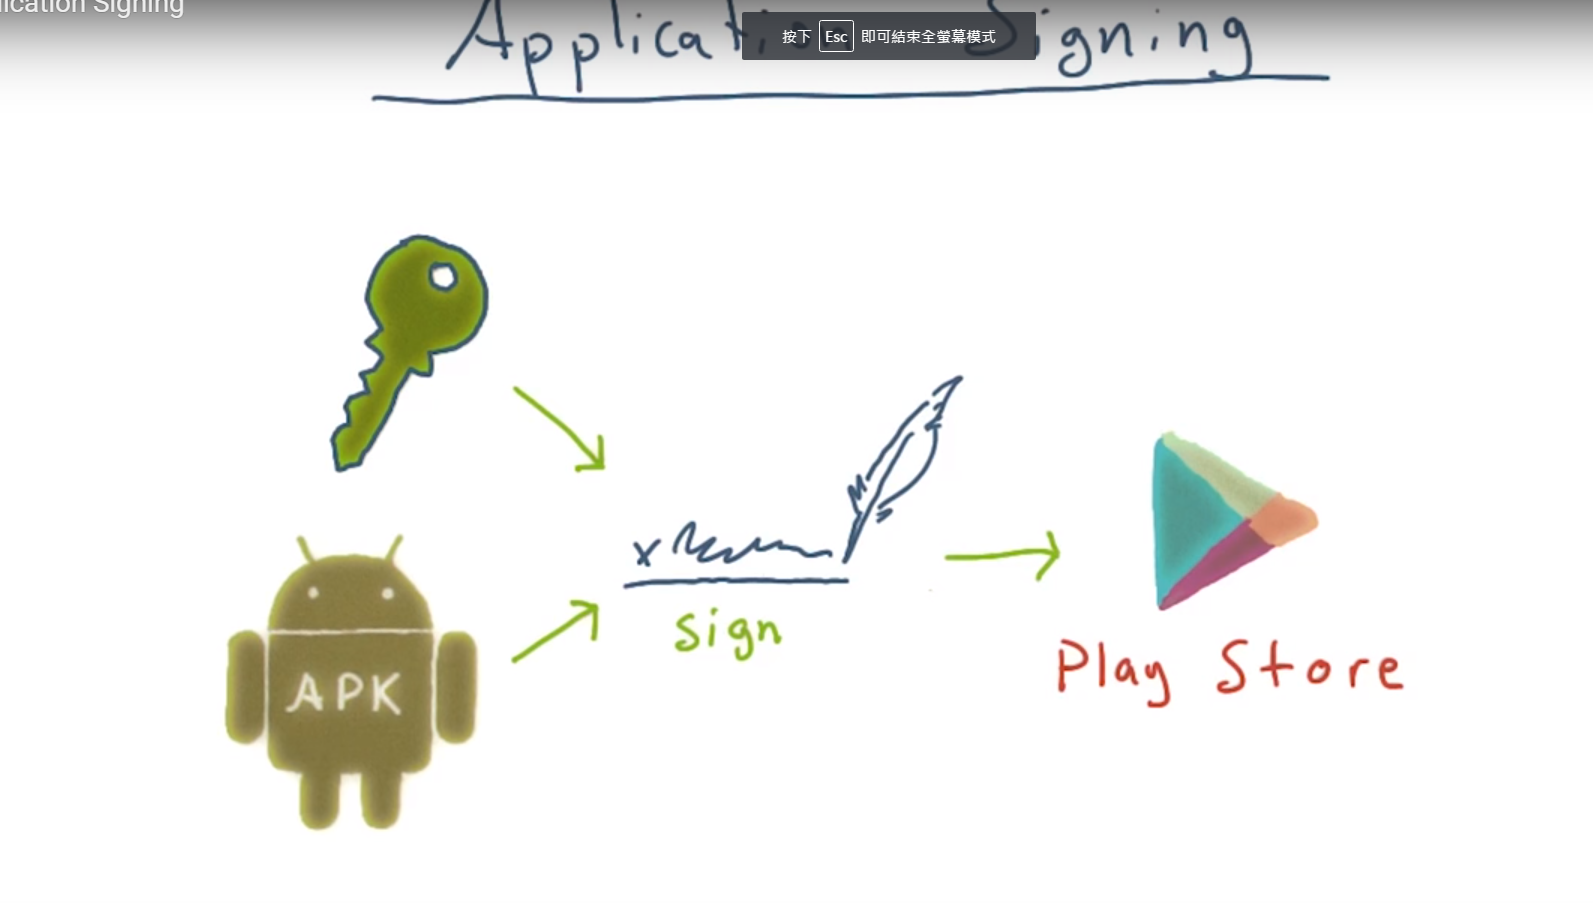
we need to have a key first.
Build,>generate>Signed APK
create a new key store
than the keystore is created
Automated sign

than select new signing

create a congif,and celect the keystore we cretae bedore
than click build type
create release
set the sign config to be the config1
finally ,we can see the the app build.gradle change
config1 {
keyAlias 'roy989898'
keyPassword 'royyahoo6a20'
storeFile file('C:/Udacity/Gradle/Ex4.04/keystore.jks')
storePassword 'royyahoo6a20'
}
it use C:/Udacity/Gradle/Ex4.04/keystore.jks,not portable,we can use:
$rootDir/keystore
than choose release

than we can build the app
Proguard
can remove unuse code and resource ,to make the app size more drease.
to enable it,we need
shrinkResources true
in the build.gradle>release
example:
release {
minifyEnabled false
shrinkResources true
proguardFiles getDefaultProguardFile('proguard-android.txt'), 'proguard-rules.pro'
}
Android Testing
ref:
two type:
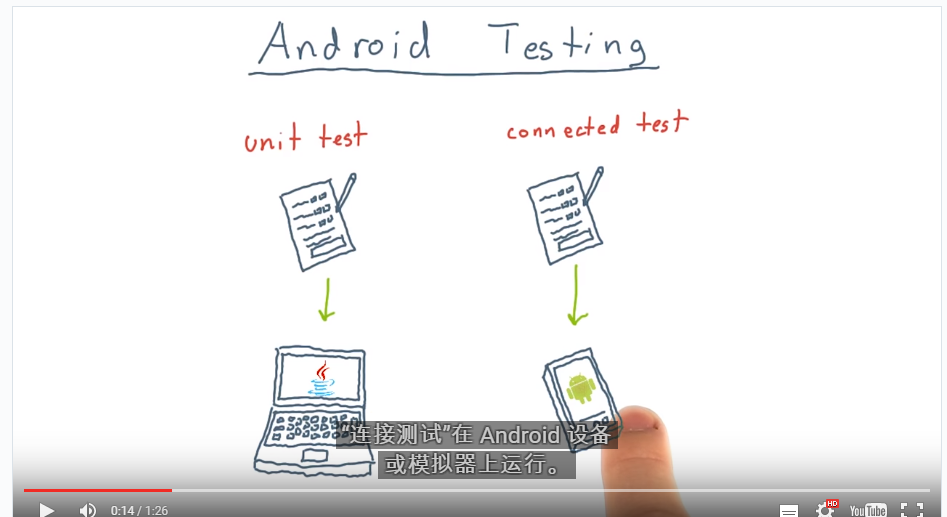
unit test run on computer JVM,connectest run on a android or android emulator
non android class should use unit test to test,android related class should use connected test
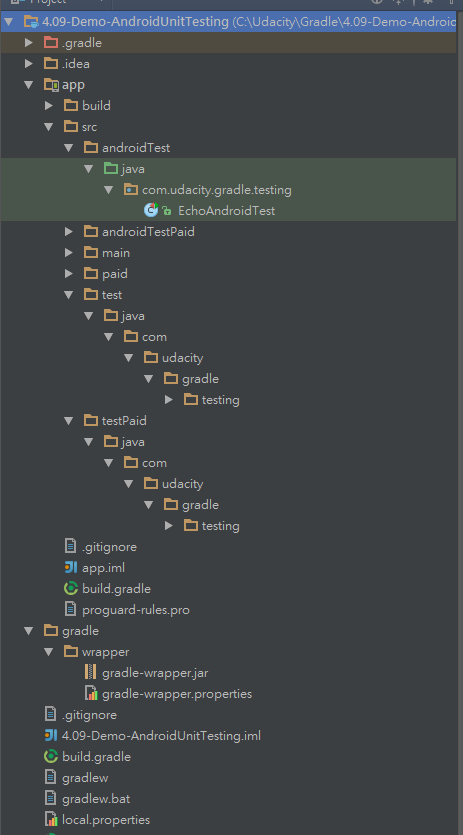
the code use to test put at:

it is because have different build type or productFlavors,(free paid),we can create different test for different build type
click
to start the test